Before you can use the EBF Onboarder, you first need to make some preparations:
- You have to create a Service Account dedicated to the EBF Onboarder which has the roles for API commands required on the source and target UEM server (see chapter 03.1).
- You also need to prepare your network and your UEM servers to allow the EBF network/servers to communicate with your environment (see chapter 03.2).
- You can change several settings which have an impact on various aspects of the device migration – including settings for the sending of emails (see chapter 03.3).
- You can create several admin accounts with customized rights so that the migration can be done by several admins (see chapter 03.4).
- Please be aware that only devices that are assigned to a user (email) can be migrated. Userless devices will not be found.
- Browsers: We recommend using the default browsers, like Safari on iOS. Nevertheless, we added support for other browsers as well: Microsoft Edge, Yandex, Chrome*, Firefox*, Opera*, DuckDuckGo* (*no profile push).
NOTE:
Browsers like Microsoft EDGE can download a profile but are not able to install them. The profile can only be saved and can only be installed when starting the the downloaded file.
03.1. Service Account for API commands
EBF Onboarder requires a Service Account which has the roles for API commands on each source and target UEM system to allow the software to find the devices and migrate them from one system to another. You should login to the source system with this user and confirm that the account is able to fetch the devices.
EBF Onboarder can take advantage of your LDAP if you are using one. The EBF Onboarder will use the users’ email addresses to trace their devices and by default, registers the devices with the same email addresses on the target system.
NOTE:
LDAP is not connected to the EBF Onboarder. The EBF Onboarder is only using the user attributes from the source system (which can be connected to LDAP).
EBF Onboarder will not create any device user on the target system but expects the device user to exist already with the same email address. If the email address is different, you can customize the target email address with our ‘Transformation Tool’ (see chapter 06).
03.1.1. Prerequisites for the source system
Depending on your source system there are specific prerequisites for the Service Account who sets up the migration project that needs to be fulfilled before:
| Source system | Service Account Requirements |
| Baramundi Management Suite (bMS) | The external host name(Port 443) and credentials of an administrator user of bMS are required. We also need Jobs created in bMS to unenroll or wipe the devices. Please read the separate documentation in addition to this one to learn more about the prerequisites. You can find it here |
| BlackBerry UEM | The user must be a BAS user with the right to read groups and devices. The port is normally 18084 (e.g. uem.acme.org:18084). |
| BlackBerry UEM Cloud |
|
| BlackBerry UEM v12 |
|
| Cisco Meraki | You need to provide:
Select this source type for the current Meraki version. |
| Cisco Meraki (before api v0.11.0) | You need to enter host, API Key, username and password. This source type supports older versions of Meraki. |
| Good for Enterprise | The user must have the Administrator role and must know the Domain Key. |
| Google G-Suite | A Service Account and json file need to be created to work with the EBF Onboarder. |
| Ivanti (MobileIron) | Supported source systems:
|
| Jamf Pro / Jamf School / Jamf Now | The user must have the Administrator role. Please read the separate documentation in addition to this one to learn more about the prerequisites. You can find it here. For Jamf Now, the host is prefilled already. |
| Kandji MDM | The API Host and API Token are required: Open Settings > Access> Tab API Tokens in the Kandji Console API Host: API Token: Blueprints: Prism: Devices: Device Actions: During the project setup you will be able to select devices within a Blueprint. |
| KNOX Management Suite | Host, User and Password are required. Host: The URL of your Samsing KNOX Manage console, example: eu04.manage.samsungknox.com User and password of a user who can manage the devices in the KNOX MDM.
|
| MaaS360 | The user must have the Administrator role. For API access, billingId, platformId, appId, appVersion and appAccessKey as well as host name and user/password are required. Further information can be found here |
| Microsoft Intune | In addition to the default Global Microsoft Cloud & GCC (endpoint.microsoft.com) we support the following additional Microsoft National Clouds as well:
|
| SAP Afaria | The user must be a Customer Admin on a T-Systems hosted Afaria instance. |
| Sophos Mobile Control | The user must have the Administrator role and known Customer.
|
| SOTI | You need to enter host, port, API Client-ID, API Client secret, SOTI admin username and password. Please read this information to learn how to create an API Client.
|
| Omnissa Workspace ONE /AirWatch | The user must have API access and must know his API Key and optional PIN.
|
| XenMobile 9/10 (Citrix Endpoint Management) | You need to enter the Host (external reachable hostname, the port (for XenMobile 10 only), a username and a password. The user must have the Administrator role.
|
| Xinca | You need to enter host, network ID and API Key. |
| Managed Bulk Import | Bulk import can be used to add devices to a MDM system or other special cases… You need to provide a csv file with the following format: userid;usermail;devicename;serial;phone For the communication templates you can use the parameter {displayName}, which will be replaced with the |
03.1.2. Prerequisites for the target system
ATTENTION for Ivanti (MobileIron), Jamf Pro/School, MaaS360, Microsoft Intune and Omnissa Workspace ONE as a target system:
Please read the separate documentation in addition to this one to learn more about the prerequisites. You can find them here.
If you want to keep the apps installed on the devices, you need to configure this in the source system. Please refer to the documentation of your UEM system for this. In most cases it can be configured in the app settings of the UEM system for mobile devices. Desktops might have a different approach.
There are at least two cases where we recommend keeping one or more apps to save download time:
- You can already push the client app of the target UEM system (e.g. Intune Comp Portal, Ivanti Mobile@Work™ Client or Omnissa Workspace ONE Intelligent Hub) already to the devices using the source UEM system. If you have done that, it is not necessary to download it again during the migration. You need to make sure, that the app will not get removed from the device after removing it from the source system.
- Apps that will also be used on the target UEM system do not need to be downloaded again. They will be reconfigured by the new UEM system.
03.1.3. Prerequisites for the Apple Volume Purchase Program (VPP)
The EBF Onboarder is able to migrate iOS and macOS devices. But it does not migrate your VPP licenses. This needs to be done with the Apple Business Manager or Apple School Manager. You must configure the VPP connection on the target UEM system prior to the migration process with the EBF Onboarder. The licenses will be detected as released on the source UEM system and will be available to use on the target UEM system (please see the Apple documentation as this can request time for the synchronization).
03.2. Network configurations
This section will describe how you must prepare your network configurations to use the EBF Onboarder.
03.2.1. UEM server configuration settings
Your firewall rules or any network control appliance settings should allow your EBF Onboarder server to access your UEM servers through APIs (REST or SOAP, depending on the MDM), typically port 443.
Please add the following addresses to your network appliances/firewall/proxies for port 443 to authorize the communication with the EBF Onboarder server:
| Hostname | TCP IP Address | Ports |
| app-out.ebf.com | 62.138.245.79 | 443 |
ATTENTION:
- Every communication (API requests and SMTP) comes from 62.138.245.79. Please update your network appliances accordingly.
- If you are using other redirections to protect your server and are using specific ports (different from 443), please verify that the EBF Onboarder servers are allowed to reach the specific port of your MDM system as well.
- For Ivanti (MobileIron) as a source or target system: Please read the separate documentation in addition to this one to learn more about the server communication settings. You can find it here.
03.2.2. SMTP server communication settings
If you want to customize the sender email address and adapt it to your enterprise email address, you can do that either using the EBF SMTP server or your own SMTP server. Please read chapter 03.3.14.1 if you want to use the EBF SMTP server and chapter 03.3.14.2 if you want to use your own SMTP server to learn more about the necessary adjustments.
03.2.3. Device network configurations
Devices need to connect to HTTPS port 443 to your EBF Onboarder server (see chapter 03.2.1). Moreover, please make sure that all relevant ports for your UEM system are accessible for your devices.
03.3. Tenant settings
You can change several settings which refer to all migration projects and have an impact on various aspects of the device migration – including settings for the sending of emails.
To do that go to ‘Settings’ > ‘Tenant Settings’:

03.3.1. Password request customization
During the migration process the user might need to enter a password that is linked to his account on the target system. The password can belong to one of the following:
- LDAP account
- Active Directory account
- Specific UserID
- User’s email address
To give users an indication of the password they need to enter, you have the possibility to customize the text which is displayed to your users and helps them choose the correct password.
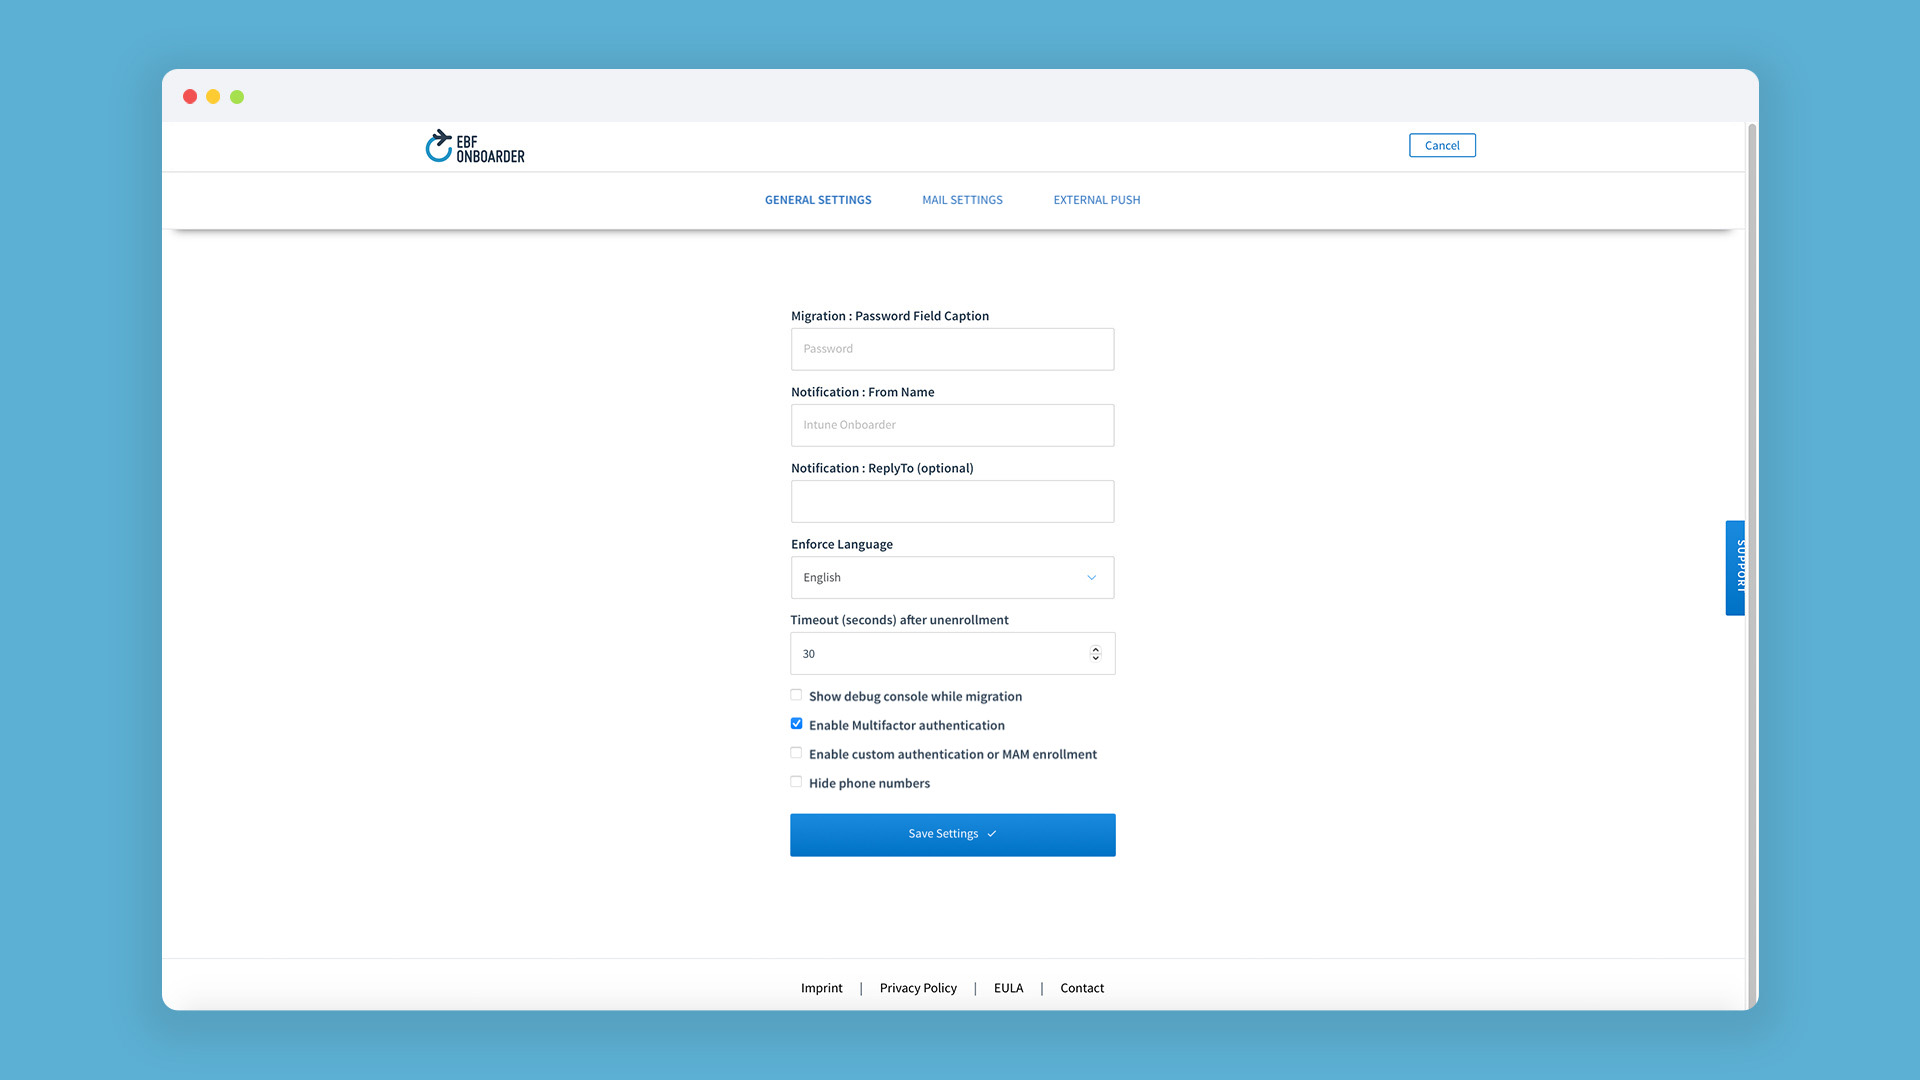
To do that go to ‘Settings’ >> ‘Tenant Settings’ >> ‘General Settings’, enter a text which indicates which password the user needs to enter in the field ‘Migration: Password Field Caption’ and save your changes:

03.3.2. Language enforcement
You can define the language of the EBF Onboarder portal.
To do that go to ‘Settings’ >> ‘Tenant Settings’ >> ‘General Settings’, select a language in the dropdown for ‘Enforce Language’ and save your changes:

NOTE: If you select English or German, the Portal language and steps on the device will be displayed in the selected language. If you select French, only the steps on the device are displayed in French, the portal language will be English.
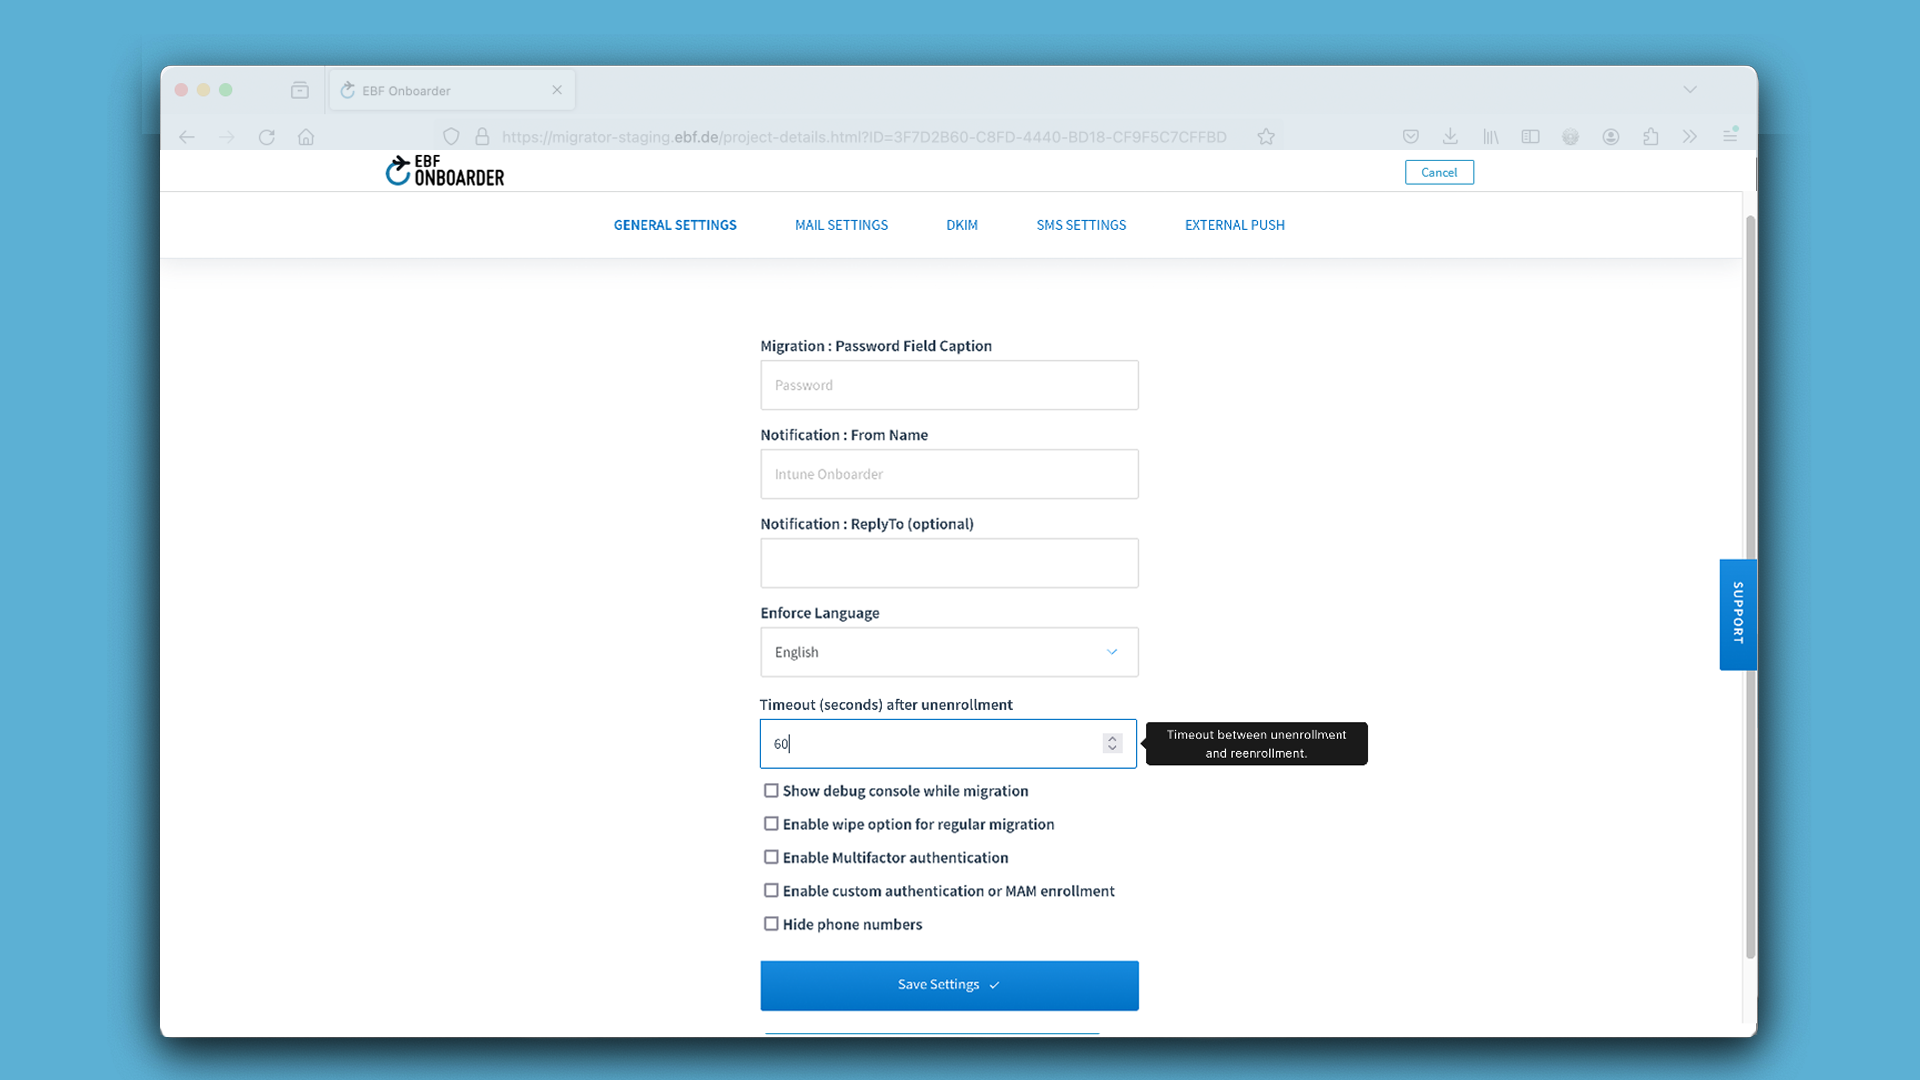
03.3.3. Timeout after unenrollment customization
At one point of the migration process the devices will be retired from the source system. The time that a device is allowed to take for retiring from the source system is limited by default to 30 seconds.
The duration of the retiring process depends, for example, on the network capacities. Also mailboxes which contain many emails can increase this process as the removal of the profile from the device can take more time. If one or several test users receive an error in the test phase, this indicates that it takes too long to get the retiring acknowledgement from the source system.
As long as the retiring acknowledgement is not confirmed by the source system, the EBF Onboarder will not proceed to the next step which is the registration at the target system. Thus, you need to increase the timeout parameter in order to allow the communication between the source system and the device to take place.
EXAMPLES:
- For Apple ADE (former DEP Supervised) the value should be: 0.
- For Apple Supervised (no ADE / DEP) the value should be: Value for unenrollment + 60 seconds.
The value requires proper testing as this value is used for the whole EBF Onboarder tenant.
To do that go to ‘Settings’ >> ‘Tenant Settings’ >> ‘General Settings’, increase the number for ‘Timeout (seconds) after unenrollment’ and save your changes:
03.3.4. Activate Debug console
It can happen that the retiring process takes too long or fails. This is usually the case if a user has insufficient rights or if he has lost network connection (e.g. because the Wi-Fi configuration was removed during the retiring process).
You are able to read the messages that have been exchanged between the device and the source UEM system during the migration process in order to analyze why the migration has failed. It might be useful to share these messages with the EBF support team.
To read those messages go to ‘Settings’ >> ‘Tenant Settings’ >> ‘General Settings’, select ‘Show debug console while migration’ and save your changes:

If this setting is enabled and a device is starting the migration, the logs are displayed at the top of the screen of the user. They can be marked and copied, or a screenshot can be created and sent to the support team for further troubleshooting.
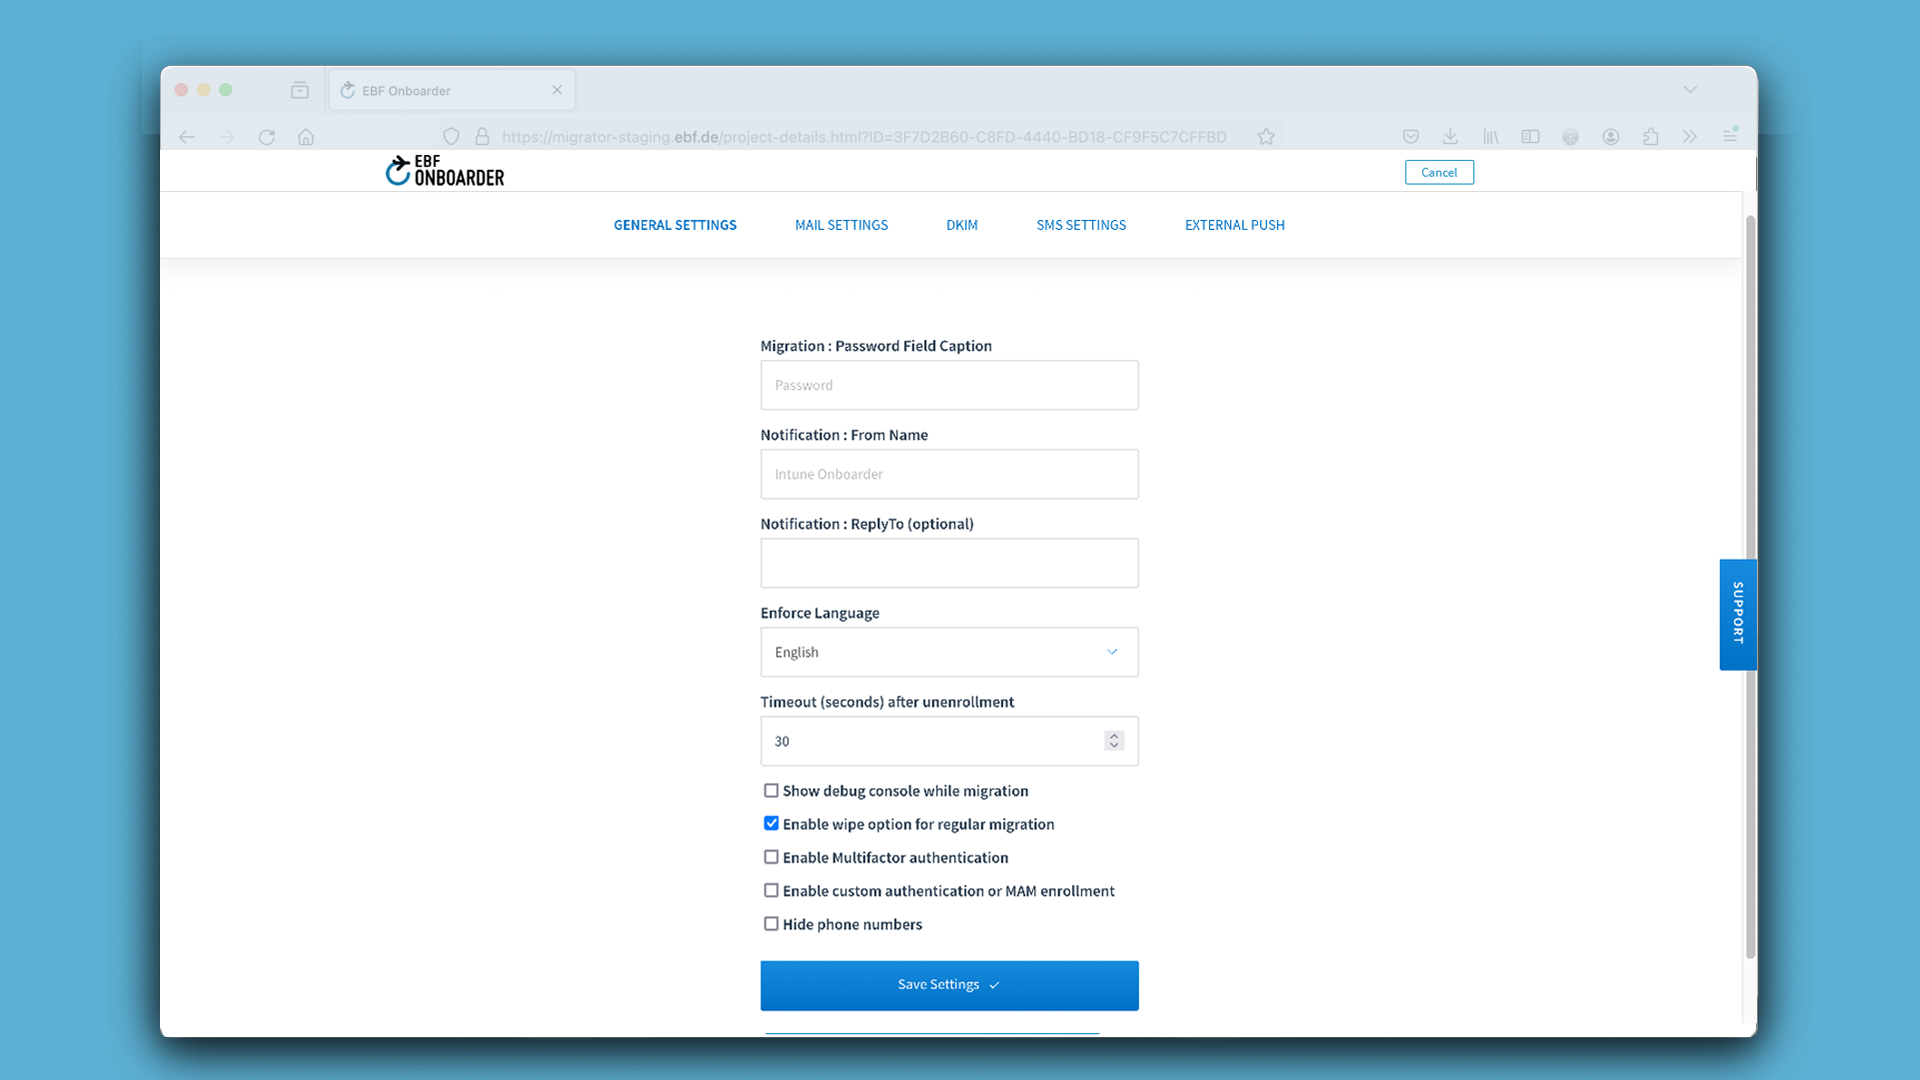
03.3.5. Enable wipe option for regular migrations
If you want or need to wipe devices during the migration, you can choose ‘Managed Enrollment’ as a target if your source UEM system is one of the following: Ivanti EPMM/MobileIron Core, Ivanti Neurons/MobileIron Cloud, Workspace ONE UEM, Meraki, MaaS360, Sophos, Soti, Soti v13.4, BlackBerry UEM v12, BlackBerry UEM, BlackBerry UEMCloud, Microsoft Intune, Jamf Pro or Jamf School.
This allows you to wipe devices and enroll them to the target. But, you are not able to:
- monitor the status of the migrations
- send reminders for ‘Partially Completed’ migrations
- send Welcome messages automatically to the users/devices
- You can also change the wipe option in a project, after it has been created.
- You can change the option at two locations.
- Dashboard: Double click the wipe icon, select and confirm the change
- In the project: Double click the Wipe devices icon, select and confirm the change.
- If the icon is light grey, wipe is disabled in this project.
If you enable this feature, you will find an additional option in the source settings while creating migration projects (see chapter 4.2).
You can identify projects using this feature on the EBF Onboarder dashboard with the help of a symbol showing a device with an x:
Because if setting up the target MDM as well, you can take advantage of all features of the EBF Onboarder for the target systems:
- monitor the status of the migrations
- send reminders for ‘Partially Completed’ migrations
- send Welcome messages automatically to the users/devices for completed migrations.
03.3.6. Enable ForceRetire (Ivanti)
For the Sources Ivanti EPMM and Neurons:
If the Force retire command should be used to retire devices, please check this box.
To enable this feature go to ‘Settings’ >> ‘Tenant Settings’ >> ‘General Settings’, select ‘Enable ForceRetire (Ivanti)’ and save your changes.
03.3.7. Disable web clips from Ivanti
If the Ivanti EPMM or Ivanti Neurons Source system should not create web clips on the devices, you can disable this option.
To enable this feature go to ‘Settings’ >> ‘Tenant Settings’ >> ‘General Settings’, select ‘Disable web clips from Ivanti’ and save your changes.
NOTE:
For new tenants, this feature will be disabled by default. Webclips will be created for invitations in already existing projects as well.
03.3.8. Disable JamfPro invitation
For migrations with the target Jamf Pro the EBF Onboarder does not create enrollment invitations. If enrollment invitations are required, please uncheck this box and press save Settings.
03.3.9. Multifactor authentication
If you want to increase the security for the EBF Onboarder login, you can enable Multifactor authentication for your tenant.
To enable this feature go to ‘Settings’ >> ‘Tenant Settings’ >> ‘General Settings’, select ‘Enable Multifactor authentication’ and save your changes:
When you login to the EBF Onboarder the next time you will see a pop-up asking to confirm a TAN. An email will be sent to your mailbox with the TAN that needs to be entered. Click OK to access the EBF Onboarder.
03.3.10 OTP Login
If you want to enable the one-time-password (OTP) authentication of your admins to login to the EBF Onboarder, check this box and press Save Settings.

After saving the settings, an OTP is required for each admin to login to the EBF Onboarder. To setup an authentication app, an email is sent to the email address of the admin (from noreply.onboarder@ebf.com) with subject ‘OTP Setup’ after saving the settings.
If you open the Admin Settings,page there will be an additional button for each admin called Reset-OTP. Press this button, the admin lost the ORP setup in the app or has issues to logon.

To disable the OTP logon, uncheck the OTP box in the Tenant Settings. Afterwards, the admins are able to login with the known user/password credentials.
03.3.11. Hide phone numbers
If the devices’ phone numbers should not be displayed in the EBF Onboarder UI, you can force the EBF Onboarder to display only the last 4 digits.
To enable this feature, go to ‘Settings’ >> ‘Tenant Settings’ >> ‘General Settings’, enable ‘Hide Phone numbers’ and save your changes. Once you enable this option, phone numbers will be displayed with only the last 4 digits (if available on your source system).
NOTE:
- If you enable this option while already having existing and active migration projects, the phone numbers of these projects will be hidden right away. A reload after disabling or enabling the option is not required.
- While this setting is enabled, SMS can still be used to communicate with your users. Read chapter 3.3.16 for details on how to setup SMS communication in the EBF Onboarder.
03.3.12. Web based enrollment for Intune
If you use web-based enrollment for your devices that are registering with Microsoft Intune, instead of forwarding the user to download the Company Portal app, you can enable this here. All your migrations will use this type of registration.
ATTENTION:
You also need to enable the support in Microsoft Intune: https://learn.microsoft.com/en-us/mem/intune/fundamentals/whats-new#plan-for-change-web-based-device-enrollment-will-become-default-method-for-iosipados-device-enrollment
03.3.13. Suspend a migration project
The Suspend feature enables you to stop users from starting a migration. If a user started the migration already, we do not stop him from continuing the process (target enrollment, reminders, welcome mail).
Check the box if you want to use the feature “Suspend a migration”. You should also specify your own text that a user will get displayed on the device instead of the migration button.
Once enabled in the tenant settings you will find a switch in each project at the bottom left and on the project plate in the dashboard. You can suspend and restart a project from the dashboard and within the project.
03.3.14. Email settings
By default, invitations are sent from the EBF SMTP server – with several options for customization. But you can also use your own SMTP server to do this.
Email sending using the EBF SMTP server
By default, the EBF Onboarder sends invitations, reminders and/or welcome messages to your users from the EBF SMTP server and uses a ‘noreply.onboarder@ebf.com’ address. But you can change the sender name, the ‘reply to’ email address and the sender email address.
Sender name customization
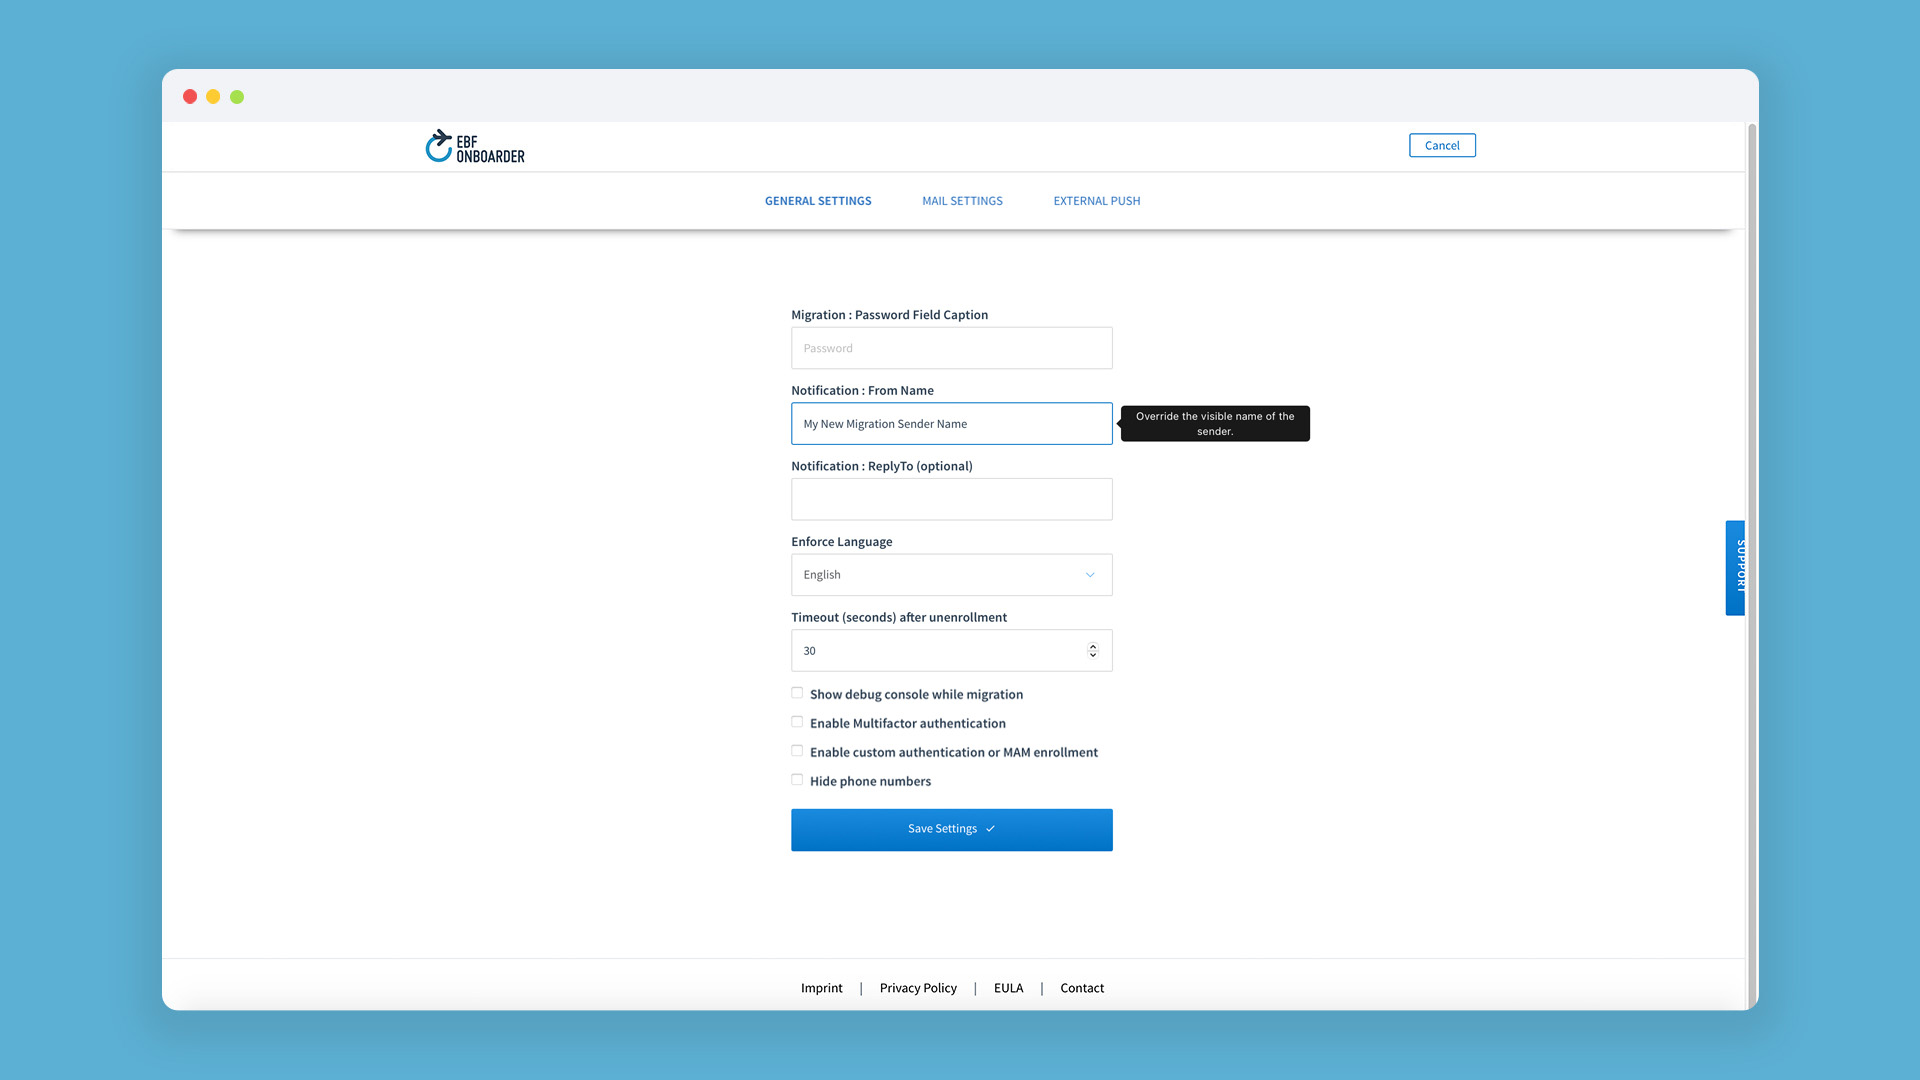
You can change the visible name of the sender so that your users can easily identify the sender.
ATTENTION:
It is just the name that is replaced. The sender email address will remain the same (noreply.onboarder@ebf.com). See this chapter to learn how to change the sender email address.
To change the sender name, go to ‘Settings’ >> ‘Tenant Settings’ >> ‘General Settings’, enter the name that users should see as sender name in the field ‘Notification: From Name’ and save your changes:
NOTE:
- It’s recommended to send a test message to the admin’s email address afterwards to check if all settings are correct (see chapter 05.4).
- If you use Modern authentication, ‘Notification : From Name’ will be prefilled with the mail address of the configured mail account. The ‘From Name’ will be the ‘Display Name’ of the sender.
‘Reply to’ email address customization
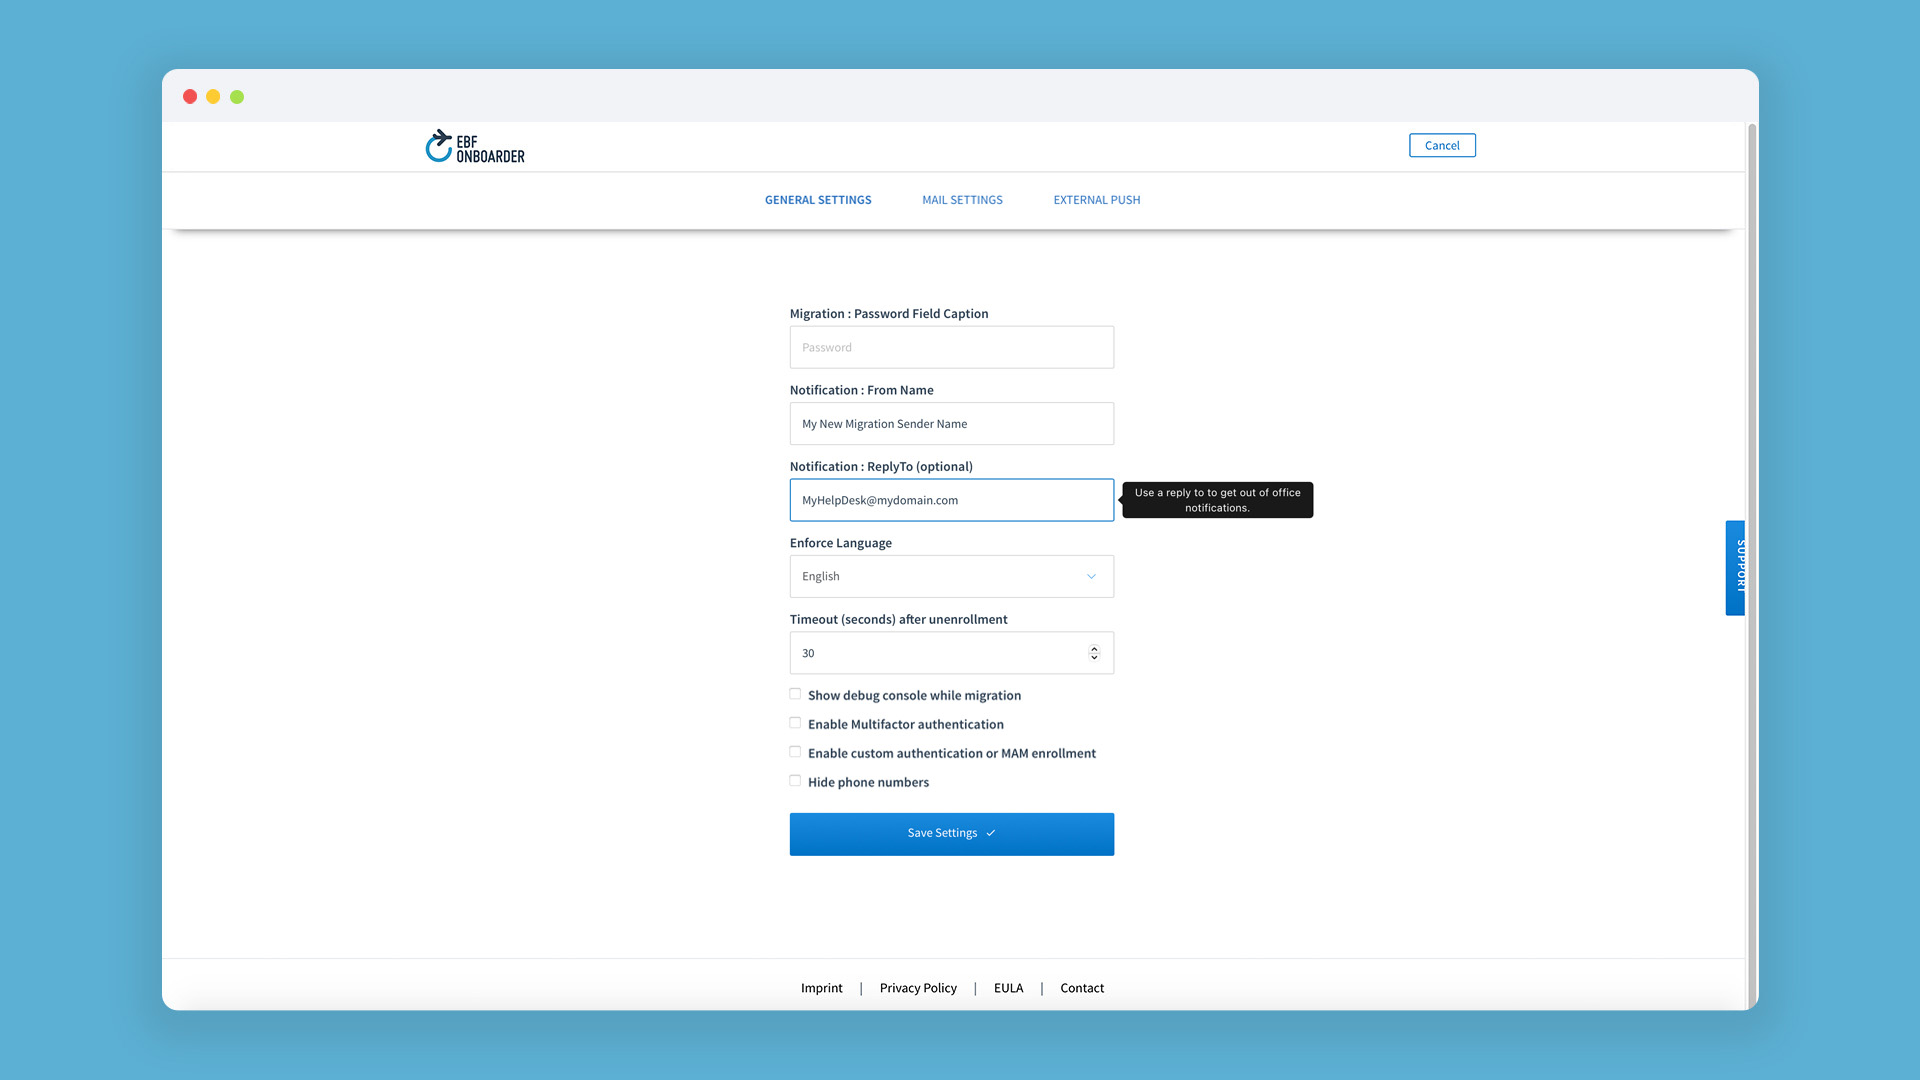
You can replace the ‘Reply to’ email address so that your users can directly contact your IT help desk, for example, if they need more information regarding their device migration.
To do that go to ‘Settings’ >> ‘Tenant Settings’ >> ‘General Settings’, enter the email address that users should reply to in the field ‘Notification: ReplyTo (optional)’ and save your changes:
NOTE:
- It’s recommended to send a test message to the admin’s email address afterwards to check if all settings are correct (see chapter 05.4).
- If you use Modern authentication, ‘Notification : From Name’ will be ignored.
Sender email address customization
You can customize the sender email address to adapt it to your company email address.
ATTENTION:
- As you are using the EBF SMTP server, you have to make sure that your mail system accepts EBF messages which appear to be sent by your own SMTP domain but are sent by the EBF SMTP server. You may need to change the whitelisting rules for this and you need to add the following IP address to your SPF record:
SMTP PORT Hostnames IP Address Port 25 smtp-out.ebf.com 62.138.245.88
- You also have to verify that the server will not block the email address after a certain number of mails which might happen for SPAM protection reasons.
- After making all necessary changes you have to contact the EBF support (support@ebf.com) as the EBF team needs to put the spoofing in place for you and help you test your network and SMTP configurations. Please provide your sender email address and details of the SPF record to the EBF team.
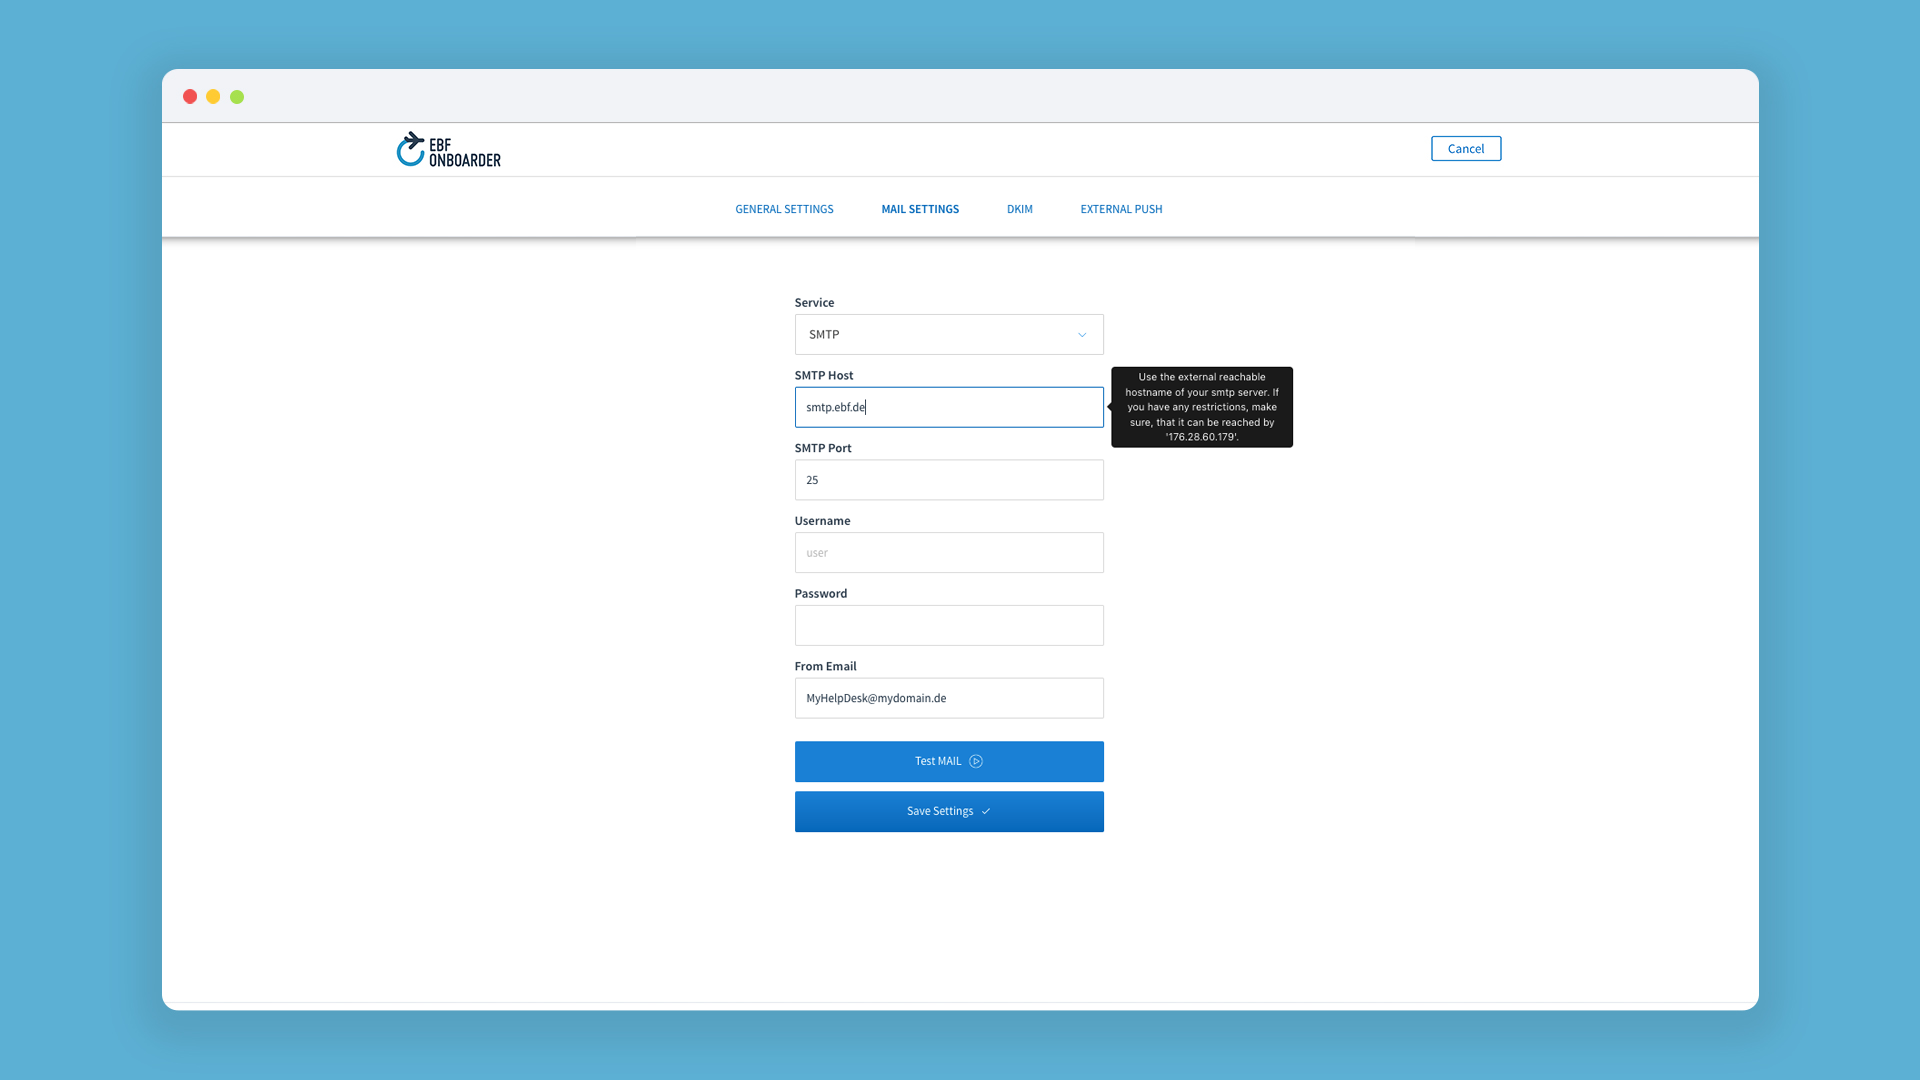
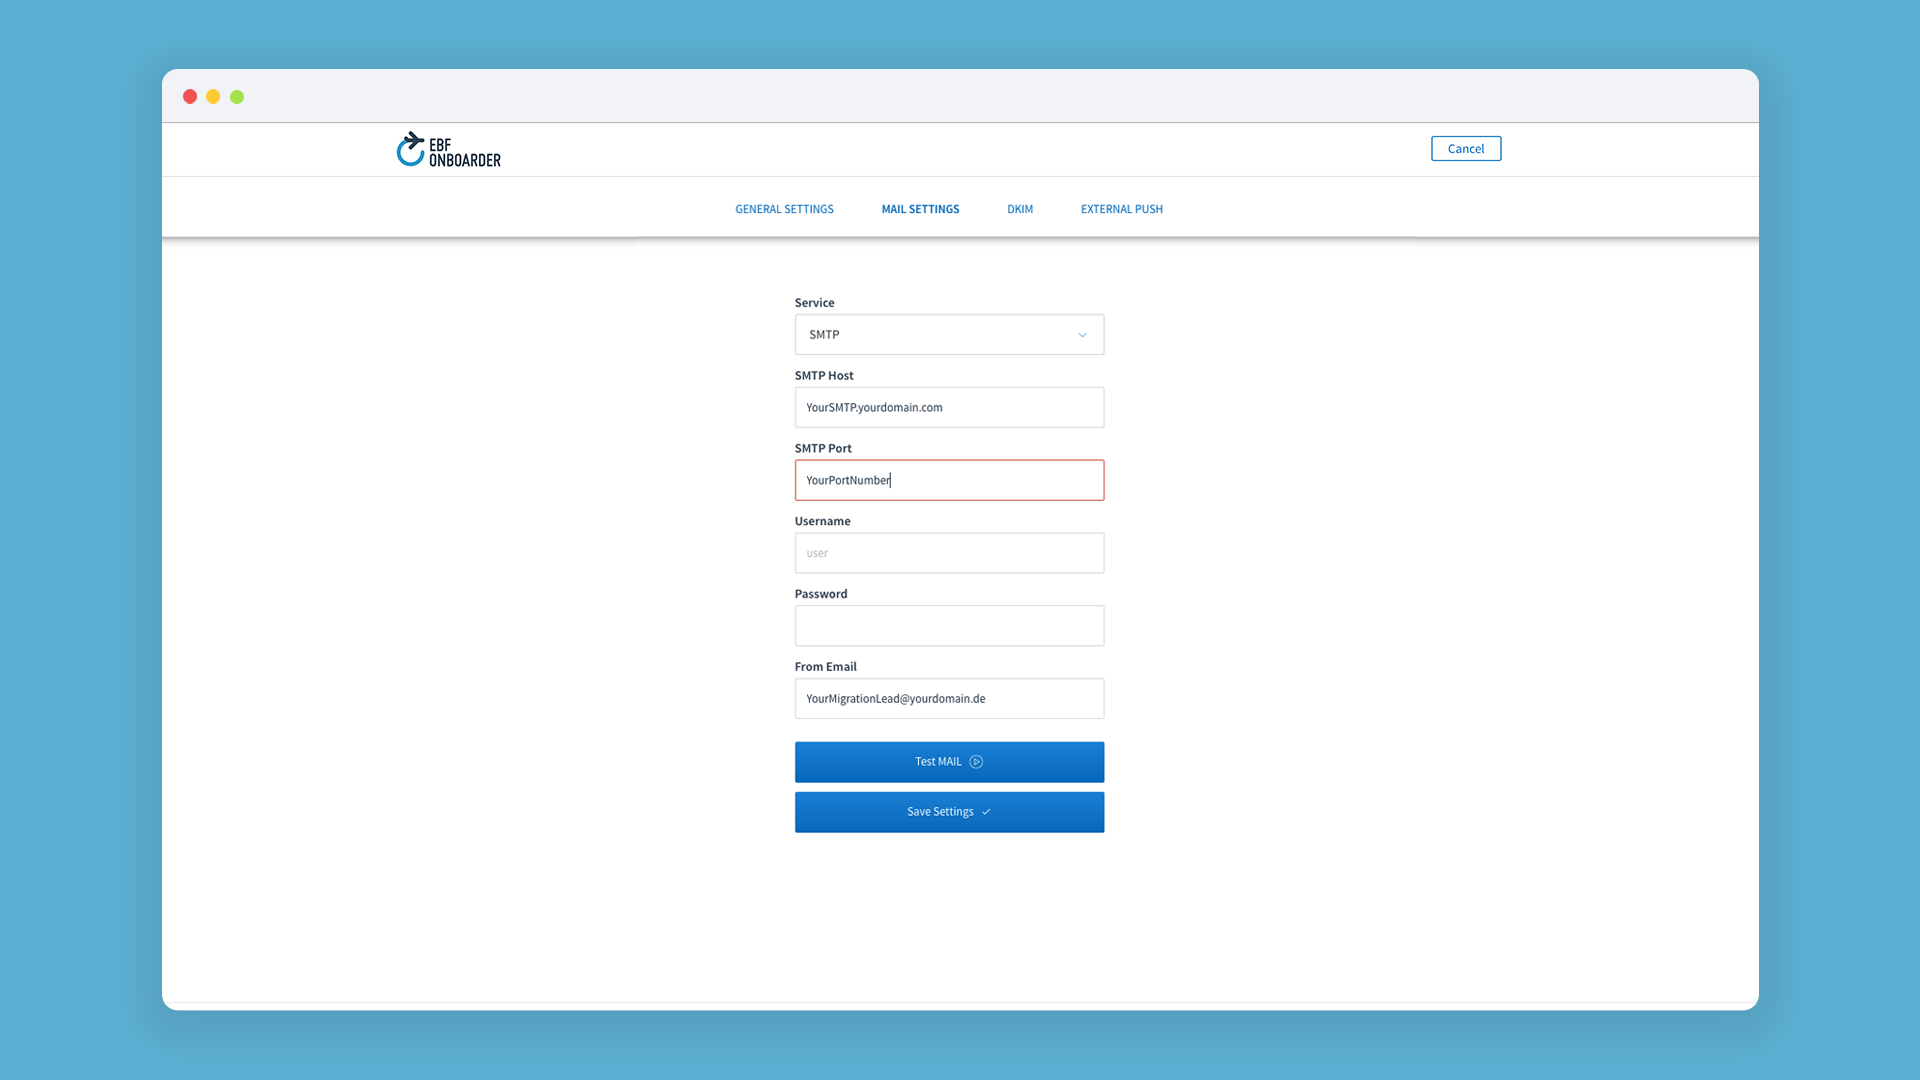
To change the sender email address, go to ‘Settings’ >> ‘Tenant Settings’ >> ‘Mail Settings’ and
- select the service SMTP,
- enter the EBF SMTP server (smtp.ebf.de) in the field ‘SMTP Host’,
- enter ‘25’ in the field ‘SMTP Port’,
- enter the SMTP Username and the SMTP Password of your dedicated user,
- enter the email address (your-address@yourdomain.com) that users should see as sender email address in the field ‘From Email’:
NOTE:
- Save your settings only if you are sure that EBF has prepared the spoofing for you for this new ‘From Email’ address.
- If you want to go back to the SMTP default settings, just clear all the fields and save this.
- It’s recommended to send a test message to the admin’s email address to check if all settings are correct (see chapter 05.4).
- If the sender name should be different from the email address, change this on the ‘General Settings’ page (Notification: From Name).
Email sending using your own SMTP server
If you want to use your own SMTP server to send the emails generated by the EBF Onboarder, you need to get an account from your SMTP team to configure the SMTP server on your EBF Onboarder tenant.
You need to add the following IP addresses to your firewall settings:
| Hostnames | IP address |
| app-out.ebf.com | 62.138.245.79 |
ATTENTION:
Every communication (API requests and SMTP) comes from 62.138.245.79. Please update your network appliances accordingly.
To configure the SMTP server on your EBF Onboarder tenant, go to ‘Settings’ >> ‘Tenant Settings’ >> ‘Mail Settings’ and
- select the service SMTP,
- enter the name or IP address of your SMTP server,
- enter the SMTP Port your server is using,
- enter the name of the SMTP Service Account and its password,
- enter the email address your-address@yourdomain.com that users should see as sender email address in the field ‘From Email’:
NOTE:
- EBF default encryption for SMTP is TLS 1.2.
- If you want to go back to the SMTP default settings, just clear all the fields and save this.
- It’s recommended to send a test message to the admin’s email address to check if all settings are correct (see chapter 05.4).
Email sending using an Exchange Online Mailbox
If you want the emails to be sent from an email address of your own organization and with your own domain, you can integrate the EBF Onboarder in Exchange Online.
ATTENTION:
On October 1, 2022, Basic Authentication was deprecated by Microsoft for Exchange Online.
Modern Authentication for Exchange Online Mailbox
NOTE:
After setting up Modern Authentication, old SMTP configurations will no longer work in the EBF Onboarder.
In order to setup Modern Authentication in the EBF Onboarder portal, you must follow these steps:
- Please make sure to use a Service Account created with your initial domain (yourcompany.onmicrosoft.com) and not your custom domain (e.g. @yourcompany.com). For the setup in the EBF Onboarder portal, you need its email address and password.
NOTE:
- Please make sure to login with this user to https://outlook.office365.com to confirm that it is working (e.g. that it is not forced to reset the password).
- It’s recommended to use a dedicated account only for the migration project as accounts are typically limited to 10.000 mails within 24 hours. In case you have a high number of migrations (>10.000) and the migration mails and reminders will exceed the mail limit, the migration project should be done in waves and mails should be sent out once a week.
- Create your own app in your Azure Portal. For the setup in the EBF Onboarder portal, you need the Application (client) ID and the Client Secret value of this app.
- Login into the Azure Portal (Default: https://portal.azure.com/).
- Within ‘Home’ and ‘Azure services’ click on ‘App registrations’.
- Register a new app by clicking on ‚New registration‘.
- Enter a user-facing display name and set up the app for ‚Accounts in this organizational directory only (Single tenant)’ and click on ‚Register‘:
- You will find your Application (client) ID and Directory (tenant) ID on the next page.
- Go to ‘API permissions’ on the left side on the same screen and
- delete the existing permission ‚User.Read’ and confirm,
- click on ‚+ Add a permission‘ and select ‚Microsoft Graph‘,
- select ‚Delegated permissions‘,
- add the following permissions for the Service Account: Mail.Send and Save
- and ‚Grant admin consent for (your domain)‘.
- Go to ‘Certificates & secrets’ and set up a new client secret:
- Press ‘+ New client secret’, provide a meaningful description and select a value for ‘Expires’. It would be possible to choose the planned migration date, but it is recommended to add some months to be prepared for a possible delay.
- Press ‘Copy the Value’ and save it at a save place as it will not be displayed again.lay.
- Login to the EBF Onboarder portal, go to ‘Settings’ >> ‘Tenant Settings’ >> ‘Mail Settings’.
- From the ‘Service’ drop down select your Microsoft Cloud. In most cases ‘Graph – Global Service GCC [DEFAULT]’ will be the right choice.
- For ‘client id’ enter the Application (client) ID.
- For ‘client secret’ enter the Client Secret value.
- For ‘user’ and ‘password’ enter the credentials of the mail user.
- If you want the mails to be sent from the account saved in the ‘Sent’ folder of the user’s mailbox, check ‘Save Mail to send items’.
- Click on ‘Test Mail’ to confirm the configuration. An email will be sent to the email address you used to login to the EBF Onboarder portal. Errors will be displayed in a red box at the bottom right.
NOTE:
- The ‘From Name’ will be the ‘Display Name’ of the sender.
- ‘Notification : From Name’ will be prefilled.
- ‘Notification : ReplyTo (optional)’ will be ignored.
- Currently, every change in the settings will create a test mail to make sure the Mail system is still working.
Exchange Online Mailbox
NOTE:
This service might be deprecated for our account.
Follow these steps to integrate the EBF Onboarder in Exchange Online:
- Ensure that you are using a user account with a licensed and enabled Exchange Online mailbox for the email address you want to use for the migration emails.
- Disable multi-factor authentication on this account as this is acting as a service account to forward the emails. The account should use a complex password that either never expires or expires long after the device migration is due to be completed.
- Enable SMTP AUTH on the mailbox being used: Go to the Microsoft Office 365 Admin Center, click on ‚Users‘ >> ‘Active Users‘, select the user account for the mailbox and click on ‚Mail‘. Click on ‚Manage email apps‘, check the option for ‚Authenticated SMTP‘ and save your changes.
- Ensure the mailbox account is exempt from any conditional access rules blocking legacy protocols.
- Go to ‘Settings’ >> ‘Tenant Settings’ >> ‘Mail Settings’ in the EBF Onboarder portal and enter:
- SMTP Host = smtp.office365.com
- SMTP Port = 587
- SMTP Username = Office 365 Account Username
- SMTP Password = Office 365 Password
- From Email = Default email address for this account
- Click on ‘Test Mail’ and if this works fine on ‚Save Settings‘ which also creates a test message. Errors will be displayed in a red box at the bottom right.
NOTE:
- Please create a cloud-only Service Account in Entra-ID and assign an Exchange Online license for using the SMTP feature from Exchange Online. Accounts that have MFA activated or authenticate via ADFS are not supported.
- Here you can read more about how to set up a multifunction device or application to send emails using Microsoft 365 or Office 365 (Option 1 is used in this scenario):
https://docs.microsoft.com/en-us/Exchange/mail-flow-best-practices/how-to-set-up-a-multifunction-device-or-application-to-send-email-using-microsoft-365-or-office-365- Here you can read more about how to enable or disable authenticated client SMTP submission (SMTP AUTH) in Exchange Online:
https://docs.microsoft.com/en-us/exchange/clients-and-mobile-in-exchange-online/authenticated-client-smtp-submission
Email sending using your Gmail SMTP
If you want to use your SMTP Server from Gmail to send the emails generated by the EBF Onboarder, you need to follow the following steps:
- Log in to your Gmail account: https://myaccount.google.com.
- Enable two factor authentication for your Gmail account: https://myaccount.google.com/signinoptions/two-step-verification
- Enable an „app password“: https://security.google.com/settings/security/apppasswords (only possible after enabling two factor authentication): Select ‚Other (Custom name)‘ for ‘Mail’, enter any name you want and click on ‘Generate’. The newly generated password will be used in the EBF Onboarder SMTP settings.
- Go to ‘Settings’ >> ‘Tenant Settings’ >> ‘Mail Settings’ in the EBF Onboarder portal and enter:
- SMTP Serve = smtp.gmail.com
- SMTP Port = 587
- SMTP Username = Your productive SMTP username
- SMTP Password = Your newly generated app password
- Click on ‘Test Mail/save’. This should be green now. Errors will be displayed in a red box at bottom right.
03.3.15. DKIM
DKIM (DomainKeys Identified Mail) is a method using a digital signature which allows to trust emails sent from foreign systems like the EBF Onboarder to your users. The EBF Onboarder send mails by default with the email: noreply.onboarder@ebf.com. Our main domain ebf.com has an active DMARC policy and publishes DKIM and SPF records, emails mails sent from the EBF Onboarder are always signed using DKIM.
If your IT team enforces the use of DKIM, they will help you to provide the data needed for the configuration in the EBF Onboarder. The DKIM Domain, the DKIM Selector and the DIM Key are required.
If you need further help or require a special configuration, please sent an email to support@ebf.com.

03.3.16. SMS settings
If you want to send Information, Invitation, Reminder and Welcome messages to your users by SMS, you need a separate SMS service provider and make changes in the SMS settings of the EBF Onboarder. If you do not want to send any SMS, you should not make changes in the SMS settings.
If you are already sending SMS to your users regularly, you might have a SMS service provider account which you can use. Otherwise, you need to look for a SMS service provider, purchase a proper amount of SMS and add the data of your SMS service provider to the EBF Onboarder.
NOTE:
- It is important that the provider is able to send SMS to all countries where your users are located.
- We can only support one SMS provider per tenant. If you need more than one provider for the migration, please create another tenant.
- Please purchase a proper amount of SMS. If you want to use SMS for all kind of messages (Information, Invitation, Reminders and Welcome message), please have in mind that the necessary amount of SMS might be four or five times as much as your number of devices.
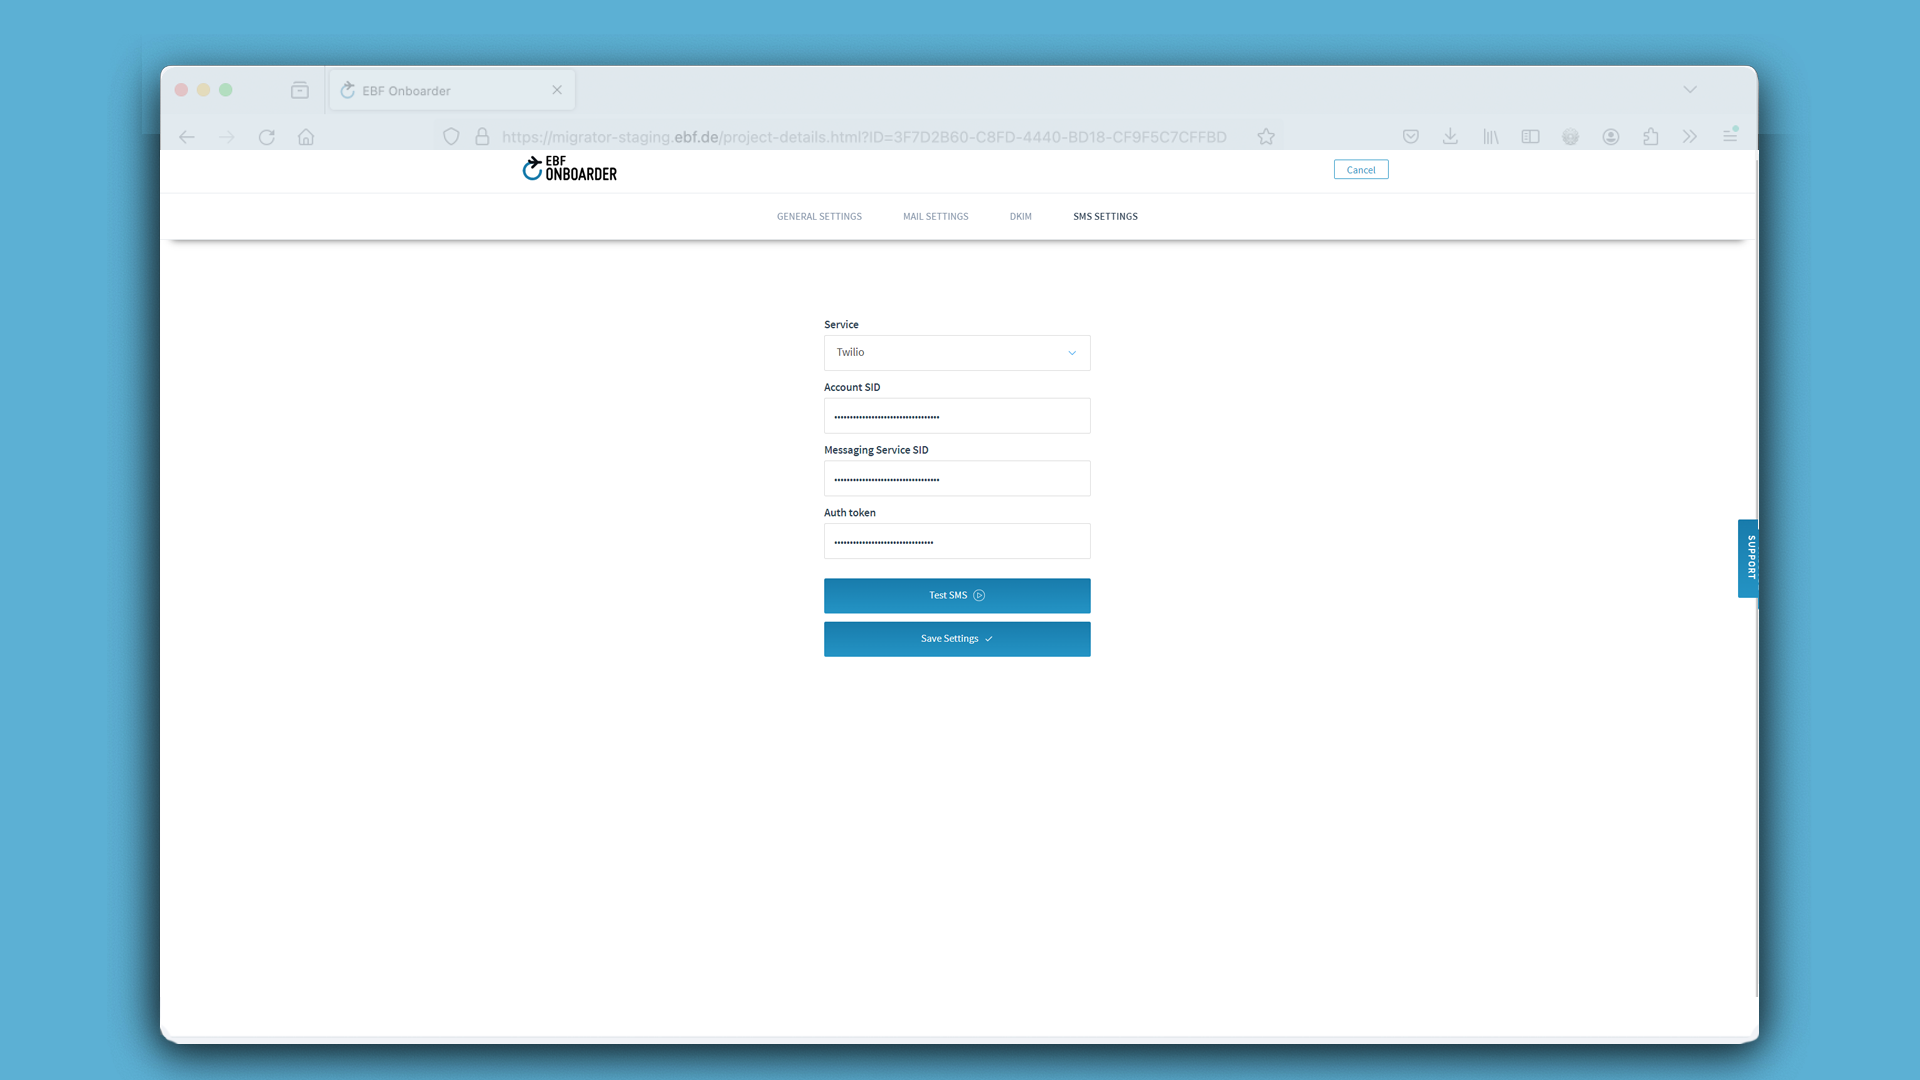
To add the required data, go to ‘Settings’ >> ‘Tenant Settings’ >> ‘SMS Settings’ in the EBF Onboarder portal, select your SMS service provider and enter your data. In the screenshot, Twillio is chosen as an example.
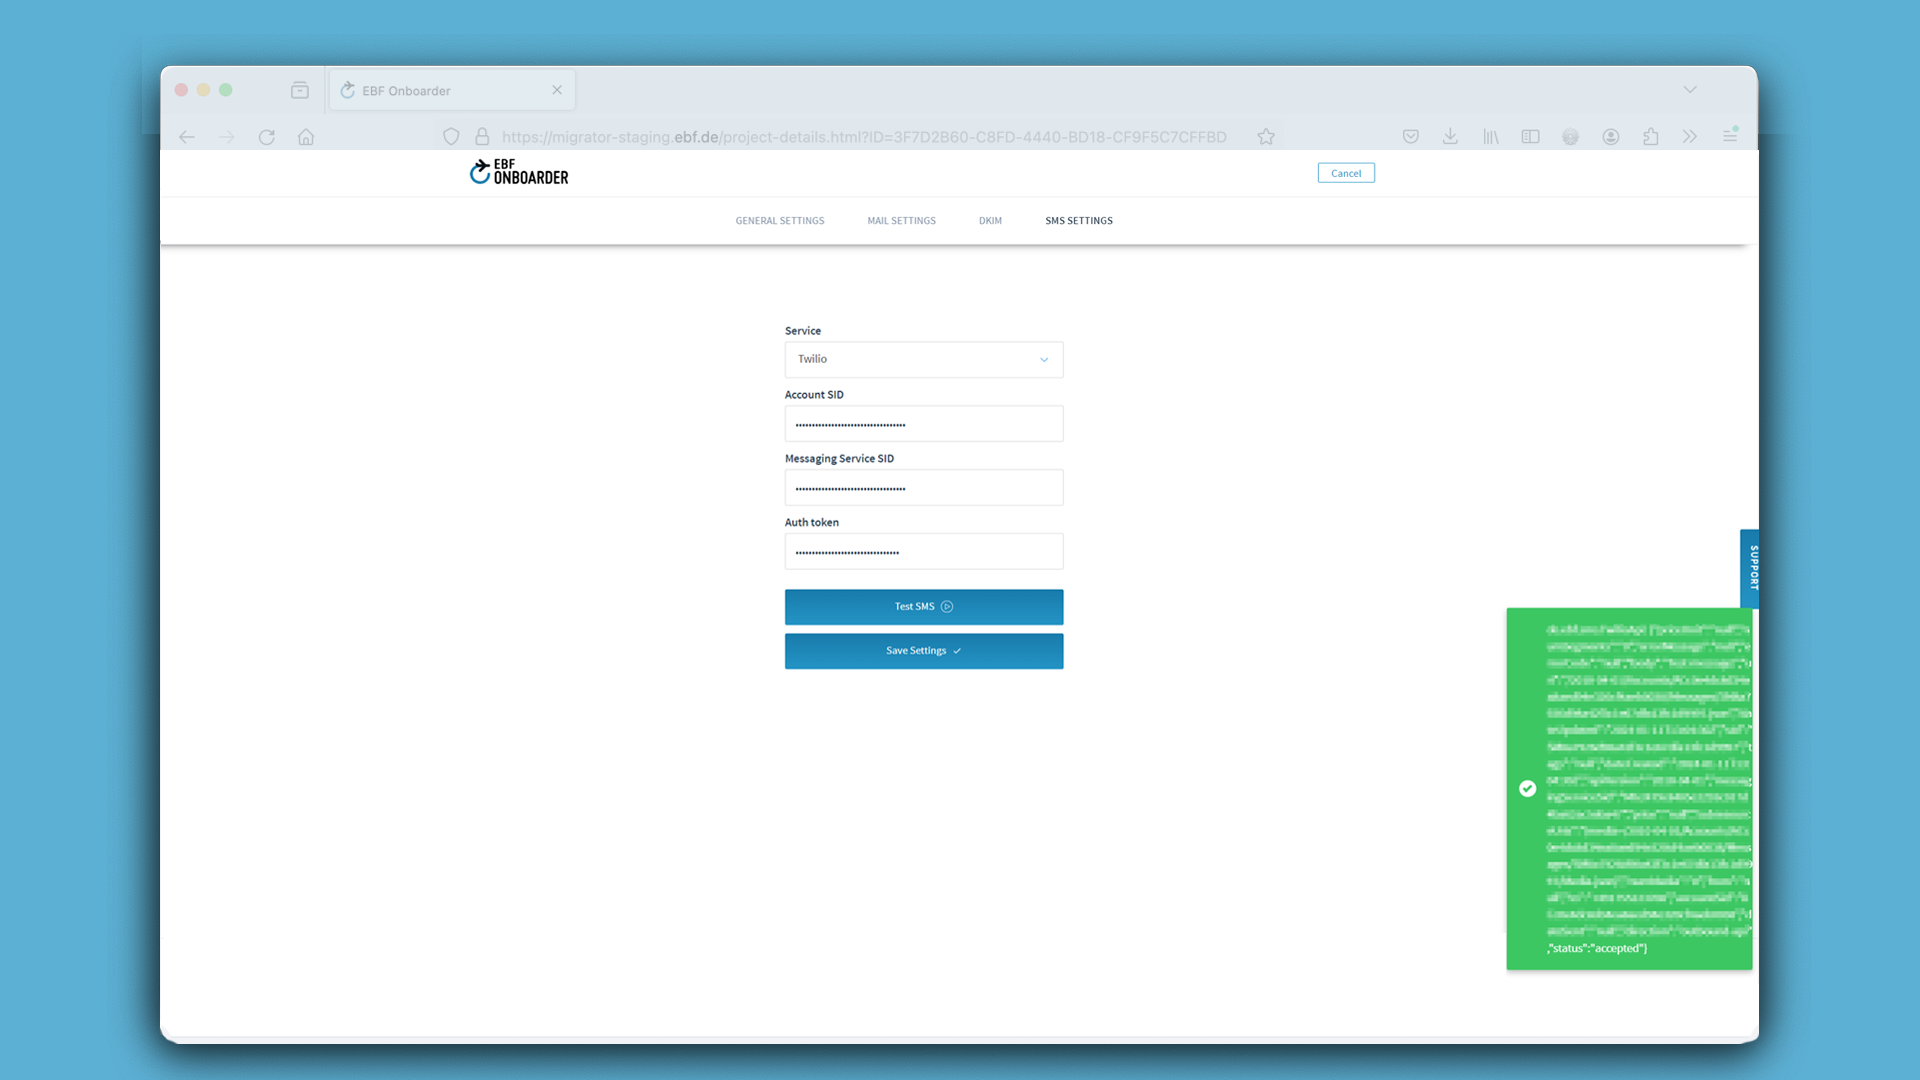
After entering your account data, you can click on the ‘Test SMS’ button, provide a mobile number and click on ‘Send’. If all settings are correct and the SMS service account is setup properly, a green box is shown and a test SMS will show up on the device ending with ‘Test message!’
If the green box appears, but you are not receiving the test SMS, you should first check the coverage of the device and confirm the mobile number. If this does not resolve the issue, it is most certainly an issue with the SMS service provider account which you need to check with your SMS service provider. We cannot support you with this.
ATTENTION:
If the SMS settings are not setup properly, you will see the SMS option in the Communication tool and you will be able to request SMS to be sent, but this will fail.
03.4. Admin settings
The EBF Onboarder has multi-admin and multi-tenant capacities. It provides the opportunity to create several admin accounts that can access and use the EBF Onboarder portal with customized rights. The advantage of this multi-admin capacity is that different admins (e.g. from different sites around the world) can conduct the migration of the devices for which they are responsible. It also supports splitting the tenant, so that an admin of one country/department cannot see the migration and device data of another country/department. To realize this, we make use of the already existing categories, that can now be assigned to admin users.
If you start a new tenant all admins, rights and categories are managed by one super admin or top admin of the tenant. By default, this is the first administrator who registered the tenant for his company.
- The super admin can create the other admins, assign roles, create and assigned categories for the tenant and is the only admin which is able to change the tenant settings by default.(e.g. SMTP settings of the tenant, see chapter 03.3).
- Admins can, according to the assigned roles and categories(multi-tenant), manage and monitor existing migrations without being allowed to change the tenant and Admin settings. They can change the settings of invitations and reminders and launch migrations.
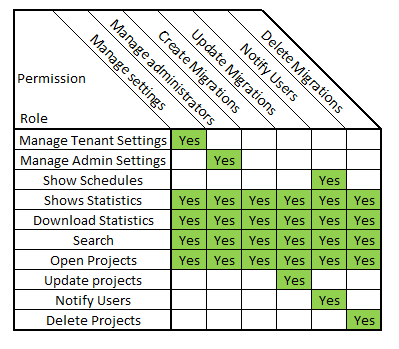
There are six roles/rights you can apply to an admin:
- ‘Create migrations’: This admin can create new migrations.
- ‘Update migrations’: This admin can edit migration projects
- ‘Delete migrations’: The only role who is allowed to delete a migration project
- ‘Notify users’: This admin can send and schedule invites to start the migration
- ‘Manage administrators’: This admin can create new admin accounts.
- ‘Manage settings’: This admin can edit the settings of the tenant
03.4.1. Admin accounts overview
To get an overview of all admin accounts you can go to ‘Settings’ >> ‘Admin Settings’:
A list of all admin accounts that have already been created for the tenant will be displayed. The first one on the list is the super admin. The column ‘Administrative rights’ provides information about the rights of the account. The column ‘Categories’ show you, if the access of this is admin is limited to any categories.
03.4.2. Admin accounts setup
To create a new admin account the super admin or an admin with the right ‘Manage administrators’ needs to know the name and email address of the admin he wants to add. This is necessary since an invitation will be sent to the person as soon as he has been added as an admin. The invitation will ask him to choose his own password which is needed to access the EBF Onboarder tenant as an administrator. If OTA is enabled, the OTA setup for this admin will start by a mail as well.
The invitation will be sent by ‘<target> Onboarder’ from the email address ’noreply.onboarder@ebf.com‘ and the subject ‘New Account’.
NOTE:
The invitation will be sent to the person as soon as you click on ‘Save Admin’. Thus, it is recommended that you inform the person in advance in order to avoid that he is surprised to receive the invitation from the EBF Onboarder. Also make sure that he understands that he has only 30 minutes to choose his password and activate his account.
The super admin or an admin with the right ‘Manage administrators’ needs to take the following steps to add another admin:
- Go to ‘Settings’ >> ‘Admin Settings’.
- Click on ‘New Admin’.
- Enter the name and email address of the new admin and select the rights which he should receive:
- Check ‘Create migrations’ to allow creating, editing and monitoring migration projects.
- Check ‘Update migrations’ to allow editing a migration project
- Check ‘Notify Users’ to allow this admin to send out Information, Invitation and Reminder.
- Check ‘Delete Migrations’ to allow an admin to delete projects
- Check ‘Manage settings’ to allow editing the settings of the tenant (same tasks as the first created admin).
- Check ‘Manage administrators’ to allow adding, editing and removing admins.
NOTE:
If you don’t select any of these rights, the admin account will, by default, be able to manage and monitor all existing migrations. He will be able to change the settings of invitations and reminders and to launch a migration.
Please take a look at the matrix below:
- In addition to the roles/rights you can also use our categories for multi-tenant management.
In the ‘Admin Settings’ you can assign existing or new categories to an admin. Do not forget to press ‘Update’ to apply the changes.
From this time on, the admin will only be able to access projects and its data from these categories. - Click on ‘Save Admin’. An invitation will now be sent to the person’s email address.
03.4.3. Edit the admin
You can edit the name and right of an admin:
- Go to ‘Settings’ >> ‘Admin Settings’.
- Click on the name of the admin and edit the name.
- Edit the ‘Administrative rights’ if desired.
- Press the ‘Update’ button on the right to confirm the change.