01. Introduction
There is a general documentation available for the EBF Onboarder, where you can find information about its prerequisites and the whole migration project. It describes how you can setup a migration project, how you can setup invitation emails and reminders which guide your users through the migration. It also tells you how to initiate the migration process and how to track the migration status.
This documentation complements the general EBF Onboarder documentation and provides more detailed information about the prerequisites for the source system Workspace ONE.
ATTENTION:
This documentation does not replace any VMware documentation. It is only describing prerequisites for the EBF Onboarder. Please consult the VMware documentation and support if necessary.
02. Prerequisites for the source system Omnissa Workspace ONE
If your source system is Omnissa Workspace ONE, it is recommended that you login into your Omnissa Workspace ONE console and make the changes which are described in the following chapters. In this way you can ensure that the EBF Onboarder will be able to find and retire (eg Enterprise Wipe) the devices from your source system. An API Key and admin account credentials are required.
02.1. API Key
The EBF Onboarder will require an API Key to access the Omnissa Workspace ONE system.
NOTE:
Do not use an existing API Key. Create a new API Key as there is a daily limit of 50,000 connections for each API Key that would be reached especially on shared tenants if you use an old API Key.
Follow these steps to enable API access:
- Login in your Omnissa Workspace ONE/AirWatch console.
- Go to ‘Groups & Settings’ >> ‘All Settings’ >> ‘System’ >> ‘Advanced’ >> ‘API’ > ‘REST API’.
- Select the tab ‘General’ and select ‘Enabled’ for Enable API Access. In this way, an API key for the top organization group is created automatically.
- Click on ‘Add’.
- Scroll down the table and enter a name for your API Key and select ‘Admin’ in the drop-down list.
- Save the new API Key.
NOTE:
Please also read the VMware documentation about generating an API Key and enabling API Access:
It is recommended to create the API Key for the top organizational group with the type ‘Customer’ (not a subgroup) where you will also create a dedicated admin for the EBF Onboarder. To do this follow these steps:
- Login in your Omnissa Workspace ONE console.
- Go to ‘Groups & Settings’ >> ‘Groups’ >> ‘Organization Groups’ >> ‘Details’.
- Ensure that you are in the desired organization group with the type ‘Customer’.
NOTE:
If you change the structure of your top organization group, please re-create an API Key for the EBF Onboarder right after making the changes.
02.1.1. Update password and API Key
In case you need to update the password and/or the API key during a running migration, just open any project and click the edit symbol (pen).
Here you will be able to update the password and the API key. Once saved, this new value will be used in ALL projects with the same user / API key or User/password combination. So you do not need to perform these steps in all your migrations.
02.2. Accounts
The EBF Onboarder needs an Admin Account to have access to the Omnissa Workspace ONE system. Before you create the Admin Account (see chapter 02.2.2), you first have to create roles for a Service Account which you can then associate to the Admin Account (see chapter 02.2.1).
NOTE:
Please consult the Workspace ONE documentation if necessary.
02.2.1. Admin role
NOTE:
You can either follow the steps below or import the role settings into Omnissa Workspace ONE using the EBF Onboarder Role.xml-file available in the zip file which you can download here. The zip file also contains an MS Excel file for a detailed list of required permissions.
- Login in your Omnissa Workspace ONE console.
- Go to ‘Accounts’ >> ‘Administrators’ >> ‘Roles’.
- Click on ‘Add Role’.
- Enter a name and description which indicates that this role belongs to the EBF Onboarder.
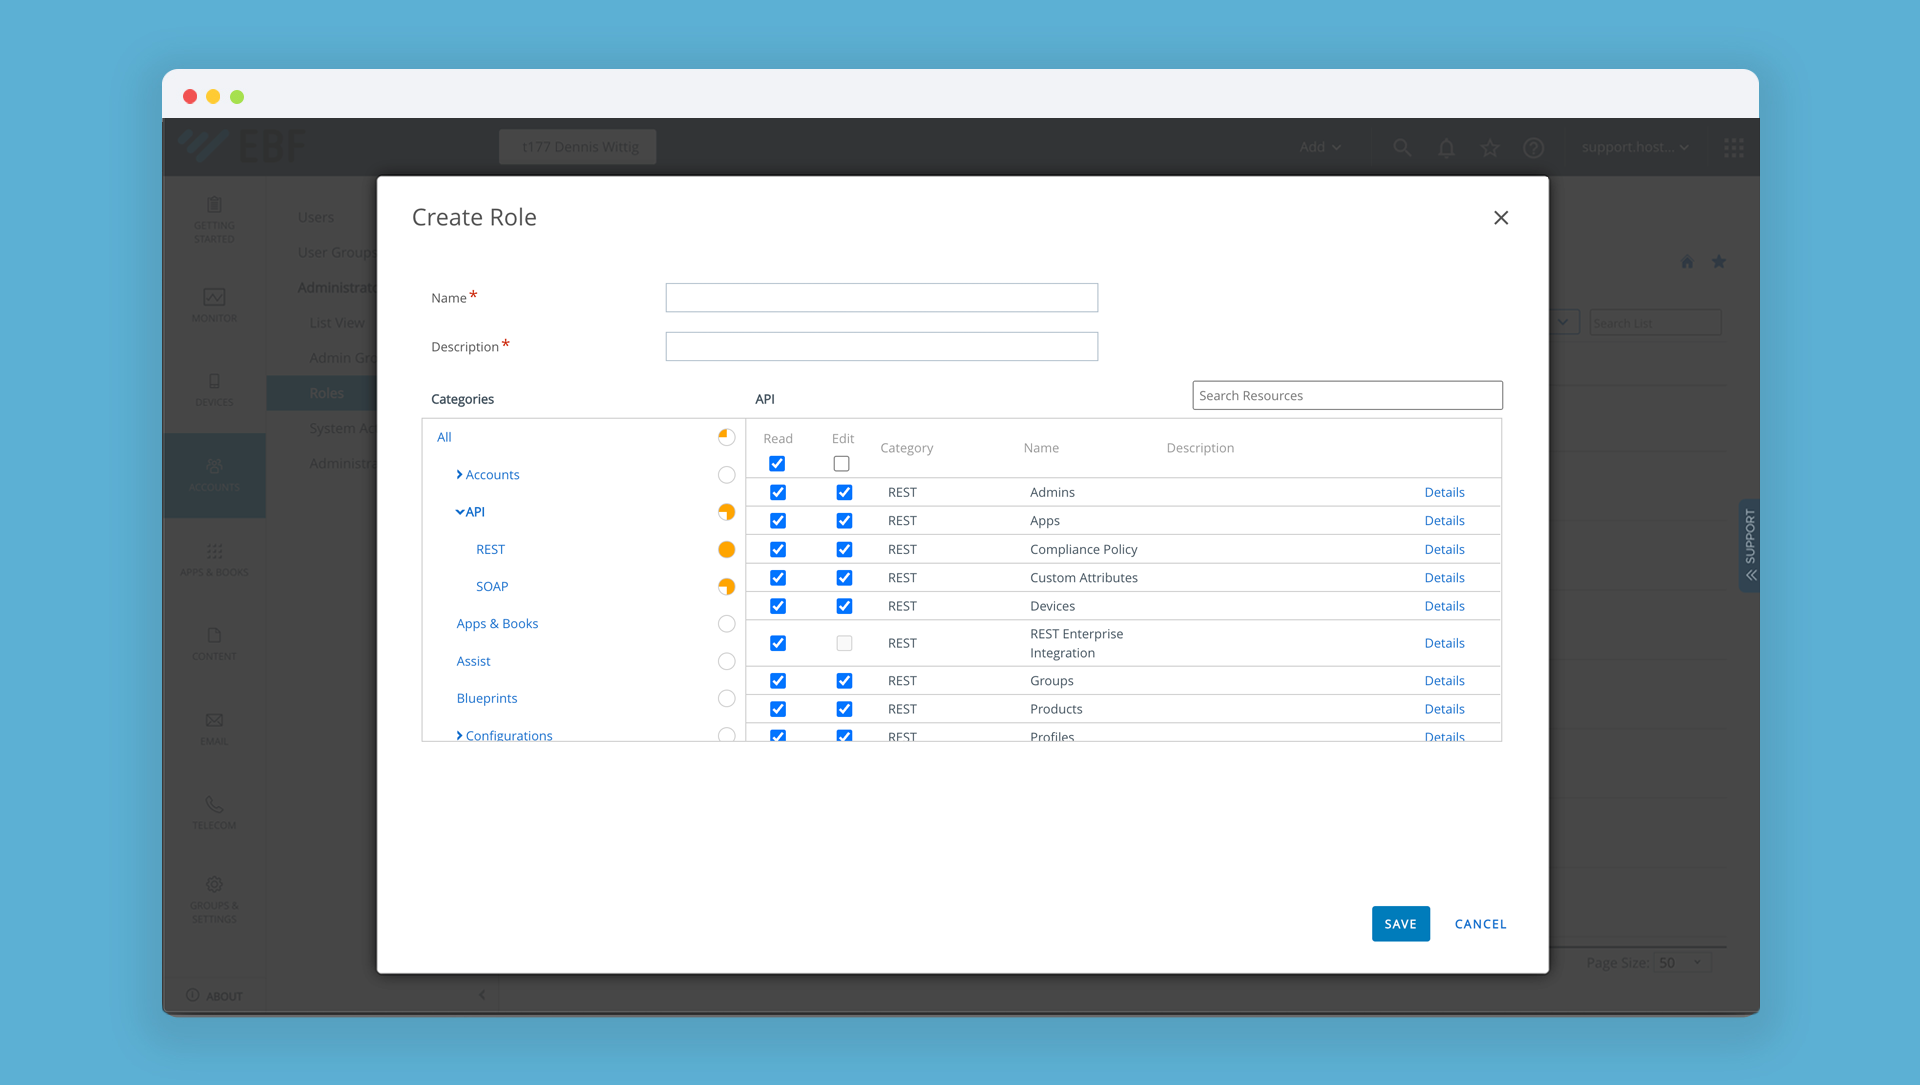
- Select ‘API’ and provide all API REST entries with the ‘edit’ right – except the last SOAP entry (General):
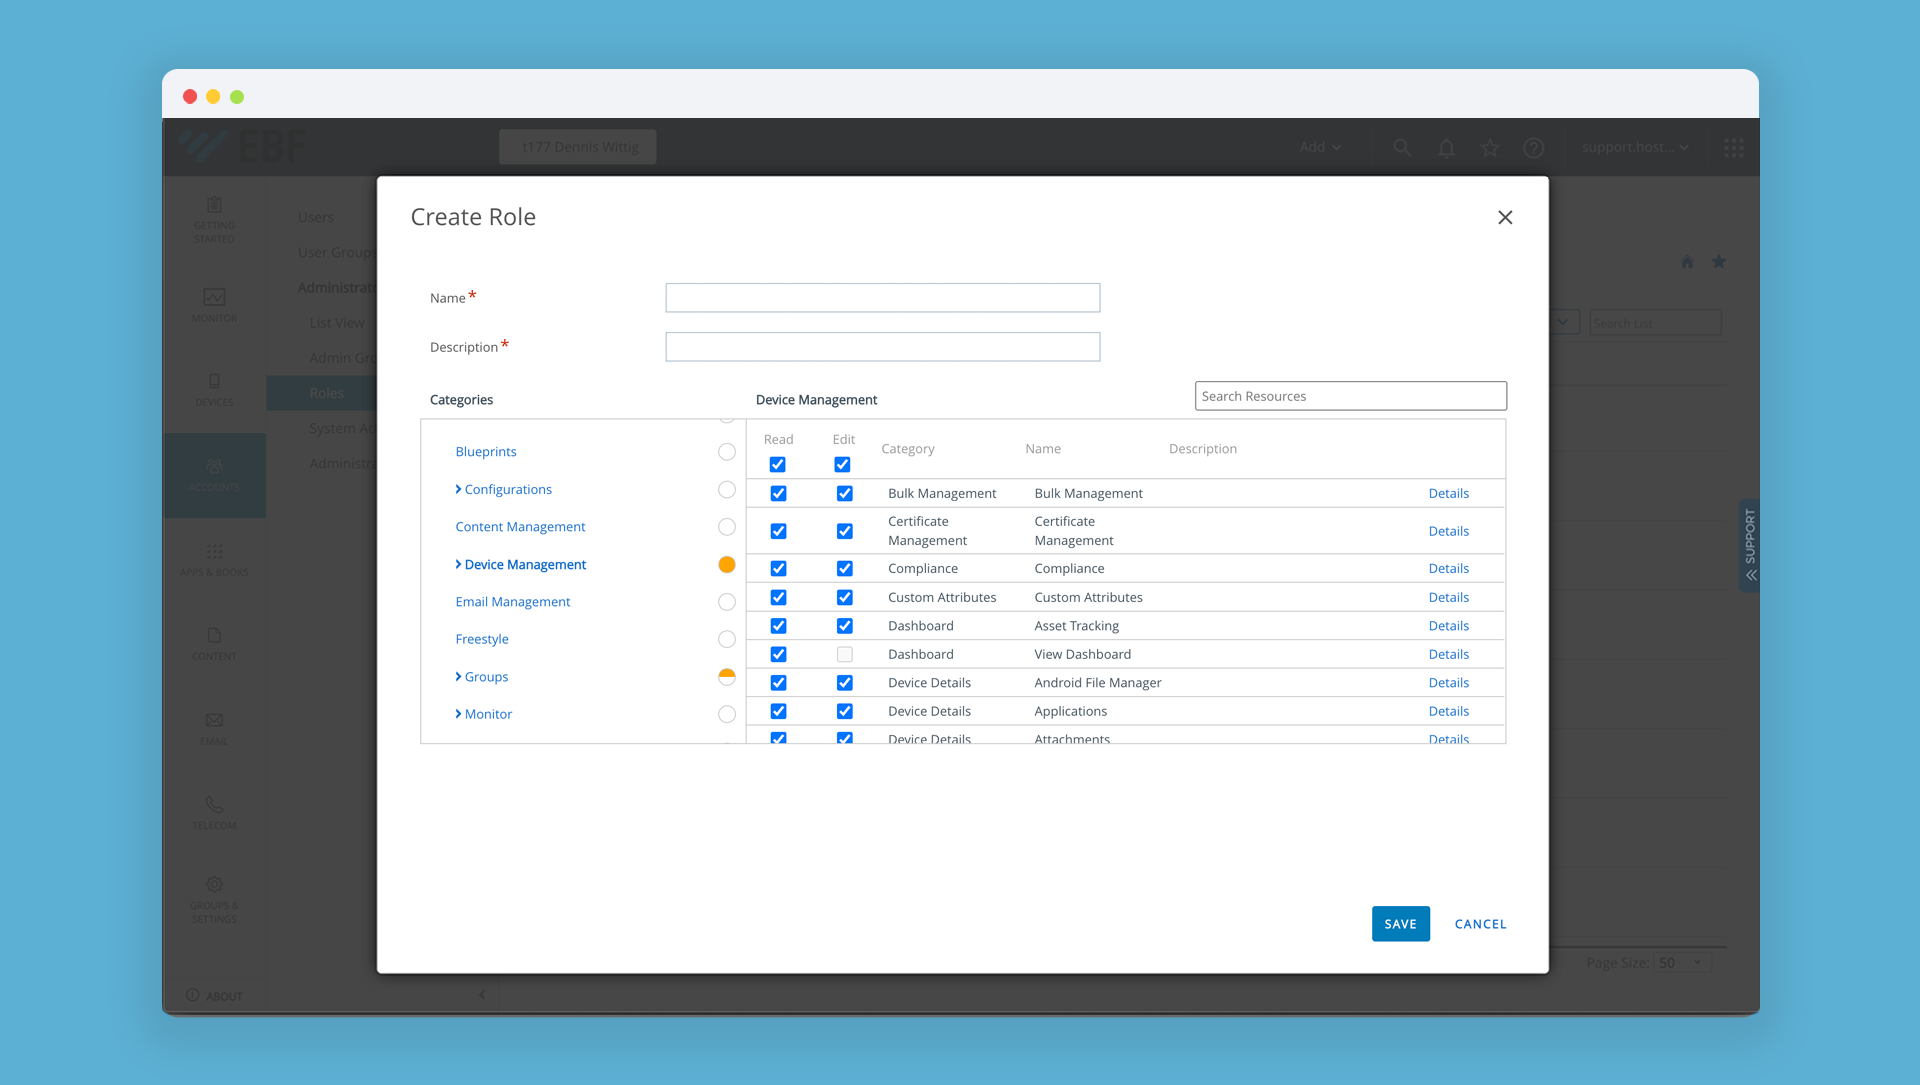
- Add the role ‘Device Management’ and provide it with ‘read’ and ‘edit’ rights:
- Add the role ‘Groups’ and provide it with ‘reading’ right only:

- Save the settings.
02.2.2. Admin Account
Create an Admin Account which the EBF Onboarder can use to access the Omnissa Workspace ONE system. Assign the EBF Onboarder specific role and the Device Management role which you have created (see chapter 02.2.1) to the Admin Account.
- Login in your Omnissa Workspace ONE console.
- Go to ‘Accounts’ >> ‘Administrators’ >> ‘List View’.
- Click on ‘Add’ and choose ‘Add Admin’.
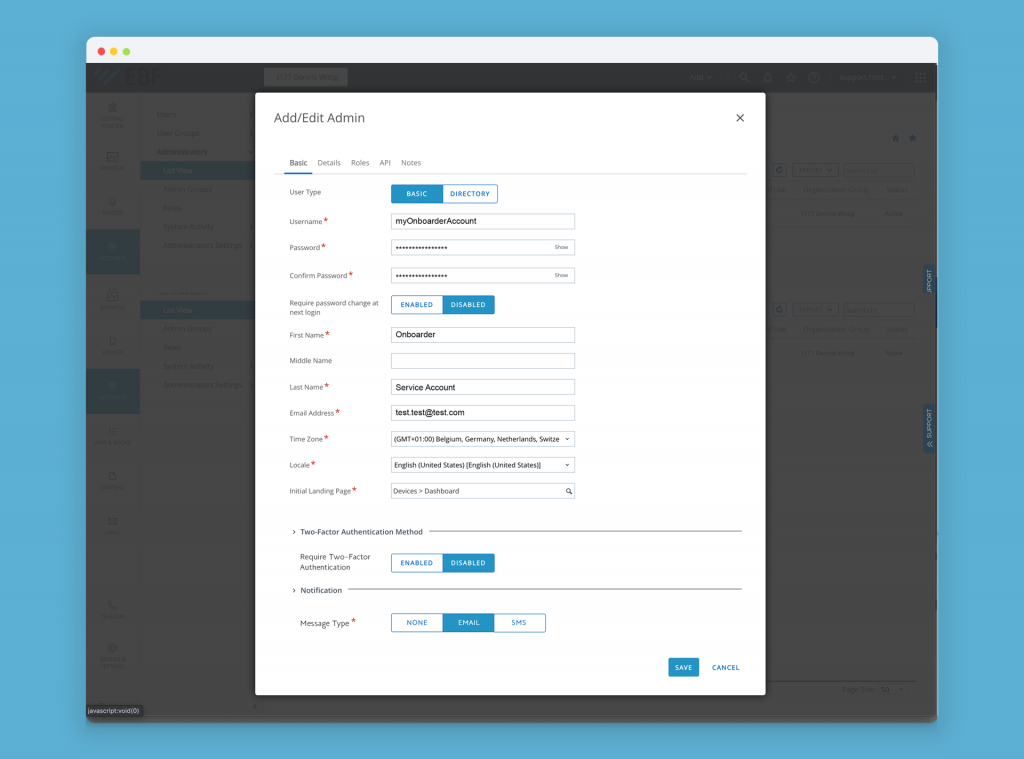
- Go to the tab ‘Basic’ and enter the parameters for the new admin account:
NOTE: Two-Factor Authentication must be disabled as the EBF Onboarder does not support it.
- Go to the tab ‘Roles’ and click on ‘Add role’ to add a role for the organization group ‘Group’ and select the EBF Onboarder specific role (see chapter 02.2.1).
- Click once more on ‘Add role’ to add another role for the organization group ‘Group’ and select the role ‘Device Manager’ (see chapter 02.2.1).
- Go to the tab ‘API’ to validate that the user credentials will be used by the API to access the console. Select ‘User Credentials’ as authentication method.
- Save the new admin.
02.3. Privacy settings
Edit your Workspace ONE/AirWatch privacy settings so that Workspace ONE/AirWatch has full access to ‘Unassigned Devices’ as some devices may be seen as ‘Unassigned’ by EBF Onboarder when a previous enrollment was done manually.
- Login in your Workspace ONE/AirWatch console.
- Go to ‘Groups & Settings’ >> ‘All Settings’ >> ‘Devices & Users’ >> ‘General’ >> ‘Privacy’.
- Select ‘Override’.
- Scroll down to the ‘Commands’ section and select ‘Unassigned’ for ‘Device Wipe’, ‘Clear Device Passcode/Lock Device/Shutdown/Reboot’ and ‘File Manger Access’.
02.4. Device wipe settings
You need to increase the number of devices your source system will accept to retire during a certain period as there will be a large amount of retiring/wiping requests during the migration to your source system.
- Login in your Workspace ONE/AirWatch console.
- Go to ‘Groups & Settings’ >> ‘All Settings’ >> ‘Devices & Users’ >> ‘Advanced’.
- Click on ‘Managed Device Protection’.
- Select ‘Override’ and change the settings:
- Increase the number of ‘Wiped Devices’ and enter a number between 2000 and 3000.
- Increase the number of ‘Within (minutes)’ to 20.
- Save with ‘Inherit’ or ‘Override’.
02.5. Wipe a macOS device by Managed Enrollment
If a MacOS Device is wiped using an API, the WorkSpace ONE API call has a mandatory option. This forces to add a 6-digit PIN. This PIN needs to be entered only on Intel-based Macs. The device will ask for the PIN after the restart following the wipe.
The EBF-Onboarder is using the API as well, so we also need to provide a restart password.
For Intel-based MacOS devices wiped using the EBF-Onboarder, the restart password is: ‘123789’. MacOS devices using an Apple CPU will not be asked for the startup password.
02.6. Windows desktop apps
If you migrate from Workspace ONE to another UEM, you might want to keep the installed apps so that users do not need to download several GB of data again. For desktop devices this is possible as the EBF Onboarder is able to use the Workspace ONE feature ‘Keep Apps On Device’.
To activate it, you need to enable ‘Keep apps while unenrollment’ during the source setup (see chapter 04.2. of the general documentation).
NOTE:
- This feature is only for Windows desktop devices. On all other devices apps will be removed by an enterprise wipe.
- It’s not possible to activate this setting to an existing migration project.
- Please read the VMware documentation as well as the devices need to fulfil certain requirements. You can find them here: Enterprise Wipe > Keep Apps on Device.
02.7. Host for the EBF Onboarder project setup
When entering the host server and getting an Error 500, you are using the Device Services Server.
In this case please use the API Server(typically as<a number>.awmdm.com) as the host.
03. Retiring process monitoring
03.1. Notifications settings
To follow the retiring process of the devices from your source system, enable your source system to send notifications to your Admin Account. In this way you will be informed if there is any issue during the wiping process which is required by the EBF Onboarder.
- Login in your Workspace ONE/AirWatch console.
- Go to ‘Groups & Settings’ >> ‘All Settings’ >> ‘Devices & Users’ >> ‘General’ >> ‘Notifications’.
- Select ‘Override’.
- Select ‘Administrator’, enter the email address and select a message template.
03.2. Wipe Logs
Make sure that there is no problem with the wiping of your devices by checking the Wipe Logs:
- Login in your Workspace ONE/AirWatch console.
- Go to ‘Devices’ >> ‘Lifecycle’ >> ‘Wipe Logs’ and check if the status is ‘Processed’. If not, please contact your VMware support to check why the ‘Enterprise Wipe’ is not performed.
03.3. Device status
Check the status of your devices to make sure that the device wipe command can be executed successfully.
- Login in your Workspace ONE/AirWatch console.
- Go to ‘Devices’ >> ‘List View’ and check the status:
- In the column ‘Last seen’, a number with a green background indicates that the device was recently seen in the system. A red number indicates that the device has not been seen for several days.
- The column ‘General info’ shows whether a device is compliant.
If the device was not seen on your source system since a few days and/or if the device is not compliant with your source system’s policies, the device wipe command may not be possible to execute.
NOTE: It is recommended to contact the users of devices which have not been seen for a while or which are uncompliant before starting any migration. In this way, you can ensure that the status will change to green for ‘Last seen’ and ‘Compliant’.