01. Introduction
There is a general documentation available for the EBF Onboarder, where you can find information about its prerequisites and the whole migration project. It describes how you can setup a migration project, how you can setup invitation emails and reminders which guide your users through the migration. It also tells you how to initiate the migration process and how to track the migration status.
This documentation complements the general EBF Onboarder documentation and provides more detailed information for the target system Workspace ONE about:
- the prerequisites for the target system,
- the target system selection during the migration project setup,
- the device selection during the migration project setup.
02. Prerequisites for the target system Workspace ONE
02.1. User import
During the migration process the EBF Onboarder will associate devices to an existing user account of the target system. Therefore, the users need to exist already.
There are two different ways to add users:
- The easiest way is to import users with LDAP (see chapter 02.1.1).
- If you don’t use LDAP, you have to add your users to the group (GroupId) to which the devices should be added (see chapter 02.1.2).
02.1.1. User import with LDAP
Importing users with LDAP allows you to benefit from an almost silent migration to Workspace ONE – without requiring to use the Intelligent Hub Agent. LDAP needs to be configured for this already.
To do this, pre-import your users from LDAP to Workspace ONE and import them to the GroupId to which the devices should be added.
The EBF Onboarder will then be able to find the users and their userIDs which match with the userIDs in the source system. In this way, the EBF Onboarder can pre-register the devices during the migration process.
We also recommend Mapping User Groups for Enrollment with the EBF Onboarder to ensure that the users are found in the right GroupId:
https://kb.omnissa.com/s/article/50101856?lang=en_US&queryTerm=mapping%20user%20groups%20directory%20service
02.1.2. Local Users
If you can’t or don’t want to use LDAP to pre-import your users to Workspace ONE, you need to add your users to the group (GroupId) where you want the devices to be added. You have to use the same email addresses for the users in Workspace ONE as in the source system.
The EBF Onboarder will then be able to find the users in the GroupId and use their email addresses as their UserId to register their devices (see chapter 02.1.2.1). In some cases, it is required to use the Intelligent Hub Agent (see chapter 02.1.2.2).
02.1.2.1. Migration without custom authentication (default)
By default, the EBF Onboarder will pre-register the devices that you migrate to Workspace ONE by using the user email addresses and the GroupId of the group the user was created in. During the migration, the user will be asked for the password of his target system account. If the EBF Onboarder cannot find the user in the GroupId, the tool will forward the user to the Intelligent Hub Agent to finish the device registration.
02.1.2.2. Migration with custom authentication
In some cases, it is required to use the Intelligent Hub Agent directly (without pre-registration). This is for example the case:
- if the target system is configured with a different username and password than the user email address,
- if Single Sign On (SSO) has been implemented on the target system (the EBF Onboarder does not support SSO for the users’ authentication),
- if the admin wants the user to be able to choose the GroupId at the time of the login and does not want to point them to only one GroupId.
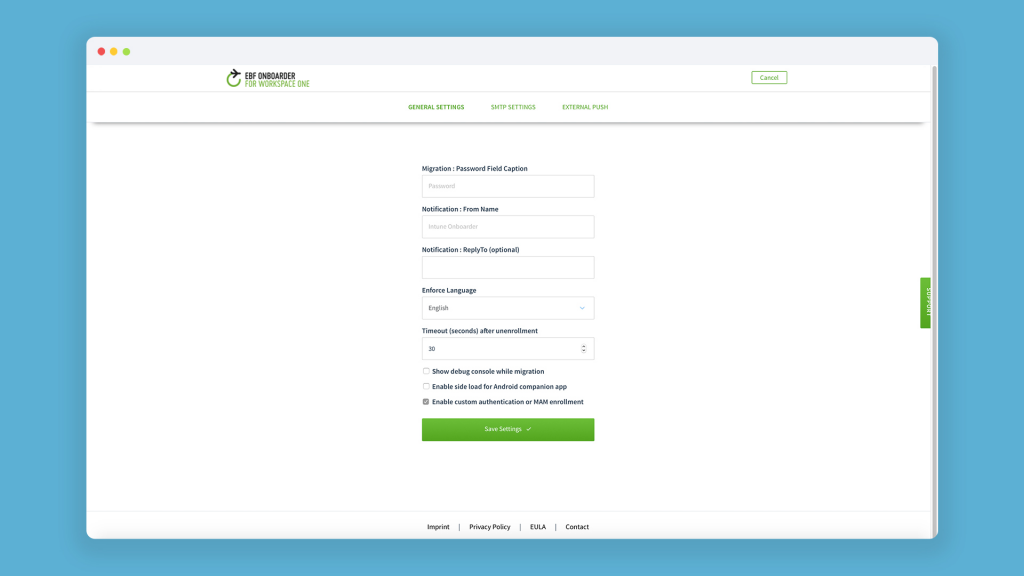
To enable the users to use the Intelligent Hub Agent to finish the migration, you need to change the tenant settings of the EBF Onboarder. Follow these steps in the settings of the EBF Onboarder:
- Go to the EBF Onboarder dashboard.
- Click on ‘Settings’ >> ‘Tenant Settings’.
- Check the box ‘Enable custom authentication or MAM enrollment’.
- Save the settings.
At the end of the migration process the user needs to install the Intelligent Hub Agent, open it and enter certain information to finish the device registration to the right GroupId. For this, the users will be asked to enter the Workspace ONE server name, his credentials and the GroupId.
02.2. API Key
The EBF Onboarder will require an API Key to access the Workspace ONE system (whether or not it is configured with LDAP and whether or not it uses custom authentication).
NOTE: Do not use an existing API Key. Create a new API Key as there is a daily limit of 50,000 connections for each API Key that would be reached especially on shared tenants if you use an old API Key.
Follow these steps to enable API access:
- Login in your Workspace ONE console.
- Go to ‘Groups & Settings’ >> ‘All Settings’ >> ‘System’ >> ‘Advanced’ >> ‘API’ > ‘REST API’.
- Select the tab ‘General’ and select ‘Enabled’ for Enable API Access. In this way, an API key for the top organization group is created automatically.
- Click on ‘Add’.
- Scroll down the table and enter a name for your API Key and select ‘Admin’ in the drop-down list.
- Save the new API Key.
NOTE: Please also read the VMware documentation about generating an API Key and enabling API Access:
It is recommended to create the API Key for the top organizational group with the type ‘Customer’ (not a subgroup) where you will also create a dedicated admin for the EBF Onboarder. To do this follow these steps:
- Login in your Workspace ONE console.
- Go to ‘Groups & Settings’ >> ‘Groups’ >> ‘Organization Groups’ >> ‘Details’.
- Ensure that you are in the desired organization group with the type ‘Customer‘.
NOTE: If you change the structure of your top organization group, please re-create an API Key for the EBF Onboarder right after doing the changes.
02.2.1.Update password and API Key
In case you need to update the password and/or the API key during a running migration, just open any project and click the edit symbol (pen).
Here you will be able to update the password and the API key. Once saved, this new value will be used in ALL projects with the same user / API key or User/password combination. So you do not need to perform these steps in all your migrations.
02.3. Accounts
The EBF Onboarder needs an Admin Account to have access to your target UEM system. Before you create the Admin Account, you first have to create roles for a Service Account (see chapter 02.3.1) which you can then associate to the Admin Account (see chapter 02.3.2).
NOTE: Please consult the Workspace ONE documentation if necessary.
02.3.1. Admin role
NOTE: You can either follow the steps below or import the role settings into Workspace ONE using the EBF Onboarder Role.xml-file available in the zip file which you can download here. The zip file also contains an MS Excel file for a detailed list of required permissions.
- Login in your Workspace ONE/AirWatch console.
- Go to ‘Accounts’ >> ‘Administrators’ >> ‘Roles’.
- Click on ‘Add Role’.
- Enter a name and description which indicates that this role belongs to the EBF Onboarder.
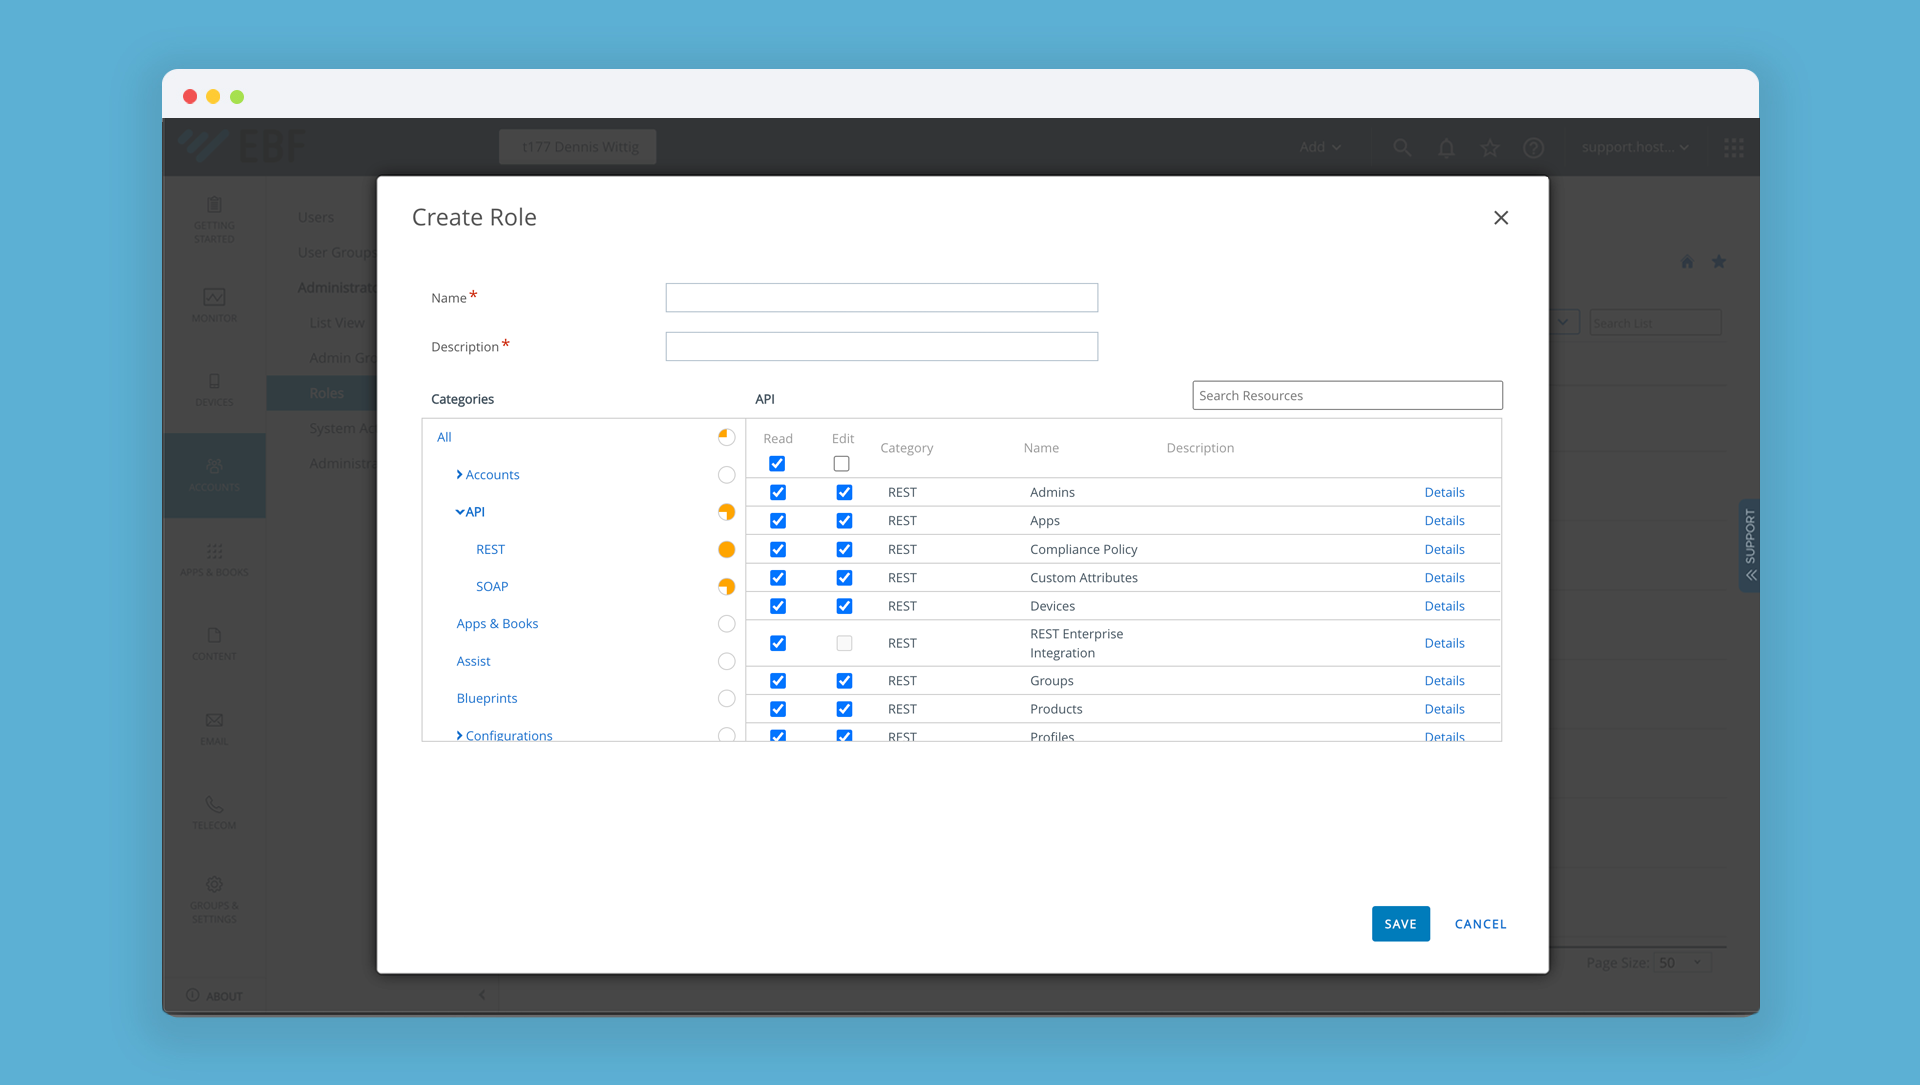
- Select ‘API’ and provide all API REST entries with the ‘edit’ right – except the last SOAP entry (General):
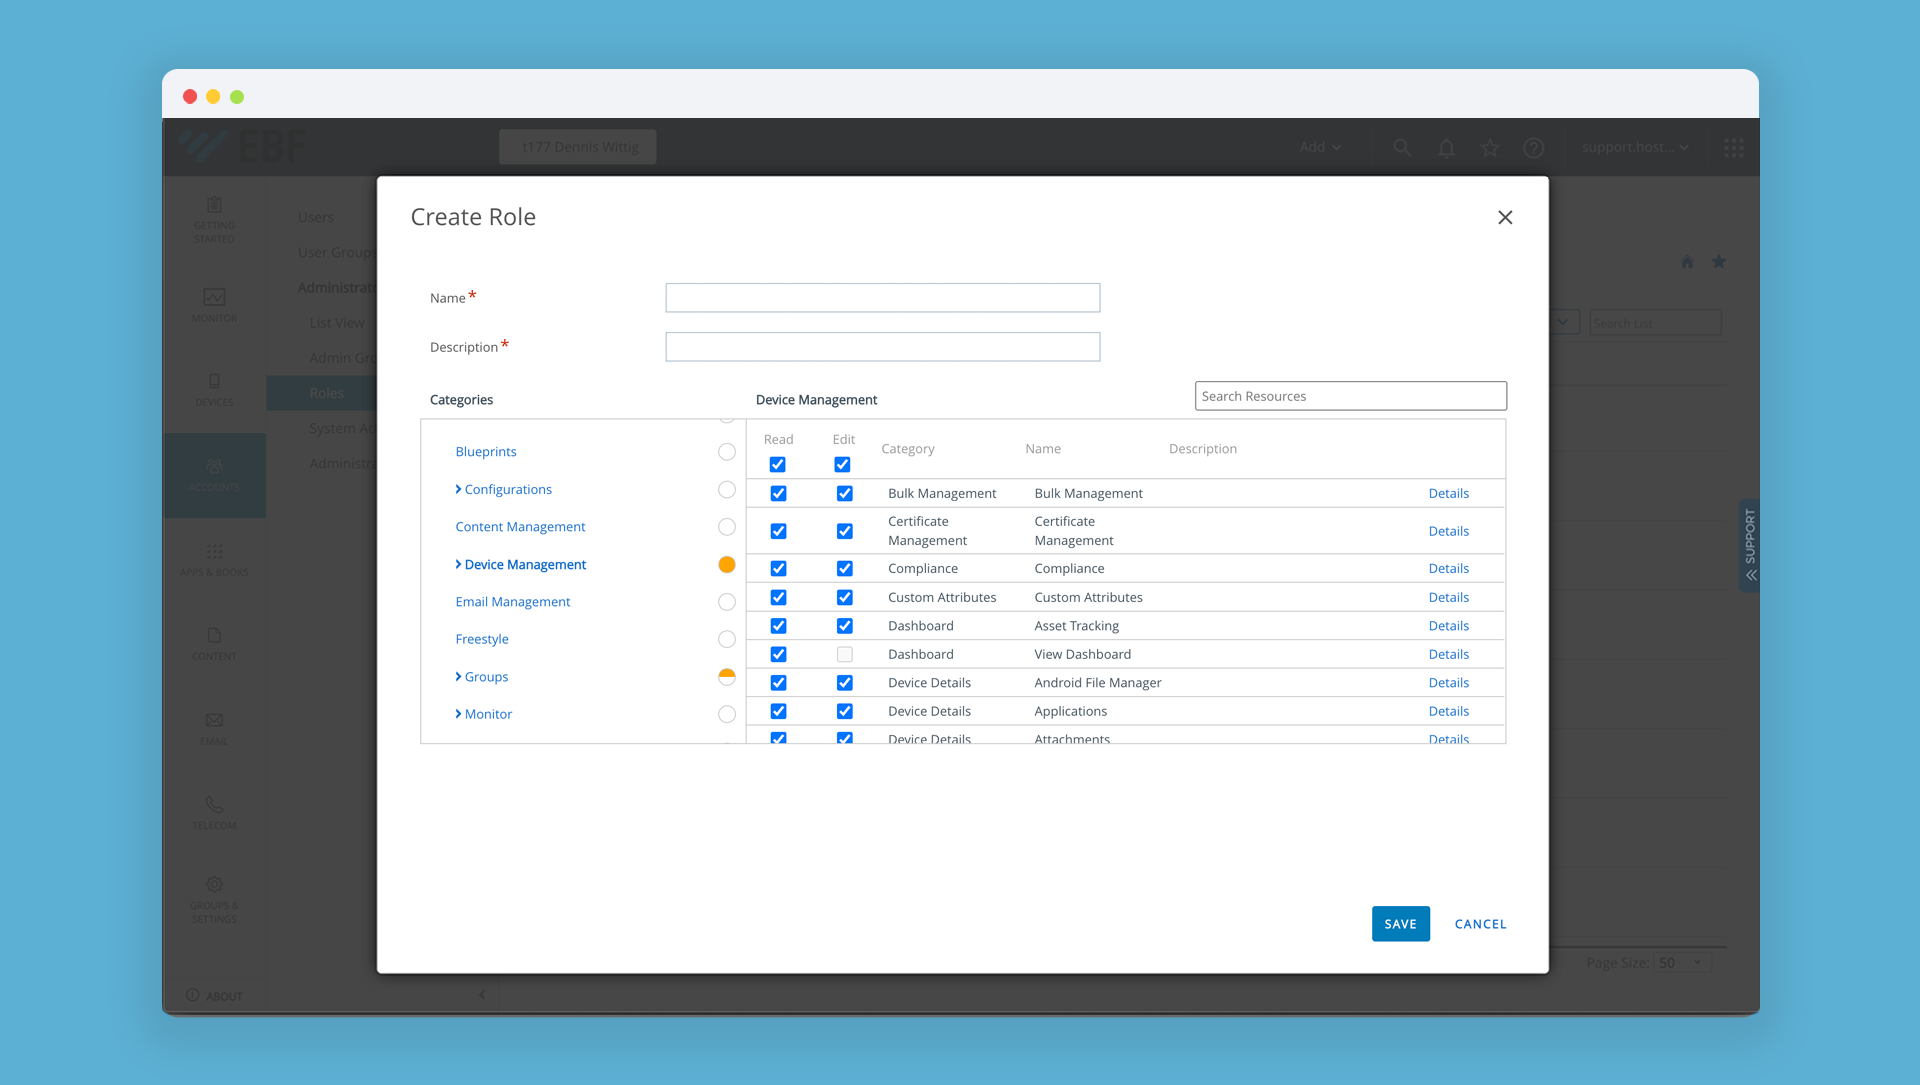
- Add the role ‘Device Management’ and provide it with ‘read’ and ‘edit’ rights:
- Add the role ‘Groups’ and provide it with ‘reading’ right only:

- Save the settings.
02.3.2. Admin Account
Create an Admin Account which the EBF Onboarder can use to access the Workspace ONE system. Assign the EBF Onboarder specific role and the Device Management role which you have created (see chapter 02.3.1) to the Admin Account.
- Login in your Workspace ONE console.
- Go to ‘Accounts’ >> ‘Administrators’ >> ‘List View’.
- Click on ‘Add’ and choose ‘Add Admin’.
- Go to the tab ‘Basic’ and enter the parameters for the new admin account:
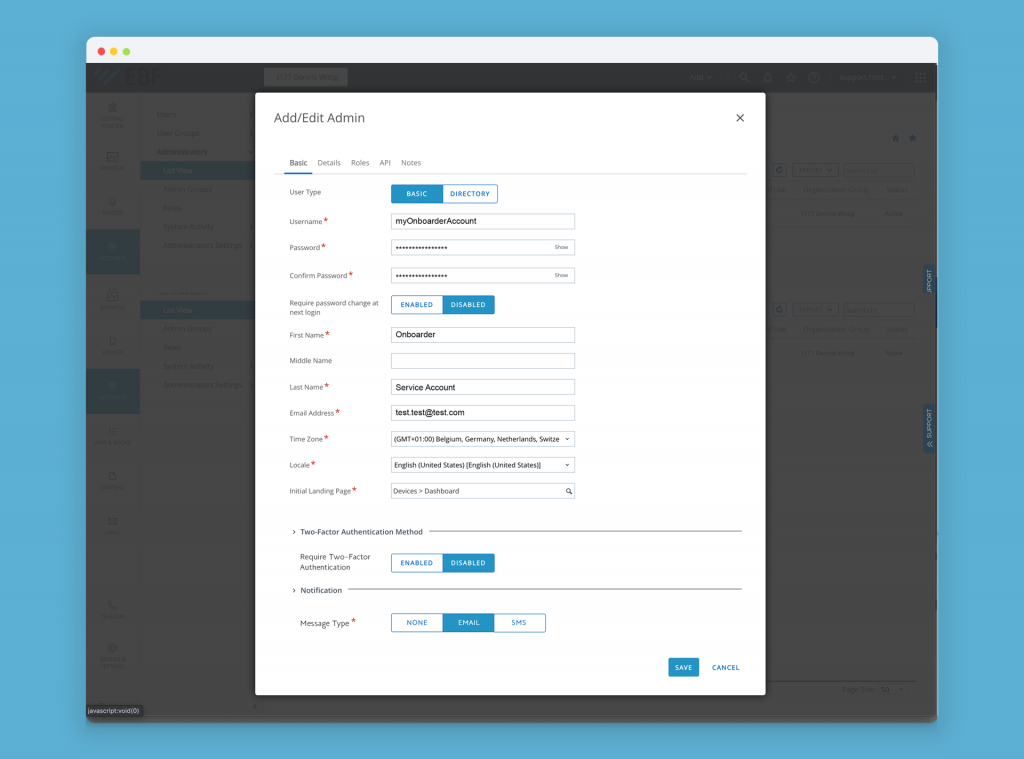
NOTE: Two-Factor Authentication must be disabled as the EBF Onboarder does not support it.
- Go to the tab ‘Roles’ and click on ‘Add role’ to add a role for the organization group ‘Group’ and select the EBF Onboarder specific role (see chapter 02.3.1).
- Click once more on ‘Add role’ to add another role for the Child Group to which devices should be registered. Select the right group and the role ‘Device Manager’.
- Go to the tab ‘API’ to validate that the user credentials will be used by the API to access the console. Select ‘User Credentials’ as authentication method.
- Save the new admin.
02.4. Enabling device enrollment in the right group
The EBF Onboarder needs to have the right access in order to be able to register the devices to the group where enrollment is enabled.
NOTE: The settings of a new Workspace ONE environment usually don’t allow devices to be enrolled in a new group by default or only allow this to happen for the parent level, but not for the Child Group which does not inherited the Enable Enrollment profile from the root.
- Login in your Workspace ONE console.
- Go to ‘Groups & Settings‘ >> ‘All Settings’ >> ‘Devices & Users’ >> ‘General’ >> ‘Enrollment’.
- You will see a list of groups. Select the group child to which the devices should be registered.
- Go to the tab ‘Authenticat’ and select ‘Override’.
- Scroll down, select ‘Open Enrollment’ as a ‘Devices Enrollment Mode’ and disable the parameters for:
- User Enrollment for iOS 13+ and macOS 10.15+ devices
- Require Intelligent Hub Enrollment for iOS
- Require Intelligent Hub Enrollment for macOS
NOTE: Please also read the VMware documentation about allowing enrollment in the group to which the devices should be registered:
- https://kb.omnissa.com/s/article/50101856?lang=en_US&queryTerm=mapping%20user%20groups%20directory%20service
- https://docs.omnissa.com/bundle/SystemSettingsV2406/page/SystemSettingsfortheWorkspaceONEUEMconsole.html
- https://docs.omnissa.com/bundle/SystemSettingsV2406/page/ApplemacOSIntelligentHubSettings.html
02.5. Self-Service Portal
The EBF Onboarder will use the pre-login method for registering the devices in Workspace ONE. For this, it is required that your users have access to the Self-Service Portal.
- Login in your Workspace ONE console.
- Go to ‘Groups & Settings‘ >> ‘All Settings’ >> ‘Devices & Users’ >> ‘General’ >> ‘Enrollment’.
- Select the tab ‘Grouping’ and verify that ‘Full Access’ is selected for ‘Default Role’. And you can also change the ‘Default Device Ownership’ to ‘Corporate-Dedicated’ or ‘Owner’.
NOTE: Please also read the VMware documentation about the Self-Service Portal and the configuration of its default login page:
02.6. Privacy settings for ‘Unassigned Devices’
Edit your Workspace ONE privacy settings so that the target system has full access to ‘Unassigned Devices’ and is able to register the device correctly as some devices may be seen as ‘Unassigned’ by the EBF Onboarder when a previous enrollment was done manually.
- Login in your Workspace ONE console.
- Go to ‘Groups & Settings‘ >> ‘All Settings’ >> ‘Devices & Users’ >> ‘General’ >> ‘Privacy.
- Make sure that the right group is selected. It needs to be the one where the devices should be registered to.
- Select ‘Override’.
- Scroll down to the ‘Commands’ section and select ‘Unassigned’ for ‘Device Wipe’, ‘Clear Device Passcode/Lock Device/Shutdown/Reboot’ and ‘File Manger Access’.
03. Target system selection for the target system Workspace ONE
When you setup a migration project with the EBF Onboarder, you will be asked to define the target system (please read the general documentation to learn more about this).
NOTE: Some UEM environments may have restrictions on incoming connections (IP filters, firewall). Please check with your target system administrator that the needed ports are open and that the EBF Onboarder IP address is whitelisted and read the a general documentation to learn more about this.
You will find the information which you need to enter in the EBF Onboarder portal on the ‘Site URLs’ page in your Workspace ONE console:
- Login in your Workspace ONE console.
- Go to ‘Groups & Settings‘ >> ‘All Settings’ >> ‘Advanced’ >> ‘Site URLs’ and get the data for ‘REST API URL’ and ‘Device Management Host’:

At the EBF Onboarder you need to add the following information for the target system:
- Target: Select ‘VMware Workspace ONE’.
- Host: Enter the ‘REST API URL’ which you have found in the Workspace ONE console without ‘https://’ and ‚/API‘, for example: example-as.awmdm.com.
- Device Management Host: Enter the ‘Device Management Host’ which you have found in the Workspace ONE console without ‘https://’ and ‚/DeviceManagement‘, for example: example-ds.awmdm.com.
- API Key: See chapter 02.2.
- User and password: The credentials for the Admin Account which you have created for the EBF Onboarder (see chapter 02.3.2).
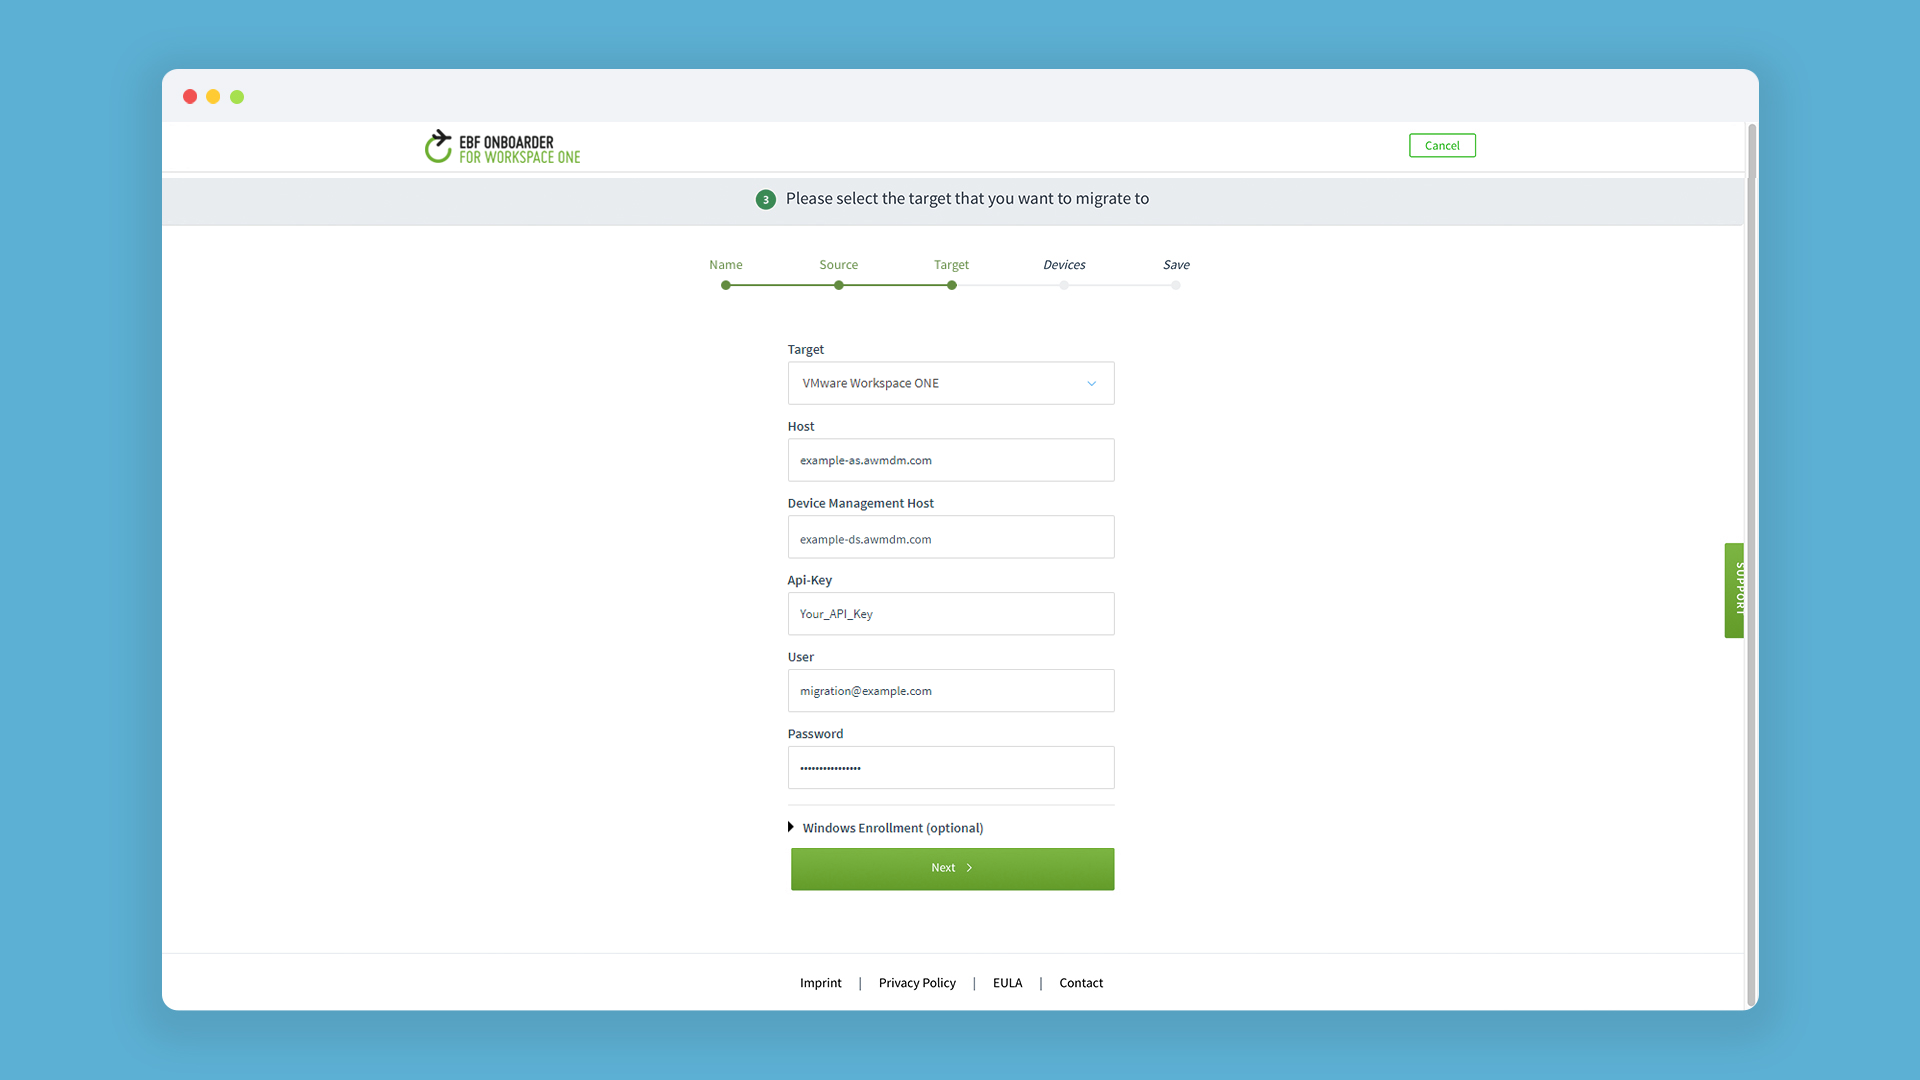
Click on ‘Next’ and continue with chapter 04.
04. Device selection for the target system Workspace ONE
When you setup a migration project with the EBF Onboarder (please read the general documentation to learn more about this), you will be asked to select the devices you want to migrate.
When you select the single devices, you can choose to which Group-ID the devices should be added. You are provided with a drop-down list where all preconfigured Group-IDs are displayed.
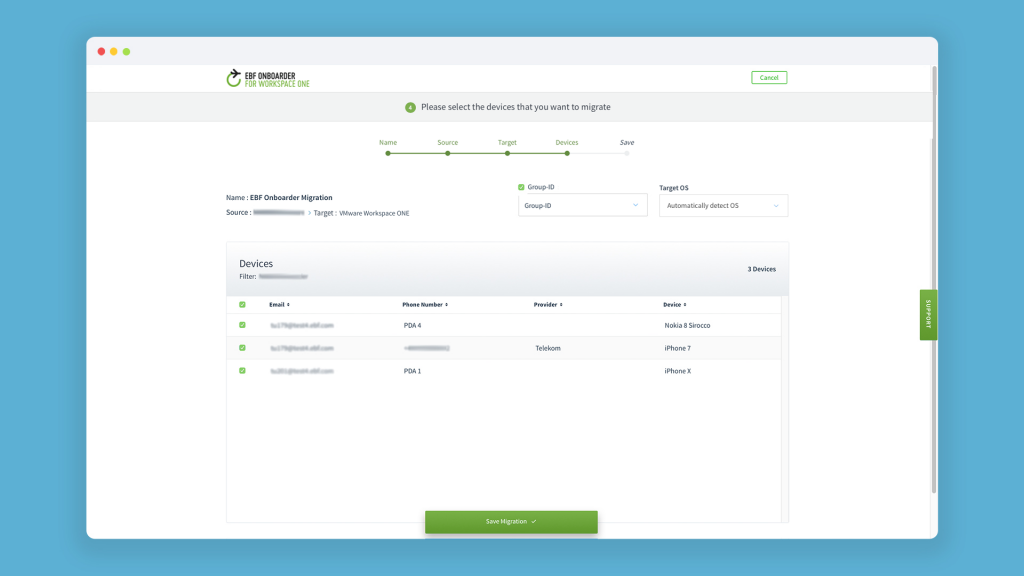
ATTENTION: Make sure that users who need to register their devices are in this Group-ID, so that the EBF Onboarder is able to find them by their email address.
04.1. Selecting the target system for MAM Enrollment
This section describes how to set up your EBF Onboarder tenant to enable Mobile Application Management (MAM) enrollment at your target system Workspace ONE.
It is aimed at admins who are familiar with the EBF Onboarder and the default Mobile Device Management (MDM) migration. It will not discuss how to prepare your Workspace ONE system for MAM enrollments. Preparation of at least one Workspace ONE Organization Group needs to be done before starting the device migration. Please read the Workspace ONE documentation on how to set up MAM enrollments at your target system.
04.1.1. Custom authentication or MAM enrollment
The EBF Onboarder is configured by default to migrate devices from a source system and enroll them as Mobile Device Managed (MDM) at the target system Workspace ONE. If you are planning to have devices being enrolled using Mobile Application Management (MAM) at the target system you need to make changes to the tenant settings of your EBF Onboarder tenant.
ATTENTION: The settings which you make to enable the MAM enrollment will affect all migration projects of your tenant and also the way the devices will be migrated to the target system. So, if you plan to have both MAM and MDM enrollments at your target system, you need to create one tenant for the MDM target and another one for the MAM target.
To prepare your tenant for MAM enrollments you have to log into the EBF Onboarder platform as Super Admin (the admin that set up the tenant).
- Go to the EBF Onboarder dashboard.
- Click on ‘Settings’ >> ‘Tenant Settings’.
- Check the box ‘Enable custom authentication or MAM enrollment’.
- Save the settings.
When you setup the migration project, make sure to select your Group-ID of your target system where you prepared the MAM enrollment. EBF Onboarder uses this information to present the user with the correct Group-ID as part of the migration.

Similar to the standard MDM enrollment users will receive an email to start their device migration. Clicking on the migration link in the email will start the migration process. This will retire the device from the source system. Instead of pushing an MDM profile (iOS only) to the device as the next step, users will be presented with enrollment details (Server URL, User ID, etc.). They will be prompted to download the Workspace ONE Intelligent Hub Agent from the Apple App Store/Google Play Store. After the download of the Workspace ONE Intelligent Hub and the registration with the provided enrollment details the migration is completed.