In this chapter we describe the different platforms The EBF Onboarder supports and types of migrations:
- Apple iOS
- Android Enterprise (13.1)
- Windows Desktop (13.2)
- MacOS (13.3)
13.1. Apple iOS
For Apple APM / DEP please check chapter 04.3.2. Apple ADE (former DEP) device migration
13.1.1 Stolen Device Protection
In iOS 17.3 Apple has introduced the Stolen Device Protection (https://support.apple.com/en-us/HT212510) feature.
If this feature is enabled and the device is not at a familiar location, the MDM enrollment is not possible as the change will be blocked by one hour. The feature needs to be enabled manually by the user on the device. We recommend disabling this feature at least one hour before starting the migration. Currently only the Device Enrollment Program /ABM will not block the MDM installation for one hour.
13.2. Android Enterprise device migration
The EBF Onboarder can migrate Android Enterprise devices. In the process, it is possible to switch to another Android operating model at the same time (Device Admin, BYOD, COPE (WPCOD), COBO, COSU).
The following table shows what is possible, which target system must be selected in step 3 of the migration process (target system selection), what the migration steps look like and if a device wipe is required.
| Android source | Android target | Migration target | Migration steps | Device wipe |
| Device Admin (Legacy) | Device Admin (Legacy) | Your target UEM system | See variant 2 below | No |
| Device Admin (Legacy) | BYOD | Your target UEM system | See variant 2 below
| No |
| Device Admin (Legacy) | COPE/COBO | Managed Enrollment | See variant 1 below
| Yes |
| BYOD | BYOD | Your target UEM system | See variant 3 below | No |
| BYOD | COPE/COBO | Managed Enrollment | See variant 1 below | Yes |
| COPE | COPE/COBO | Managed Enrollment | See variant 1 below | Yes |
| COPE | BYOD | Managed Enrollment | See variant 3 below
| Yes |
| COBO | COBO/COPE | Managed Enrollment | See variant 1 below | Yes |
| COSU | COSU/COBO/COPE | Managed Enrollment | See variant 4 below
| Yes |
Device Admin (Legacy): Personal and corporate-owned devices with device administrator privileges
COSU: Corporate-Owned Single-Use, kiosk devices
COBO: Corporate Owned, Business Only, fully-managed devices
COPE: Corporate Owned, Personally Enabled, devices with work profile
BYOD: Bring Your Own Device, user-owned devices with work profile
13.2.1 Migration steps
Migration steps – Variant 1
- An invitation email with the migration link is sent to the users.
- Users need to press the start button in the invitation email.
- The device is wiped (factory reset).
- The device reboots and the welcome screen is shown.
- A setup type must be chosen (see Setup Methods below).
Migration steps – Variant 2
- An invitation email with the migration link is sent to the users. The link can be sent in different formats:
- {urlGo} (requires access to the mailbox to receive the additional email with the PIN)
- {qr} QR code (requires a second device or a printout to receive the QR code)
- {urlIreg} (Only if Microsoft Intune is the source or target system. Please read the separate documentation to learn more about this. You can find it here.)
- Users need to open the invitation link in the personal profile.
- Users need to enter email address and PIN which is included in the email.
Migration steps – Variant 3
- An invitation email with the migration link is sent to the users. The link can be sent in different formats:
- {urlGo} (requires access to the mailbox to receive the additional email with the PIN)
- QR code (requires a second device or a printout to receive the QR code)
- {urlIreg}
Users need to open these migration links in the personal profile. If the /ireg link or /go link is used, they need to enter the email address and PIN (for urlGo) which is included in a second email.
- The work profile is removed. Users will be forwarded to the Play Store. In some cases they need to manually search the old Management App in the Play Store to be able to delete it, but this should no longer happen.
- Users need to install the MDM app from the new MDM and register.
Migration steps – Variant 4
- A web app with the migration link is provided to the users to the device with the source MDM.
- Users need to activate the migration by marking the device as notified. Currently it is required to perform this for every single device.
- Users need to open the web app and press ‘Start’.
- The device is wiped (factory reset).
- The device reboots and the Welcome screen is shown.
- A setup type must be chosen (see Setup Methods below).
13.2.2 Setup methods
There are different setup methods an admin can choose which are described in the tables below.
| Initiate setup via AFW#Token | |
| Process |
|
| Supported Android devices | Devices with Android Marshmallow 6.0 or higher |
| Supported management groups |
|
| Transfer setup details via QR code | |
| Process |
|
| Supported Android devices | New device or a device reset to factory settings with Android 7.0 or higher with a QR code reader |
| Supported management groups |
|
| Transfer setup details via NFC | |
| Process | Hold a new device or a device reset to factory settings to an NFC tag that contains setup details provided by the MDM provider. The NFC tag can include details such as Wi-Fi Login details, language, time zone and custom disclaimers. |
| Supported Android devices | Devices with Android 6.0 or higher with NFC capabilities, from Android 10 and up no longer available |
| Supported management groups |
|
| Pre-configured devices with contactless enrollment (Zero Touch) | |
| Process | Zero Touch enrollment allows you to pre-configure Android devices purchased from a Zero Touch reseller. Devices pre-registered for Zero Touch enrollment can be shipped to users directly. On first boot, registered Zero Touch devices check for an assigned company configuration and set themselves up automatically. Users can follow the on-screen instructions to complete the setup. Only for Samsung devices running Android 9.0 or 10:
|
| Supported Android devices | Devices with Android 9.0 or higher (initially via selected resellers only), compatible devices with Android 8.0 or higher, Pixel phones with Android 7.0 purchased from a Zero Touch reseller (https://androidenterprisepartners.withgoogle.com/resellers/) |
| Supported management groups |
|
| Pre-configured devices with contactless enrollment (Knox Mobile Enrollment) | |
| Process | The Knox Mobile Enrollment allows you to pre-configure Android devices purchased from a reseller with a KME enrollment. Devices pre-registered for KME enrollment can be shipped to users directly. On first boot, devices enrolled in Knox Mobile Enrollment check for an assigned company configuration and the devices are automatically provisioned. Users can follow the on-screen instructions to complete the setup.
|
| Supported Android devices | Samsung devices with Knox 2.4 or higher for Android enrollment and Knox 2.8 or higher for Android Enterprise enrollment |
| Supported management groups |
|
13.2.3. StageNow Zebra Workflow
The following sections cover the challenges of migrating Zebra devices, give an overview of Zebra StageNow, walk through the migration workflow step by step, and explain how EBF Onboarder orchestrates the process at scale.
13.2.3.1. Understanding the Challenge
When migrating Zebra devices, the main hurdles are:
- The old MDM enrolment profile (Device Owner / DPC) locks down who “owns” the device.
- The new MDM (e.g., switching from SOTI to Intune or from Workspace ONE to AirWatch) requires a factory reset or re-provisioning unless you use Zebra’s staging tools.
- Unlike iOS/ABM or Android Enterprise Zero-Touch, many Zebra deployments were set up via StageNow barcodes — not Zero-Touch Enrollment — and thus need re-staging to switch DPCs.
13.2.3.2. Zebra StageNow Overview
StageNow is Zebra’s OEMConfig-based provisioning tool that allows you to create and scan QR or barcodes that configure Wi-Fi, enroll the device, and apply XML-based settings using MX (Mobility Extensions).
You can create multiple Stage User Profiles (e.g., “Stage for Intune,” “Stage for Workspace ONE,” etc.) that define:
- Wi-Fi and proxy setup
- MDM agent installation and DPC identifier (for Android Enterprise Device Owner)
- App deployments, certificates, or custom intents
- MX commands (e.g., Enterprise Reset, Manage MDM, Persist Manager)
13.2.3.3. Migration Workflow (Step-by-Step)
Here’s a clean, repeatable process for migrating Zebra Android devices from one MDM to another using StageNow.
Step 1. Export current configuration & record details
- Document your current MDM enrollment method (e.g., Android Enterprise Device Owner vs. legacy agent).
- Retrieve Wi-Fi credentials, server URLs, and any custom scripts needed.
- Note if the devices are bound to Zero-Touch Enrollment (ZTE) or not — that determines automation potential.
Step 2. Create profile for the new MDM in StageNow
- Create a new profile of type “Stage Now – Stage User” (if you have multiple staging modes).
- Select MX Version ≥ 10.3 (required for Android 11+).
- Add these key staging modules:
Module Purpose Wi-Fi Connect device to corporate network Manage MDM Use MX command to Unenroll / Deactivate old MDM if still active Enterprise Reset (optional) Wipes user data but preserves Enterprise partition (apps/logs) App Mgr Installs the new MDM agent APK or redirects to Managed Google Play DPC Identifier Intent Mgr Launches the DPC setup intent (e.g. android.app.action.PROVISION_MANAGED_DEVICE) Persist Mgr (optional) Keeps settings across reboots if needed Once completed, StageNow will generate QR codes or an .XML staging file you can deploy via barcode scan, NFC tap, or USB staging.
Step 3. Execute migration on devices.
Depending on fleet size and state:
- Option A — Manual staging
Technician scans the StageNow QR code with Zebra StageNow client (pre-installed on most Zebra Android devices).- Device connects to Wi-Fi.
- MX executes “Unenroll old MDM.”
- If needed, performs Enterprise Reset.
- Installs and triggers the new MDM DPC agent (e.g., com.microsoft.intune, com.airwatch.androidagent, etc.).
- Option B — Remote staging (zero-touch hybrid)
If devices were enrolled via Zero-Touch Enrollment, update the DPC assignment in the ZTE portal to the new MDM. When the device next resets, it auto-provisions under the new MDM without scanning. You can still use StageNow to configure Wi-Fi and set the Stage User Profile that triggers provisioning on first boot.
Step 4 Validate Migration
- Confirm DPC ownership under Settings > Work Profile or Device Owner info.
- Ensure the old MDM agent and policies are removed.
- Check enrollment status and policy sync on the new MDM.
- Optionally push an OEMConfig (Zebra Mobility DNA) policy from the new MDM to ensure continued device-specific control.
13.2.3.4. Best Practices & Notes
- Pre-stage with Wi-Fi only profiles for large fleets so devices connect automatically.
- Use MX version matching your OS (e.g., MX 13+ for Android 14).
- Always include an Enterprise Reset / Unenroll command before installing the new DPC to avoid “MDM conflict.”
- Validate DPC extras— some MDMs (e.g., Intune) require a JSON blob for enrollment parameters (com.google.android.apps.work.clouddpc.EXTRA_PROVISIONING_ACCOUNT_TO_MIGRATE).
- For warehouse deployments, combine with Zebra StageNow Launcher via Enterprise Home Screen to limit user error.
StageNow is Zebra’s OEMConfig-based provisioning tool that allows you to create and scan QR or barcodes that configure Wi-Fi, enroll the device, and apply XML-based settings using MX (Mobility Extensions).
You can create multiple Stage User Profiles (e.g., “Stage for Intune,” “Stage for Workspace ONE,” etc.) that define:
- Wi-Fi and proxy setup
- MDM agent installation and DPC identifier (for Android Enterprise Device Owner)
- App deployments, certificates, or custom intents
- MX commands (e.g., Enterprise Reset, Manage MDM, Persist Manager)
13.2.3.5. Leveraging EBF Onboarder for Zebra Device Migration
EBF Onboarder orchestrates the full migration lifecycle — from project setup and user communication through to monitoring and completion. The following steps describe how to use EBF Onboarder together with Zebra StageNow to migrate devices at scale.
Prerequisites
- Grant EBF Onboarder access to the source MDM and the target MDM/UEM.
- In the source MDM, create device groups that reflect the migration structure (e.g. by POC, country, location, department, or device model). EBF Onboarder reads devices through these groups.
- In the ZTE portal, update the DPC assignment for the devices to point to the new MDM so they enroll correctly after reset.
- Within StageNow, create the relevant staging profile for the migration.
Step 1. Create the migration project in EBF Onboarder
- Create a new project in EBF Onboarder, connecting it to the source MDM and the target MDM.
- Select the devices to migrate based on the groups defined in the source MDM.
- Set up the communication within the project using the Content Tool. Four message types are available:
- Information
- Invitation
- Reminder
- Welcome message
If the users have access to mails, include the QR Code from StageNow in the Invitation so users are able to register the device wiped device with all the features from StageNow.
In case there is no email access, the QR code needs to be provided by a handout or to a IT support colleague to support the users - Configure role- and client-based administration: Assign administrators access only to specified projects, and grant read-only access where full control is not required.
Step 2. Start the migration
The admin can enable the migration manually or use the scheduler. The migration proceeds in two stages:
- Information: EBF Onboarder sends a message to the devices or users informing them about the upcoming migration.
- Migration: The migration is enabled for all or a subset of devices. Reminders can be sent automatically to users who have not yet started.
Step 3 — User executes the migration on the device
- The user receives a migration email from EBF Onboarder and clicks the link contained in it.
- The device is retired or reset.
- The user sets up the device by scanning the QR code provided, which enrolls the device into the new MDM via ZTE.
Step 4 — Monitor the migration
The admin monitors the whole migration progress and status in real time using the EBF Onboarder dashboard. Having a central monitoring point is critical for large-scale Zebra fleet migrations, where devices may be spread across multiple sites, countries, or organizational units.
The dashboard provides:
- Central visibility: all devices, all sites, and all migration stages are visible from a single location — no need to check individual MDM consoles or contact site teams for status updates.
- Real-time status per device: the dashboard shows which devices have completed the migration, which are still pending, and which require follow-up or manual intervention.
- Daily reports: migration progress reports can be generated to give project leads and stakeholders a regular overview of completion rates, outstanding devices, and any issues identified during the rollout.
- Project-level tracking: administrators with read-only access to a project can monitor status without being able to make changes, ensuring that reporting is available to a wider audience without compromising project integrity.
Step 5 — Send the Welcome message
Once the migration is complete, a welcome message can be sent to each user if the device is confirmed as enrolled and compliant. This confirms successful enrollment in the new MDM and can include any relevant information about the new environment.
13.3 Windows Desktop migration
The EBF Onboarder can migrate Windows 10/11 Desktop systems, including those where users have only user access on the device.
There are two cases:
- The common case: The user has only user access to the computer (see chapter 13.2.1).
- The users are part of an administrator group (see chapter 13.2.2).
13.3.1. Windows Desktop migration for standard users
For devices with standard user access to the computer, the EBF Onboarder can help you migrated the devices ain an easy way, because, you do not need to:
- provide manual administrator privileges to users to be able to register their devices in the target system
- remove autopilot devices which would result in resetting the machine
- deal with general devices without local administrators
With the EBF Onboarder you can migrate Windows devices with user accounts from the following sources:
- Active Directory Managed Devices
- MDM Managed Devices without Active Directory profiles
- MDM Managed Devices with Active Directory profiles
- Entra AD Devices with MDM to switch the MDM
- Entra AD Devices (which is intended for switching the Entra AD tenant – when you want to use Intune on the same tenant for your machine, you can register them automatically)
You can set up different target systems for your migration – including:
- Entra AD via deep link
- MDM systems via deep link without A(AD) profiles
- Entra AD with automatic MDM registration (best option, but requires the P2 license in Azure)
- Local Active Directory when the connection to the local AD servers is present (can be combined with an MDM registration (planned feature))
The steps are:
- The administrator uploads the EBF Onboarder installation package (configured Bridge and Service) to the existing software distribution tool (this could be an MDM system like AirWatch or Ivanti EPMM) and installs them on the devices. Every MDM/UEM, that can manage Windows devices and distribute software, is supported!
- After installing our tool, the device remains in the initial situation until the user starts our app to migrate.The user will migrate only when he is ready!
- The admin creates migration projects on the EBF Onboarder, informs the users and enables the migration for the devices.
- The user starts the migration on the device. The device will check for an existing migration on the EBF Onboarder server and only starts when an active migration for this device is found. Having the tool installed does not let you migrate the device. The admin can control what happens on the Windows device and who is able to migrate!
- After the migration is successfully started, the device enters a restricted mode with an admin profile where the user is not able to do anything else than migrating his devices. The process is guided by our tool and the user simply needs to authenticate at the target system.
- Once the device is migrated to the new MDM system, the administrator privileges are removed again.
- You can integrate your own PowerShell scripts for executing before and after the migration. This can be used for backup scripts or removing old management software on the devices.
- Before, during and after the migration , the admin will be able to monitor the process and inform, invite or remind the user in the EBF Onboarder portal.
NOTE: Please contact sales@ebf.com for more details.
13.3.2 Windows Desktop migration for Admin users
If the device users are part of the administrator group, you can either use the normal EBF Onboarder migration or a deep link.
Deep link configuration
When registering a desktop device, users typically need to install the client app of the target MDM system (for example the Intune Comp Portal or the Workspace ONE Intelligent Hub), type in a server name, account name and a password. Windows supports a much easier way to register devices in the target MDM system: deep links.
Deep links forward the user directly to Windows settings and the Work/School Management Registration. The userid and the MDM server can be prefilled so that users just need to enter their password to start the registration.
The EBF Onboarder can handle deep links for Windows desktop migrations. In the following chapters you will learn how to create and use them.
There are two ways to configure a deep link:
Variant 1:
You can do that during the target system selection: Windows Enrollment (optional).

Variant 2:
You can edit the deep link after creating the migration project in the migration project dashboard:
- Go to the EBF Onboarder dashboard and click on ‘Migration Details’ to access the migration project dashboard.
- Click on ‘Windows Enrollment’.
- Edit the value for “ms-device-enrollment:?”.

- The blue info button will bring you to the Microsoft Website with information about the deep link.
- Enter the correct
- Click on ‘Save’.
Deep link creation
The deep link has the following format: ms-device-enrollment:?mode={mode_name}
Example: A deep link for the EBF Onboarder and the target system Microsoft Intune is: mode=mdm&username={userid}&servername=https://enrollment.manage.microsoft.com/enrollmentserver/discovery.svc
- In this link, the parameter ‘userid’ is a EBF Onboarder parameter and is not provided by Microsoft. It adds the userid of the device user to the deep link so that userids are prefilled in the Work/School Registration screen.
- The parameter ‘servername’ is the enrollment link of your target MDM system.
- You can find more details about deep link parameters on the Microsoft website.
Deep link usage
Users basically need to perform the same steps as on other devices to use a deep link:
- They click on the ‘Start’ button in the invitation mail and follow the enrollment steps.
- They click on ‘Connect to new MDM’.
- The Windows Work/School Registration windows shows up and the user enter their password.
- The target MDM system will guide the users to the other required steps.
NOTE: The EBF Onboarder recognizes the operating system of the device. Thus, it is possible to setup migration projects with different operating systems. Each device will get the correct enrollment link. Nevertheless we recommend to create different migration projects for different operating systems to have a better overview of the migrations and to customize the information sent to users to each operating system. Additionally, users should not migrate their desktop and mobile device at the same time.
13.4 MacOS Migration
This documentation complements the general EBF Onboarder documentation and provides more detailed information for migrating devices using the EBF MacOS Onboarder.
ATTENTION:
This documentation does not replace any MDM/UEM or Apple documentation. It is only describing prerequisites, setup configuration and usage for the EBF Onboarder. Please consult the UEM/MDM and Apple documentation and support if necessary.
13.4.1 General Information
EBF has extended the configuration types for device migrations using the EBF Onboarder.
The EBF Onboarder is already able to migrate MacOS devices, if the user has administrator access on the device.
But typically, a user does not have administrator rights on their computers. For a user the registration of a device in a new target MDM/UEM is not possible, because the MacOS requests an administrator password to install the new MDM/UEM profile.
Using the EBF MacOS Onboarder software, you as an administrator can request the users to migrate from one MDM/UEM to another system, without you touching the device.
Please Note:
This software is designed to migrate users without administrator access on the computer. But Users with Admin access already can use the standard EBF Onboarder migration option.
13.4.1.1 Available Migration Types
The EBF MacOS Onboarder software supports the following migrations:
– Migrate MDM Managed Devices from one MDM/UEM to another.
We support all MDMs, that the EBF Onboarder is supporting as well.
13.4.2 Functionality
13.4.2.1 Components of the EBF Onboarder for MacOS
The Onboarder for MacOS includes these components as follows:
- The Onboarder MacOS software
The application must be distributed to designated clients. This can be any MDM/UEM or software management system that is able to manage MacOS devices and install applications.NOTE:
The source MDM must not remove the EBF software from the device after it is retired/removed/unenrolled from the MDM, but the onboarder.mobileconfig profile. - The Onboarder Helper service
This service will be installed by installing the app. This service is used to perform admin operations like allowing the user to install the new MDM/UEM profile. - onboarder.mobileconfig file
A proper configuration is required and needs to be sent to the device as well.
Details about the configuration you will find under: Configuration
13.4.2.2 How the Onboarder for MacOS works
Once the app and the mobileconfig file are installed on the device, the service is installed as well and starts.
At this point, and if the computer restarts, the service will start checking the Onboarder server for a project with the serial number of the device, authenticating to the server and tenant by the given app_token.
If the device is found, but the migration is not activated (Invite not sent), the app will show a red dot, and the “Start migration” is not displayed.

If the invite was sent and the service finds the enabled migration for the device, a green dot is showing and the “Start Migration” button will be available:

If the user starts the migration, the EBF Onboarder will retire/unenroll the device from the source system and forward you to the target MDM/UEM to download the MDM configuration profile.


If the profile was downloaded, the user will be able to install the MDM profile.
After the MDM profile was installed, the Onboarder service removes the access from the user again and removes itself from the computer.

The target MDM will continue to configure the desktop. The Onboarder software will remove itself from the computer.
The migration is complete.
13.4.3 Typical procedure of a device migration
- Identify the devices to migrate, add them to groups.
- Create a project in the EBF Onboarder, add the devices using a group and setup the Information, Invitation and Welcome messages.
- Create the onboarder.mobileconfig file:
- Create the Apptoken in the EBF Onboarder Tenant Settings
- Add the Onboarder Server url
- Setup/disable the helper page
- Send the app and the onboarder.mobileconfig file to the computers. Wait for the deployment.
- Sent the Invitations to the users.
- User click the Start Migration button or start the app manually.
- Users migrate to the new MDM/UEM
For migrations to Microsoft Intune, the Onboarder app will download, install and open the Company Portal app automatically for the user to login to be able to load and install the MDM profile. - EBF Onboarder app removes itself from the computers.
- EBF Onboarder shows the status of the migration.
13.4.4 Configuration
13.4.4.1 Definition of the configuration
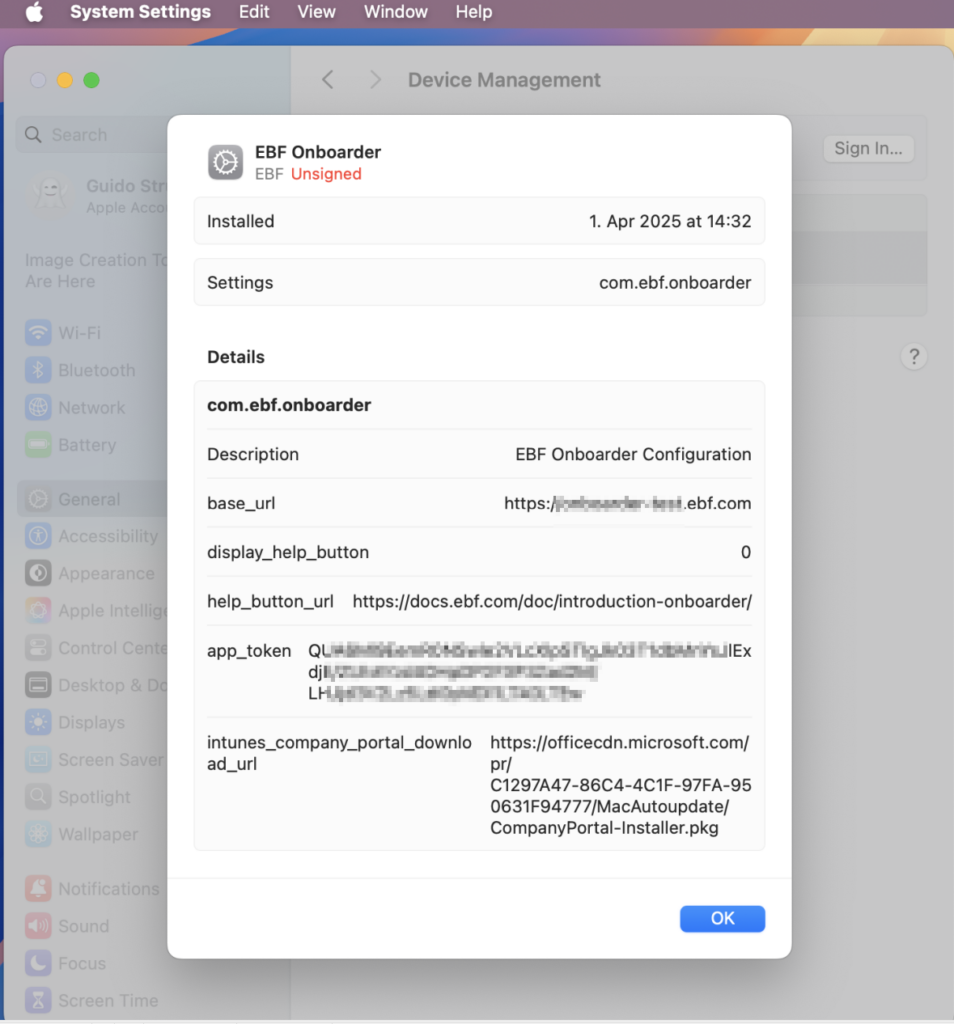
The configuration is stored in the onboarder.mobileconfig file.
The onboarder.mobileconfig file needs to pushed to the device and installed via MDM like the app, before the migration.
The following parameters needs to be modified. All other lines and parameters must not be edited.
| Key | Values |
| base_url | Mandatory: This is typically the onboarder base URLExample: https://onboarder-test.ebf.com/ |
| app_token | Mandatory: The Onboarder apptoken to authenticate the access to your tenant. Check below to see how to create the apptoken. |
| display_help_button | true: shows the help button false: do not show the help button |
| help_button_url | URL that opens, when the help button is pressed. Default: EBF Onboarder documentation: https://docs.ebf.com/doc/introduction-onboarder/ |
| intunes_company_portal_download_url | URL to download the company portal app. Default: https://officecdn.microsoft.com/pr/C1297A47-86C4-4C1F-97FA-950631F94777/MacAutoupdate/CompanyPortal-Installer.pkg |
If the onboarder.mobileconfig file was successfully pushed to the computer, you can check the content easily by opening:
System Settings -> General -> Device Management EBF Onboarder:
Please note:
The onboarder.mobileconfig (EBF Onboarder) profile needs to be removed from the computer when the source MDM profile is removed.
Click here to download a script to remove the profile, that needs to be sent and executed by the target MDM.
Example of the onboarder.mobileconfig file:
<?xml version="1.0" encoding="UTF-8"?>
<!DOCTYPE plist PUBLIC "-//Apple//DTD PLIST 1.0//EN" "http://www.apple.com/DTDs/PropertyList-1.0.dtd">
<plist version="1.0">
<dict>
  <key>PayloadContent</key>
  <array>
    <dict>
      <key>PayloadDisplayName</key>
      <string>EBF Onboarder Configuration</string>
      <key>PayloadIdentifier</key>
      <string>com.ebf.onboarder.EBF0EBF1-05D7-4B4B-8A76-EBF01B0A2DE2</string>
      <key>PayloadType</key>
      <string>com.ebf.onboarder</string>
      <key>PayloadUUID</key>
      <string>EBF0EBF1-05D7-4B4B-8A76-EBF01B0A2DE2</string>
      <key>PayloadVersion</key>
      <integer>1</integer>
      <key>app_token</key>
      <string><<<Apptoken created in your tenant>>></string>
      <key>base_url</key>
      <string>https://<<<Onboarder-server-url>>></string>
      <key>display_help_button</key>
      <true/>
      <key>help_button_url</key>
      <string>https://docs.ebf.com/doc/introduction-onboarder/</string>
      <key>intunes_company_portal_download_url</key>
      <string>https://officecdn.microsoft.com/pr/C1297A47-86C4-4C1F-97FA-950631F94777/MacAutoupdate/CompanyPortal-Installer.pkg</string>
    </dict>
  </array>
  <key>PayloadDisplayName</key>
  <string>EBF Onboarder</string>
  <key>PayloadIdentifier</key>
  <string>CM-EBF01B0A2DE2.EBF0EBF1-E074-4380-A8C7-EBF01B0A2DE2</string>
  <key>PayloadOrganization</key>
  <string>EBF</string>
  <key>PayloadScope</key>
  <string>System</string>
  <key>PayloadType</key>
  <string>Configuration</string>
  <key>PayloadUUID</key>
  <string>EBF0EBF1-E074-4380-A8C7-EBF01B0A2DE2</string>
  <key>PayloadVersion</key>
  <integer>1</integer>
  <key>TargetDeviceType</key>
  <integer>0</integer>
</dict>
</plist>
13.4.4.2 How to Generate the apptoken
- In the EBF Onboarder please go to Settings –> Tenant Settings:
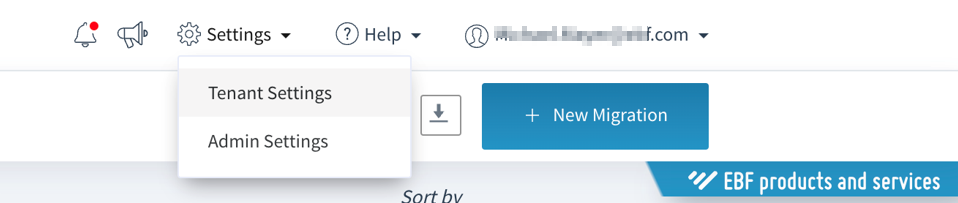
- Select “Apps” and click “generate Token” for the AppToken
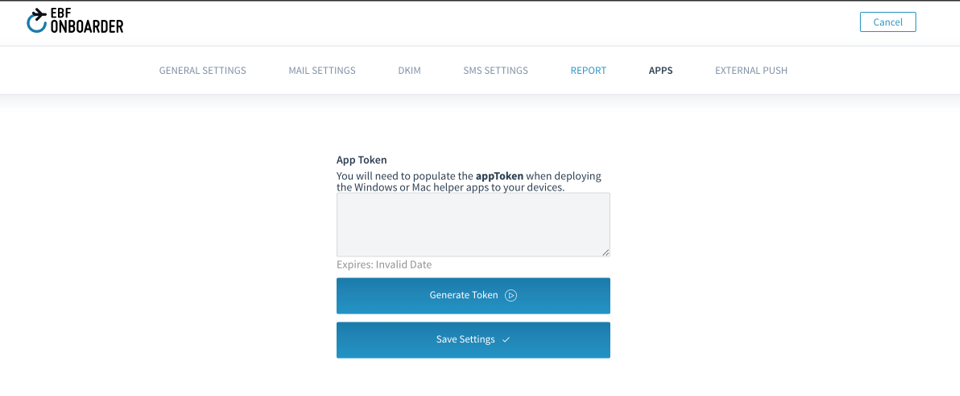
- After creating the Apptoken you can add it to the configuration file.
13.4.4.3 Start the migration
There are two ways for a user to start the migration:
Click the link in a mail or start the app.
Link in the mail.
Your user can use a button in the invitation mail to start the app and the migration.
To be able to start the Onboarder migration app with the Start Migration button, you need to edit the URL for the button.
To edit the URL:
- Open the project, open ‘Communication’ > Invitation.
- Click on the ‘View HTML Button’
- Search for {shortUrl} or {link}.
- Replace them with onboarder://
Example:

Note:
Some mail applications like MS Outlook (and the webversion) do not allow custom links. In this case users need to open the Onboarder app manually or use other tools, depending on the source system.
13.4.4.4. Enable Fast fetching (mandatory)
The EBF Onboarder system needs to be updated in time about the status of the migration on the device. To enable this feature, please open the Tenant Settings
![]()
13.4.5 Software
Please contact our support team at support@ebf.com to receive the software package.
13.4.6 FAQ/Common Issues
13.4.6.1 Backup
The EBF Onboarder for MacOS cannot handle or create backups.
If any data is stored in an app removed by the source MDM (like on a cloud system), manual steps are required by the user (or IT) to save the data before the migration.
13.4.6.2 Microsoft Intune web enrollment
Microsoft Intune does not support Web Enrollment for MacOS computers.
13.4.6.3 Network
Device needs to stay connected to network all the time
13.4.6.4 Testing / Serial Number
If you are testing with the same device(what is typically the case), please make sure to have a device(serial number) only in one project. Means, you should delete an old project with your device. Otherwise, the Onboarder app might find the wrong project.