01. Introduction
There is a general documentation available for the EBF Onboarder, where you can find information about its prerequisites and the whole migration project. It describes how you can setup a migration project, how you can setup invitation emails and reminders which guide your users through the migration. It also tells you how to initiate the migration process and how to track the migration status.
This documentation complements the general EBF Onboarder documentation and provides more detailed information for the target system Microsoft Intune about:
- the prerequisites for the target system,
- the target system selection and setup during the migration project setup,
- the device selection during the migration project setup,
- the monitoring of the migration project.
| The EBF Onboarder supports the following endpoints (National Clouds) offered by Microsoft: | |
| Global Service & GCC [DEFAULT]: Select this option if you use the standard Microsoft Azure/Intune system with Azure AD endpoints: | US Government L4 (GCC High): Select this option if you use the Microsoft 365 L4 GCC High environment with the following Azure endpoints to connect to your system: |
| China operated by 21Vianet: Select this option if you use the Microsoft Cloud for China operated by 21Vianet environment with the following Azure endpoints to connect to your system: | US Government L5 (DoD): Select this option if you use the Microsoft 365 L5 DoD (DoD=Department of Defense) environment with the following Azure endpoints to connect to your system: |
| German Cloud [DEPRECATED]: The German Cloud reachable at https://portal.microsoftazure.de is out service. | |
02. Prerequisites for the target system Microsoft Intune
NOTE:
We informed you already in our FAQ not to add more than 1000 devices into one project. We also ask you not to start the migration of more than 4000 devices a day because of Microsoft Azure Graph API limitations. Delays while adding a user to a group might occur.
NOTE:
Please check chapter 4.3.2. to get more details about Apple ADE/DEP and User Enrollment in an UEM/MDMs, chapter 13.2 for more details about Android Devices.
02.1. Microsoft Intune Service Account
We support a Microsoft Azure app that allows the EBF Onboarder to access your target system.
With your own app you have full control of the app and the client permissions (see chapter 02.1.1). The setup is the same for each endpoint/region.
Note:
- Multi Factor Authentication can be used by your users.
- The EBF Onboarder is able to migrate devices if you use Multi Factor Authentication and the Microsoft Company Portal will accept the user credentials with MFA (security reinforced) during registration.
02.1.1. Configuring your own app
Before creating a project you need to create an Azure App fitting your needs. Your own app enables you to reduce the applied roles and provides you full control over the app and client permissions. If there are any changes that need to be made to this access, you are much more flexible.
While creating the app in Microsoft Azure, you will get the Directory (tenant) ID, the Application (client) ID and the value of the client secret. You will need these three values to configure your EBF Onboarder projects.
First you need to clarify (relevant for step 2):
Which device ownership should the devices have in Microsoft Intune?
- Corporate only
- Personal only
- Corporate and personal devices
Follow these steps to create the app in Microsoft Azure:
01. Create your own app for the EBF Onboarder:
- Login into the Azure Portal (Default: https://portal.azure.com/).
- Within ‘Home’ and ‘Azure services’ click on ‘App registrations’.
- Register a new app by clicking on ‘New registration’.
- Enter a user-facing display name.
- For ‚Supported account types‘ select ‚Accounts in this organizational directory only (Single tenant)’ and click on ‘Register’:

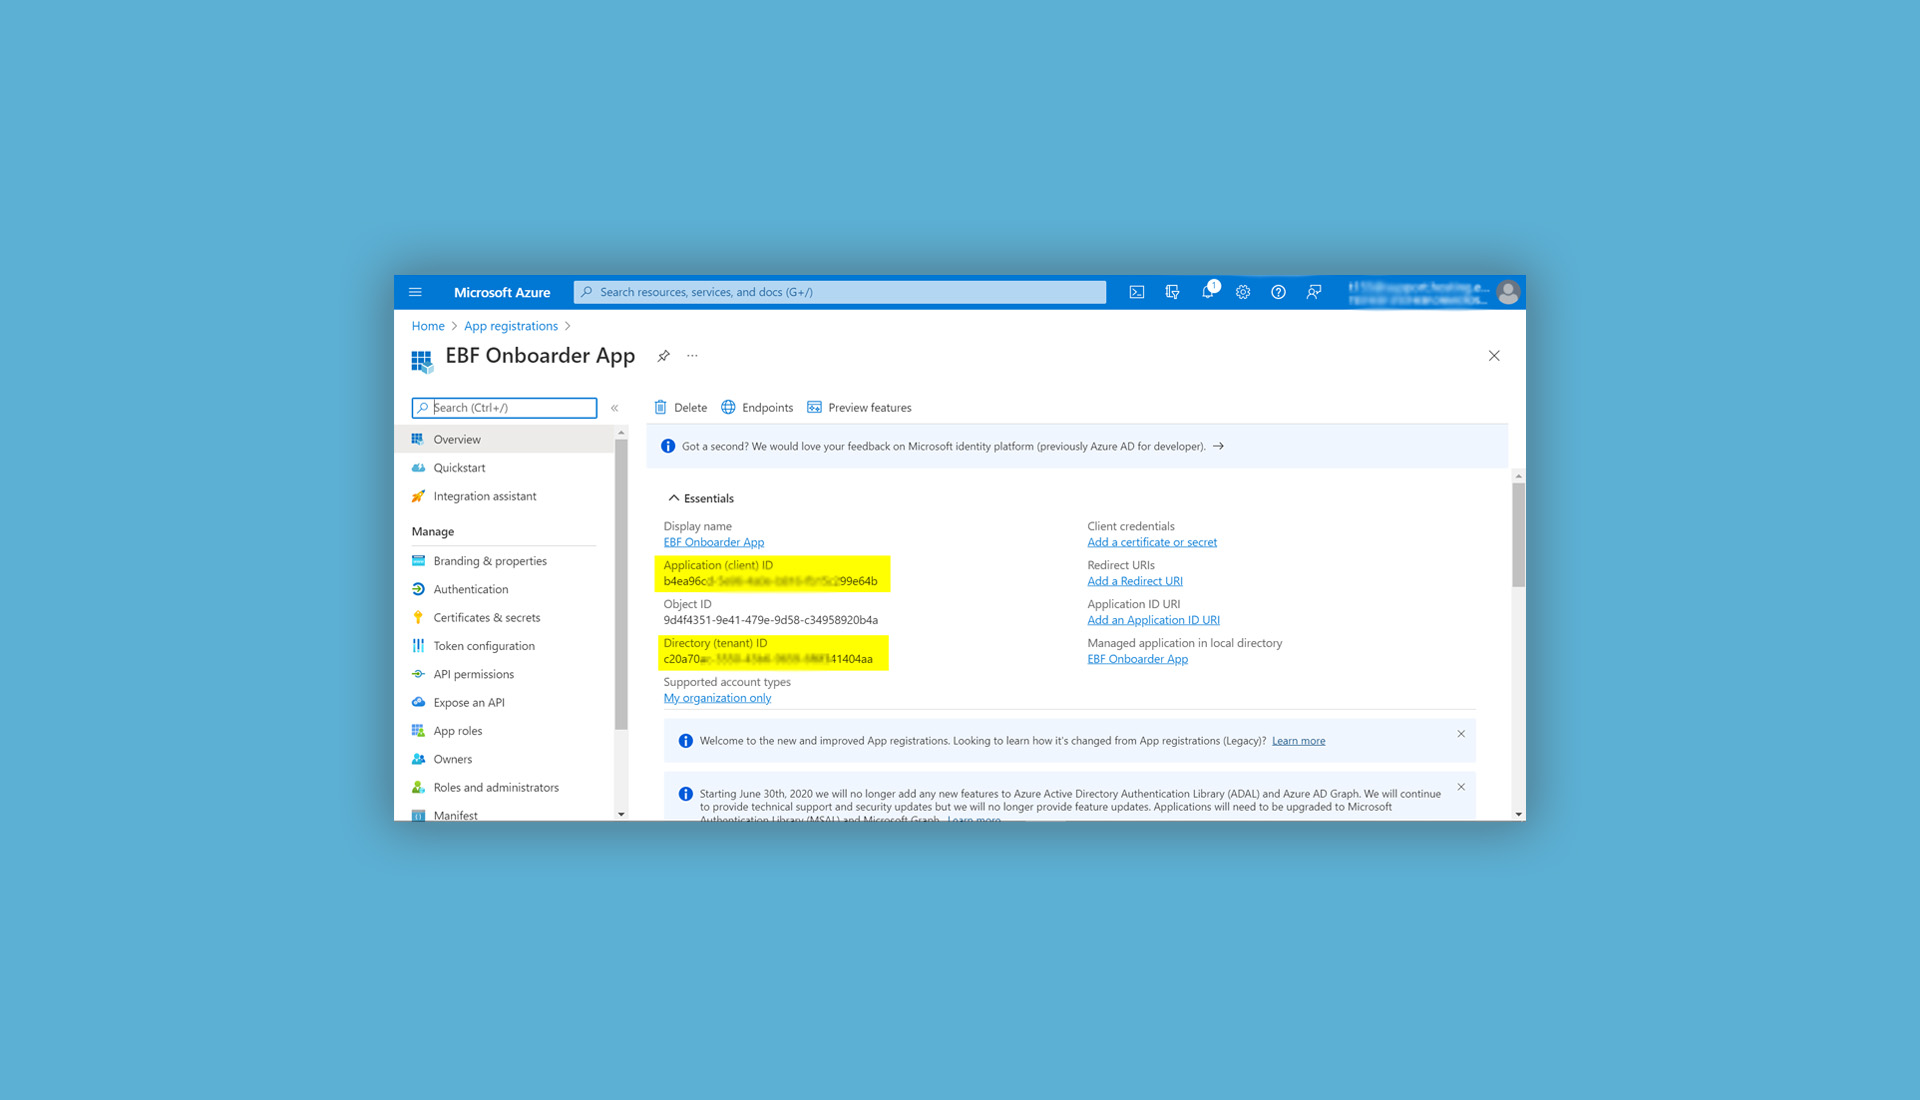
- You will find your Application (client) ID and Directory (tenant) ID on the next page. You can copy them now and also look up these information at any time within the app in your Microsoft Azure tenant.
02. Go to ‘API permissions’ on the left side on the same screen:
- delete the existing permission ‚User.Read’ and confirm (press the three dots, click on ‘Remove permission’ and confirm with ‘Yes, remove’)
- click on ‘+ Add a permission‘ and select ‚Microsoft Graph’,
- select ‘Application permissions’,
- add the following permissions for the Service Account (follow the information which correspond to your device type) and press the button ‘Add permissions’:
Please add the following permissions for corporate devices only:- User.Read.All
- Directory.Read.All
- Device.Read.All
- DeviceManagementManagedDevices.Read.All
- DeviceManagementConfiguration.ReadWrite.All
- DeviceManagementServiceConfig.ReadWrite.All
- Group.ReadWrite.All (only necessary if you want to add migrated users to a group)
Please add the following permissions for personal devices only:
- User.Read.All
- Directory.Read.All
- Device.Read.All
- DeviceManagementManagedDevices.Read.All
- DeviceManagementConfiguration.ReadWrite.All
- Group.ReadWrite.All (only necessary if you want to add migrated users to a group)
Please add the following permissions for a mix of corporate and personal devices
- Configure the app registration for personal devices.
For devices with corporate ownership in Microsoft Intune you need to import the Serial Numbers or IMEIs into Microsoft Intune BEFORE the devices migrate. See ‘Microsoft Intune > Home > Devices >Device Onboarding > Enrollment’ for more details. - Or: Setup groups on the source system which contain either the corporate or the personal devices only. Setup the app registrations for each type (see above) and use them in these projects only.
NOTE: In case there are issues with the read-only permissions, we recommend using ReadWrite permissions:
- User.ReadWrite.All
- Directory.ReadWrite.All
- Device.ReadWrite.All
- DeviceManagementConfiguration.ReadWrite.All
- DeviceManagementManagedDevices.ReadWrite.All
- Group.ReadWrite.All
Minimum permissions set:
There might be cases where security teams do not allow these permissions. But we need the permissions above to fulfill all the features available by the EBF Onboarder.The absolute minimum set of permissions are:
- User.Read.All
- Device.Read.All
- Group.Read.All
- DeviceManagementManagedDevices.Read.All
These permissions allow you to find devices in the target system only. Add users to a group or add devices as corporate devices to Intune will not be possible.
- For all cases: ‚Grant admin consent for (your domain)’.
03. Go to ‘Certificates & secrets’ and set up a new client secret:
- Press ‘+ New client secret’, provide a meaningful description and select a value for ‘Expires’. It would be possible to choose the planned migration date, but it is recommended to add some months to be prepared for a possible delay.
- Press ‘Add Copy the Value’ and save it at a save place as it will never be displayed again!

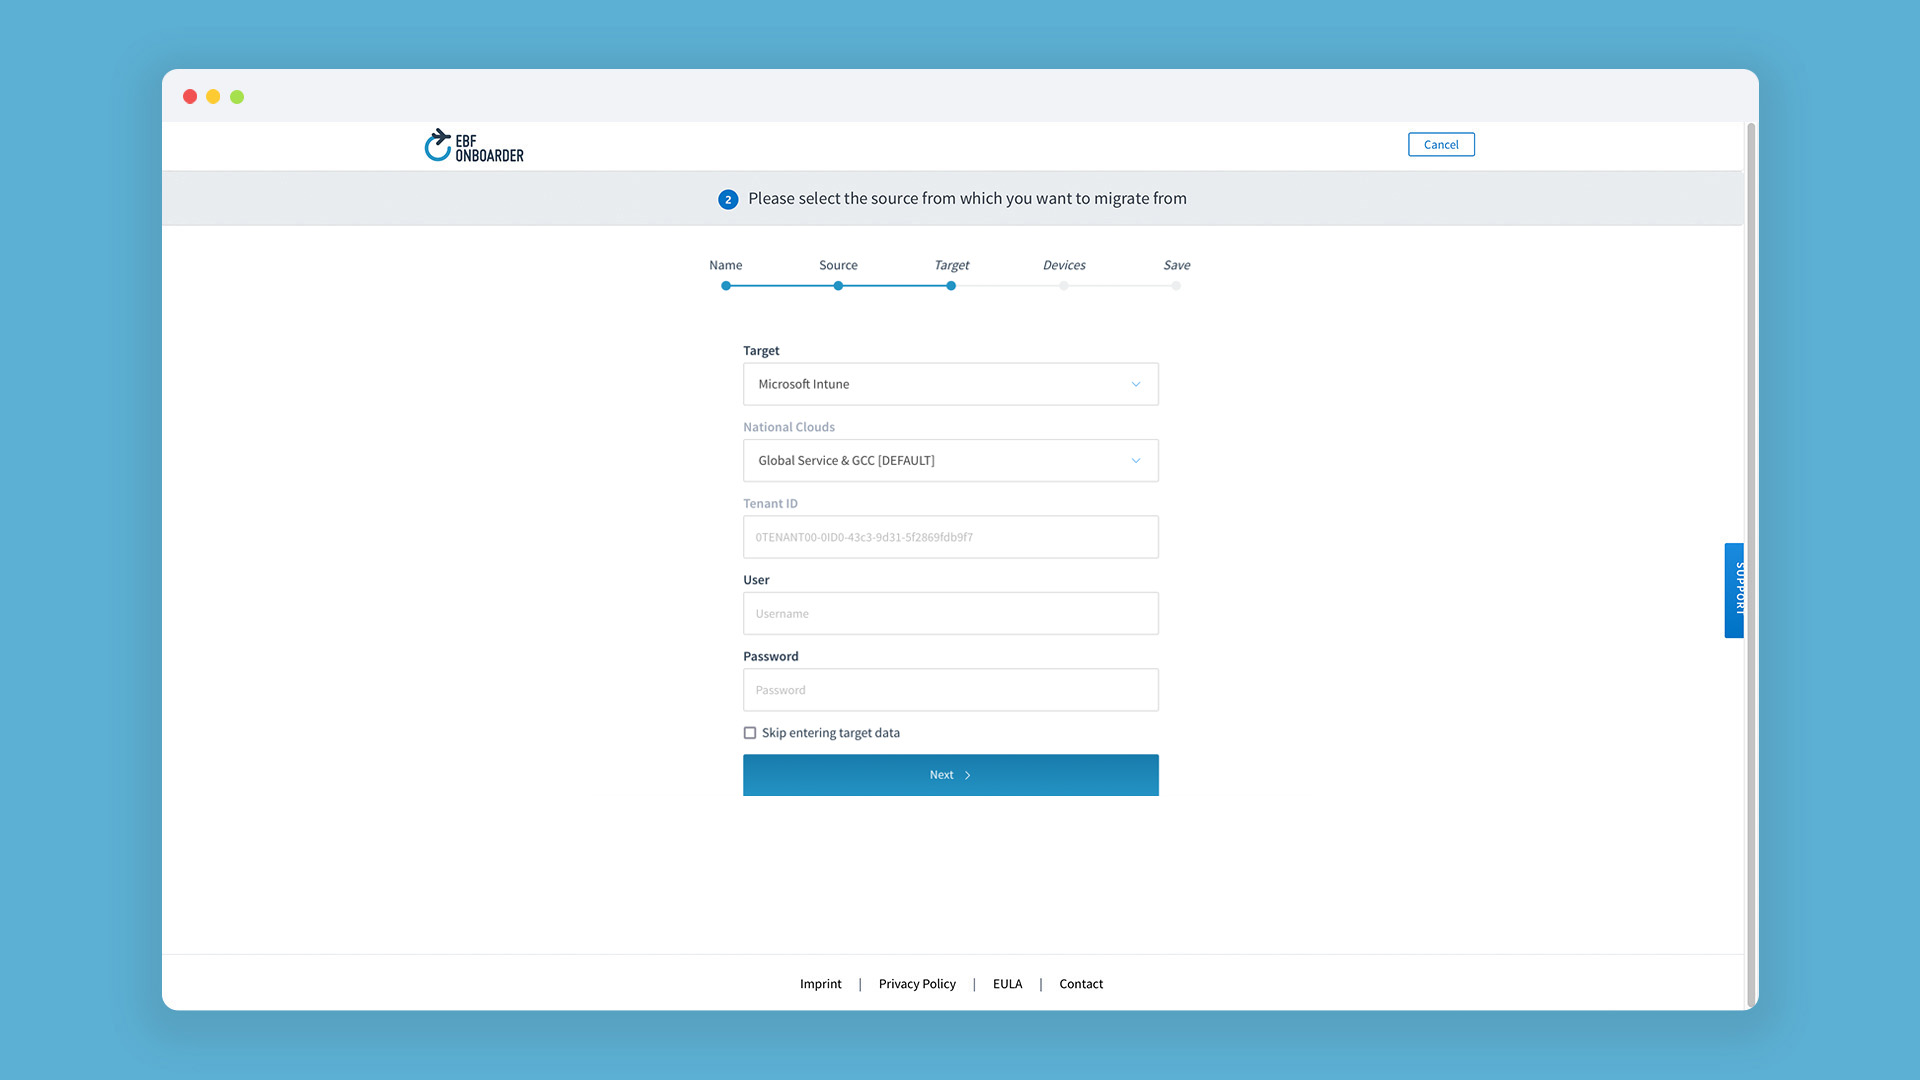
04. While configuring the migration project with the EBF Onboarder
you will be asked to define the target system, the National Cloud type and to insert your tenant ID. After entering the tenant ID, the form will switch to ask you for the client_id (Application (client) ID) and client_secret (Value of the Secret) which you have received after creating your own app in the Azure Portal:
No Permission:
If you do want to use no permission at all, you can use the options “Skip Entering Data” in the Intune target setup. In this case, the EBF Onboarder will only send an unenroll command to the device (according to the source setup). The EBF Onboarder will not be able to confirm devices in the target.
02.1.2. Using the EBF Onboarder shared app (not supported)
We are no longer supporting the shared app. Please use a client app (2.1.1).
02.1.3. Push Message
Intune allows sending messages to the devices. The message is displayed in the Company Portal app only. The user will be able to read the message in the app in tab Notifications, but the content cannot be copied into the clipboard and an URL will not work.
To be able to use this function, you need to apply this permission to your Azure app:
DeviceManagementManagedDevices.PrivilegedOperations.All
Afterwards, enable push in the Communication tool in your Onboarder project.
02.2. Best practice: If the target system requires a client app
The target system Microsoft Intune requires in most cases the Company Portal app to be installed to register a device. For web-enrollment instead, please check chapter 7.0. Best practice is to push this app to the device with the help of the source MDM. You need to make sure that this app is not removed from the device during unenrollment from the source MDM, so that it can be used to register the device during the migration.
This applies to any other app which will be used on the target system.
03. Target system selection for the target system Microsoft Intune
When you setup a migration project with the EBF Onboarder, you will be asked to define the target system (please read the general documentation to learn more about this).
Select Microsoft Intune as target system, select your National Cloud and enter your tenant ID (Directory (tenant) ID)., client_id (Application (client) ID) and client_secret (Value of the Secret). Please make sure that you have followed all instructions of chapter 02.1.1
Note:
Some UEM environments may have restrictions on incoming connections (IP filters, firewall). Please check with your target system administrator that the needed ports are open and that the EBF Onboarder IP address is whitelisted and read the general documentation to learn more about this.
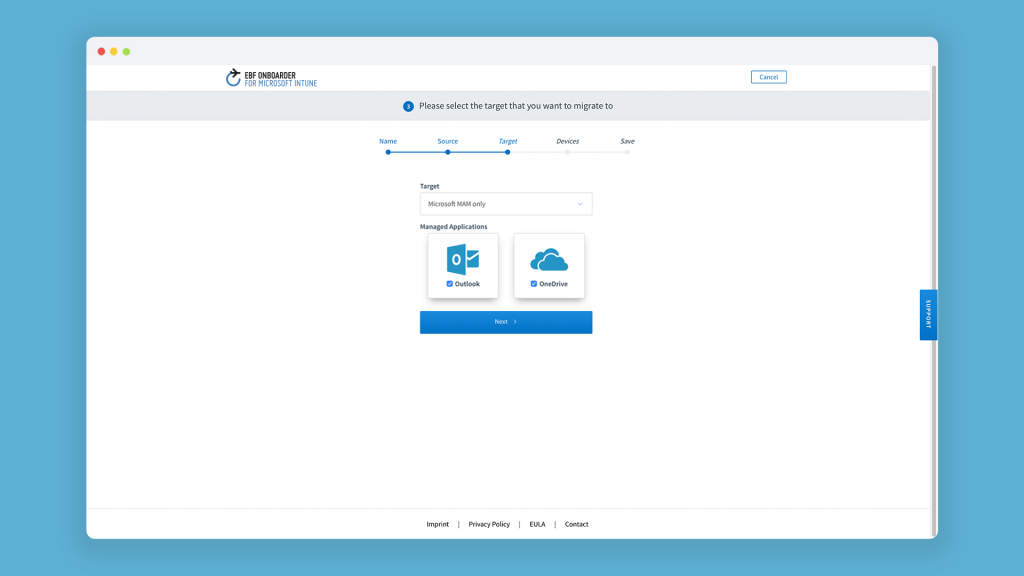
03.1. Selecting MAM as a target
You can also select ‘Microsoft MAM only’ as a target. In this case it is not an UEM migration, but a migration of Managed Applications such as MS Outlook or OneDrive for O365 customers:
04. Device selection for the target system Microsoft Intune
When you setup a migration project with the EBF Onboarder (please read the general documentation to learn more about this), you will be asked to select the users you want to migrate.
Note:
For Microsoft Intune (https://endpoint.microsoft.com/), the default setting is to add “users” to a group with membership type “assigned” in Azure Active Directory (AAD), not “devices“. The user accounts must exist in AAD before migration, as the EBF Onboarder doesn’t create user accounts.
04.1. Add user to group during migration
If you want to add a group to the users during the migration you can select the group on the same screen where you select the devices.
In the top above the device list at ‘Add to Group’ you can choose, which group the users should be added to during the migration by enabling the function and select the group from the drop down:

Note:
When you type in several letters, a list of groups starting with these letters will be displayed. This will allow you to get access to the list you are looking for faster, instead of waiting for the full list of groups to be loaded.You cannot edit the group in an existing project. If you need to apply users to another group, you need to create a new project.
05. Migration monitoring for the target system Microsoft Intune
Administrators can follow the status of a migration project easily. Depending on the project progress, they can take actions to drive the migration forward.
Note: Please read the general documentation to learn more about this and read chapter Error! Reference source not found. and Error! Reference source not found. of this documentation to find out which additional information are provided for the target system Microsoft Intune.
05.1. Graphic and mouse-over information
The bar, as described in chapter 10.2 of the general documentation illustrates the migration status.
When you hover your mouse over the icons, you will see more information about the date/time of the task for the corresponding device.
| Color | Status | Invitation sent | Invitation received | Retiring Succeeded | App Store Redirection Succeeded | Pop-up |
| Green | Interrupted: The migration was interrupted after retiring the device and was not restarted with the EBF Onboarder, but the device was registered manually in Microsoft Intune. The software will detect the presence and compliance of the device in Microsoft Intune and will change the status to ‘Confirmed Enrollment’. | . | . | . | x | The pop-up provides the timestamp of the sending date of the last invitation sent, the date of the registration in Microsoft Intune and the retiring date. |
Note:
Please read the general documentation for an explanation of all icons.
06. Migration Launch Self Service (/ireg)
In some cases it is not possible to use an email or web clip to initiate the migration of a device. In this case you can provide your users with a static link to start the migration.
06.1. Prerequisites
The EBF Onboarder Self Service will use your Default Azure Identity Provider authenticating the user by their Azure AD email address and Azure AD password.
Attention: The migration must exist already and the user must have been invited to migrate the device at least once.
06.2. Workflow
Please follow these steps to enable your users to start the migration using /ireg:
- Create a Redirect URI for the app created in chapter 02.1.2:
- Login into the Azure Portal.
- Go to ‘App registrations’, open your app and ‘Authentication’.
- Within ‘Platform configurations’ click on ‘+ Add a platform’.
- Click on ‘Web’ and enter the following for Redirect URIs: https://intune-onboarder.ebf.com/ireg
- Click on ‘Configure’.
- Provide your users with the following link: https://intune-onboarder.ebf.com/ireg
Note: This link needs to be opened on the device that should be migrated. The link must be opened in a browser that is not removed while the device is removed/retired from the source MDM system.
- The user needs to enter his email address and click on ‘Find’.
- The user needs to enter the Azure Active Directory Password and click on ‘Find’.
- If a user has more than one device registered on the source MDM system, a list of devices which are assigned to him is displayed. The correct device needs to be selected for the migration.
- The browser redirects to the start page of the migration and the migration can be initiated by clicking on ‘Start Migration’.
- The user can follow the normal migration/enrollment process on the device.
07. Web based enrollment
Follow these steps to enable the web-based enrollment into Microsoft Intune:
- Go to ‘Settings’ > ‘Tenant Settings’.
- Select the check box for: ‘Use web-based enrollment for Intune’.

- Press ‘Save Settings’.
NOTE:
Please note that you need to configure Microsoft Intune to enable web based enrollment. Please check the following website for further information:
Set up web based device enrollment – Microsoft Intune | Microsoft Learn