Dashboard
After successful login to MIDA, the dashboard will be displayed.

At the top left, the number of all devices is displayed. This includes active as well as pending devices.
At the top right, the number of devices that are non-compliant is displayed.
At the bottom left, the devices are displayed by OS version.
Devices with the status „Pending“ are not included.
Devices in pending status are listed under iOS or Android, i.e. without OS version.
The number of non-compliant and compliant devices is displayed at the bottom right.
Note: Pending devices are considered compliant. So only the devices that really have a violation are displayed here as non-compliant.
The lower values can also be displayed in a table or a pie chart.
Every information on the dashboard can be clicked to open the corresponding devices.
As an example click on an iOS version and MIDA displays you all devices with this iOS version in the devices page.
This is also working for the table and cake diagrams.
By clicking one of the values you reach the devices page showing only these devices.
You can change the Filter at the top bar:

More information are added to the devices chapter in this documentation.
You can identify the MIDA browser tabs by this icon:
![]()
Devices
After clicking on „Devices“ the list of devices of this client is displayed.
The overview page contains the following information:
- Name (User name; format: first name last name)
- Phone number of the device (if available; more details regarding eSim Support for iOS see below)
- Model (a (S) next to the model indicates, that this is a supervised iOS device)
Example:

- IMEI
- Serial no.
- Platform
- OS version
- Manufacturer
- Provider
- Last checkin
- Registered on
- Private
- Status:
- Active: The device has been fully registered and is active
- Pending: Registration data has been created and sent to the user via email. Waiting for the user to register the device.
- Signed-Out: Devices on which a sign-out was performed. These devices do not show any names, therefore they can be found quickly by sorting by name. If a sign-out or sign-in was performed on a device, but MIDA still shows the old status, this can be corrected by the device action „Wake up“.
- Deleted: If the device action „Reset (Wipe)“ is executed for a device and the device is successfully deleted, the status is set to „Deleted“. The device remains in the device list to inform about the success of the deletion. To remove the device, the „Retire“ device action must be performed.
- Compliant: If a red X is displayed in the Compliant column, the reason for this is shown by hovering over the red X with the mouse pointer:
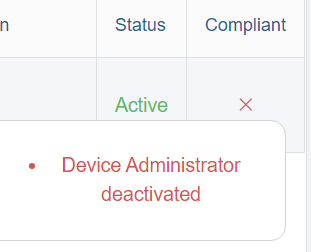
Example
If you click on the headings, this column will be sorted by the row. First ascending, with another click descending. Each column can be sorted.
Note:
If a device is complaint, it receives the compliance value: 0 from the MI Core or MIDA.
If a device has the status „Pending“ (waiting for registration), it also has the compliance value: 0
MIDA can therefore only sort by 0. With many pending devices, the view can therefore quickly be interpreted as incorrect.
Only when a device is assigned a non-compliant value, as below, does the sorting take effect correctly.
If the number of registered devices exceeds one page (20), you can scroll through the list using the right arrow and left arrow buttons at the top.
![]()
When searching specifically for devices, it is recommended to enter them in the search field at the top right.
Using the flexible search, you can enter the following search texts to filter the list:
- Last name or first name
- Email address of the user
- Phone number
- Serial no.
- IMEI (in format: XX XXXXXX XXXXXX X)
- Manufacturer (e.g. Apple)
- Provider (e.g.: T-Mobile)
- Model (example input of „iPad“ shows only iPads)
- Enter Pending to display devices with pending registrations
- Enter „Signed“ to display logged out devices
The search is applied to the entire inventory of devices administered in this enviroment.
Select All:
This selects all devices on this page only, and an action can be performed on these devices simultaneously.
Switching to another page is not recommended because the selection will be cancelled.
Refresh:
You can update the current device information in the MIDA database via Refresh. For an alignment with the MI Core, the device action „Wake up“ must be executed.
Filter:
When you click a value on the Dashboard you are going to Devices and MIDA shows only the devices matching the filter.
A red area with an X is showing to indicate, that a filter is active.

Disable the filter by clicking the red X.
When you just opened the Devices you can also use the filter or change the filter by a click on the filter button.
The content of the filter depends on the devices.
Example:

Select the values and press OK, or press Cancel or Reset.
eSim Support:
MIDA can display all phone numbers of an iOS device:
Plastic Simcard
eSim
- If a device has an eSim only, this eSim will be displayed.
- If a device has plastic simcard only, the phone number will be displayed
- If a device has an eSim and plastic sim, bit information will be displayed
- For a user-friendly display, the Provider column was removed from Devices
- The phone number column is now showing the phone number together with the provider
Example:
+491752223222 (Telekom.de)
+491729999999 (Vodafone)
This information can be found in:
- Devices list
- Device > tab General
- All Devices Quick Report
- All Devices Report
- DEP Report
Both information (Phone number and provider) be searched within the devices list.
Note:
This works for iOS Devices only (not for Android! MI Issue (API-Support))
Device Actions
Various actions can be performed for the selected device(s).
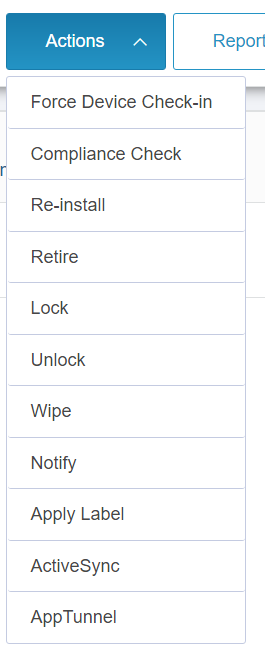
The individual device actions at a glance:
Force Device Check-In
Contact the device to report to the MDM system to:
Perform configuration changes on the device
Check if the device is currently online
Ad-hoc sync of the current device data from the MI Core to MIDA
No information about this action is displayed on the device.
With this action, the current device data that is available on the MI Core of this device is transferred to MIDA.
If you perform a wake up for up to ten devices from the Devices, MIDA will handle this like one device:
MIDA responses after the sync of the devices is complete.
If you select more than 10 devices, MIDA will start the process, but inform, that the task will be handled in the backend and that the updated data will be available in the next minutes. Refresh the device list to see changes.
Compliance Check
The device action is performed on the device like the same Action on the MI Core.
The device is also check against active Black- or White-App Lists in MIDA.
Example for the usage:
Query non-compliant devices when the reason for the blockage (disallowed app has been removed, iOS version update has been performed) on the device has been corrected so that the device is listed as compliant again. So, this action performs a compliance check to check the MIDA black and white lists as well as the compliance guidelines of MI Core.
In addition, a „wake-up“ should be performed after a short period of time.
This function requires an active network connection on the device.
No information about this action is displayed on the device.
Retire
Remove the device from MDM. This removes the MDM profile and apps from the device without prompting. The device is not reset to the delivery state.
This function requires an active network connection.
On the device, the configurations (Email, WiFi) and apps are removed.
Re-Install
A request to reinstall the EMM profile is sent to the device.
A notification is displayed on the device.
The profile must then be reinstalled on the device by the user.
The MobileIron app must be installed already for the device to process the request.
This action should be performed only in case of error.
Lock
Locks the device and forces the user to enter the device password.
This function requires an active network connection.
The device is immediately locked and prompts to enter the current device password.
Unlock
Unlock the device when the user no longer has the device password at hand.
This function requires an active network connection.
Authentication of the user is mandatory.
The user is then prompted to assign a new device password.
If the device reports to the MI Core during this time, the device is no longer compliant.
After entering the password, a wake-up and compliance check should be performed to reinstall profiles, configurations and apps.
Wipe
The device is reset to the factory settings without asking the user.
This function requires an active network connection.
To protect against an incorrect action, the admin is first asked whether this action should really be performed. Subsequently, another window is displayed in which a reason for the wipe is obligatory. Only after the input and the click on OK the command is sent to the device. The device remains in the device list to inform about the success of the deletion. To remove the device, the „Deregister“ device action must be performed.
Notify
Send a message to the device via SMS, email or Apple Push Service.
Messages can be sent via APNS/CGM, email or SMS.
APNS/CGM and SMS are sent to the device itself.
Email: This sends an email to the email address where the device was registered.
Only for an email a subject can be entered. The sender of the email is the address specified in the MIDA configuration file with the parameter mail.from.
Hint:
Notification text input fields does no longer allow unlimited input of text.
The text input fields for SMS, Email and Push Notifications are limited to:
- SMS: 160 characters
- E-Mail: 600 characters
- Push Notification: 900 characters
While entering data, MIDA will display the number of text and a green bar. If the text entered exceeds the limit the bar will turn red and the save button will be disabled. The number of characters that needs to be removed are displayed.

After removing or editing the text the Save button will be available again.
Note:
Existing objects are not changed.
This limitation was added for all new notifications in the device list or devices details but also for Compliance actions.
Apply Label
One or more manual labels can be assigned to the device.
If you click on the empty line, a list is displayed from which you can select an existing label. If you then press the line again, you can select another label.
You can remove a label from this selection field by a click on the corresponding X.
ActiveSync
This feature allows you to manually disable or re-enable mail receiving/sending from a device that uses email via the native email client.
This action is processed immediately and cannot be changed by the user.
Disable sets the ActiveSync entry for the device on the MI Core to the BLOCKED status.
Enable/Reset removes the ActiveSync entry. If the user updates his mailbox in the native email app, the ActiveSync entry is automatically created by the MI Core.
AppTunnel
This function allows you to manually disable or re-enable/reset the AppTunnel that various apps need to access network resources.
Disable sets the AppTunnel entry for the device on the MI Core to the BLOCKED status.
Enable/Reset removes the AppTunnel entry. If the user starts an AppTunnel app again afterwards on the device the AppTunnel record is created again and can connect to the backends systems again.
While a device action is running, new Device Actions cannot be started, until the task completed.
MIDA device action menu will show:

i(Pad)OS Update
Force the iOS update for DEP Enrolled devices.
MIDA enables you to push an iOS Software update to one or more devices that the following
parameters:
- DEP Enrolled = true
- Supervised = true
- Device Status = Active
To work properly the EPMM needs to show the iOS version in Device > Actions > iOS Only >
Update OS Only: Select Version.

Like on the Core you can select a single or pick different devices and use Actions > i(Pad)OS
Update. The next screen displays the devices that are eligible for an update. Other devices
are hidden but can be displayed by a click on the OFF bottom for “SHOW NON-APPLICABLE
DEVICES”

If you selected several devices but you find a device that should not get an update, select “No
Update” from the New Version” dropdown list.
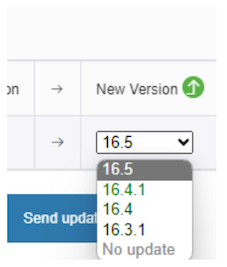
Required permission: Device Management: OSUPDATE
Sign Out (iOS Only)
a user can be signed out of a device using MIDA.
Open one or select several devices, open Actions-> Sign Out (iOS Only).
A reason needs to be entered to be able to start the action.
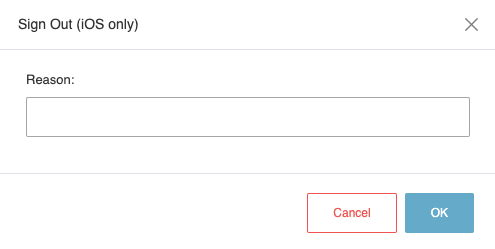
The device needs to be in coverage to execute this action.
Required permission:
Device Management
SIGNOUT
Device Tabs

A click on a device displays the details of that device, sorted into seven tabs.
A device list is also displayed on the left side. If a search was performed before and a device was clicked, only the devices that were previously found in the search will be displayed on the left side.
Overview of the Tabs
General
Information about the user and device, some of which is also displayed in the device list.
App Tunnel status (3.2.0):
Like ActiveSync mida can now also display the status of the App Tunnel.
The following conditions apply:
If there is no App Tunnel on the EPMM, the whole line will not be displayed.
If all App Tunnels have the Status Allowed, MIDA will show the status: Allowed.
If there is one App Tunnel with the status Blocked, MIDA will show: Blocked.
Required permission:
Device Management
SHOWAPPTUNNELS
Device Details
Detailed information about the device.
Displayed are among others allowed and blocked functions, which are distributed to the devices via the security policies of the EMM.
Other examples: sim card number (iPhone ICCID), ios.LastCloudBackupDate.
Using the search on top right you can search within the Details.
Labels
The labels assigned to the device.
If you click on the label in this overview, additional information is displayed for some labels: Linked devices and apps. You can find more information under: Labels
Hint:
A super admin, working in the label „All-Smartphones“ is able to open every label.
An client/dept admin who is managing a subset of devices is not able to open system-relevant labels like All-Smartphones, iOS etc.
For troubleshooting this admin will see every label applied to a device to verify that all required labels are assigned properly to a device. Example: An app cannot be found in Apps@Work.
By clicking the Delete button a manual label can be removed from this device.
Labels assigned via an LDAP group („Static?“ = false) cannot be removed using MIDA.
Apps
Display of all apps installed on the device.
The App Name, version information and the bundle ID of the individual apps are displayed. The „Managed“ column shows whether the app is managed by the MDM (checked) or not managed (unchecked).
Policies
Policies assigned to the device
The status indicates whether this policy is applied, assigned or sent to/on the device.
| Assigned | The policy has been assigned to the device but not sent or processed. |
| Sent | The policy was sent to the device. The device has not sent a confirmation to the MI Core, that the policy has been processed and is active. |
| Applied | The device has reported that the policy is active. |
Configurations
Configurations assigned to the device.
In addition to the Configuration Name the status is displayed whether this configuration is applied to the device.
Some configurations are not shown as Applied until the associated app has been run once.
Examples: IBM Verse.
Profiles
The profiles assigned to the device.
About profiles:
To perform actions on a device, mymo (the MDM) needs a profile installed on the device.
If profiles are displayed as Pending on this page, they can be resent to the device via „Push profiles“.
Next to the Actions button is a Refresh button.
This will poll all devices data from the MI Core and performs a Force Device Check-In as well.
A “devices:wakeup” is logged in the MIDA audit logs for this purpose.

New Device/s
A click on „Register->Single device“ a new device can be created.
The following window will be displayed.
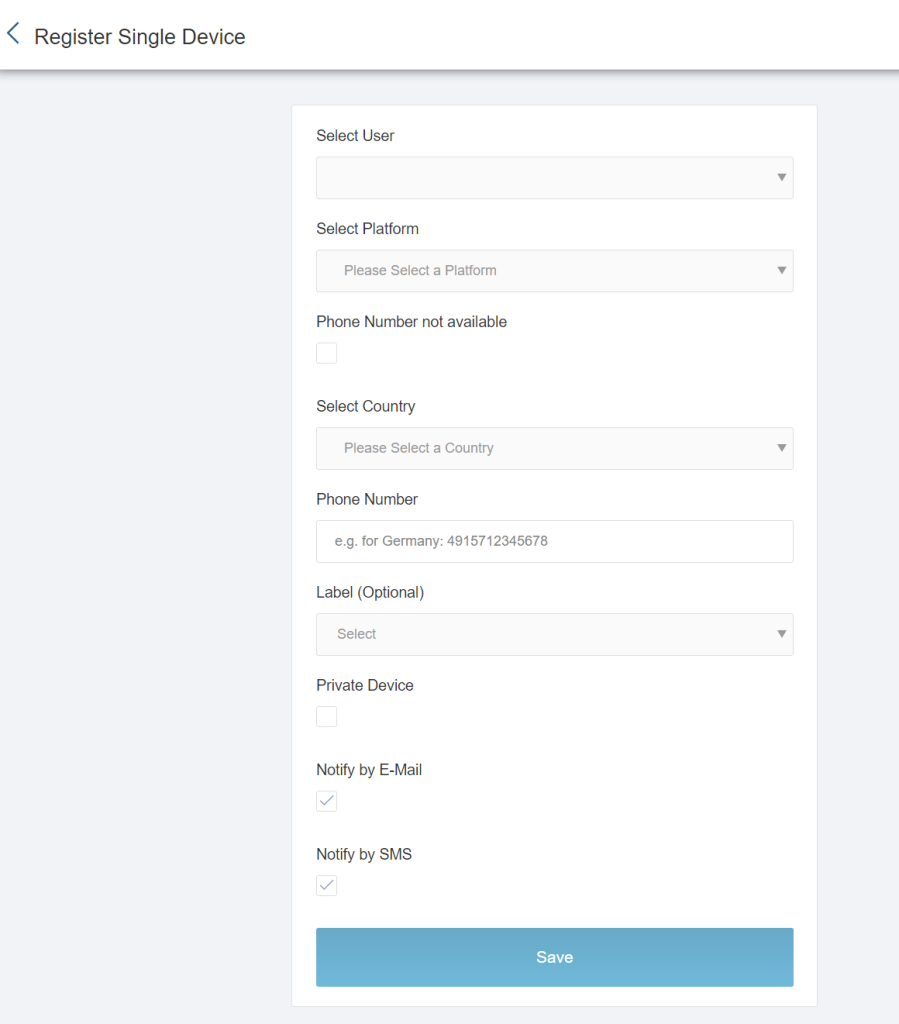
Select User
User search for the device.
You need to enter 4 characters to start the search.
The result will show in the Format: (USER_ID) Firstname Lastename <email address>.
Select Platform
Select an operating system.
Phone Number not available
Select this option if no SIM card/phone number is available on the device.
„Select country“ and „Phone number“ are greyed out.
Note:
Use this option even if the phone number is currently unknown. After registration, any existing phone number is automatically transferred to MIDA.
If an SMS with the link to the MDM system should be sent to the device:
Select country and phone number
If a phone number is to be specified, select the country and enter the phone number. (For the number +49 123 1234567, enter: 491231234567).
Via parameter „-Dmida.devices.registration.countriesList=DE \“ in MIDA configuration file MIDA is predefined to show only Germany as available country.
If the parameter is removed, MIDA will display all the countries that are also displayed on the MI Core.
Label (optional)
If the device is to be given a specific configuration from apps etc. immediately with the registration, the corresponding label is selected here. This step can also be performed afterwards. If Label (Optional) is not displayed, the role lacks the permission: devices.applyLabel.
Private Device
Please tick if the device is a private device (like BYOD).
Email Notification
The registration data is sent to the user by email.
The email notification is activated by default, as the required registration PIN is only displayed to the user in this email.
The registration PIN is by default valid for seven days.
As long as the device has not been activated by the user, the account is displayed with status Pending and green check mark . „Registered on“ and „Last checkin“ are showing no data.
After the MDM Profile is installed on the device, the device is listed as Active.
It is important here that the device has reported this status to the EMM/MIDA and thus confirmed it and has been synched to MIDA. Via the device action „Wake up“ an ad-hoc request can be sent to the device and the MI Core to refresh the data for this device.
Bulk Device Import
Multiple devices can be created in MIDA/MDM using a csv file.
To use this feature, the user role requires the permission “device management:registermany”.
The rules to create a bulk import file are:
- The file must have a .csv extension.
- Each line in the file should always have eight ‚,‘ commas.
- The 9 placeholders/sections defined from those 8 commas should have the below values:
Postion Type Value Data Required? 1 String UserID Yes 2 String Firstname Yes 3 String Lastname Yes 4 String Email Yes 5 String Phonenumber No 6 String Country Code No 7 String Platform Yes:
A for Android
I for iOS
L for macOS
E for Windows8 Boolean isEmployeeOwned Yes:
true or false9 Boolean notifyUser Yes:
true or false
Manual Device Import
Devices can be added to MIDA using Register > Manual Device Import by using the Device-UUID. The permission “device management:manualdeviceimport” is required to use this feature.
Open Devices > Register > Manual Device Import
In the following pop up type/paste in the Devices-UUID, showing on the MI Core.
You can use multiple Devices-UUIDs, enter it one by one. Press +Add after each Device-UUID.
The format of the data is checked by the form.
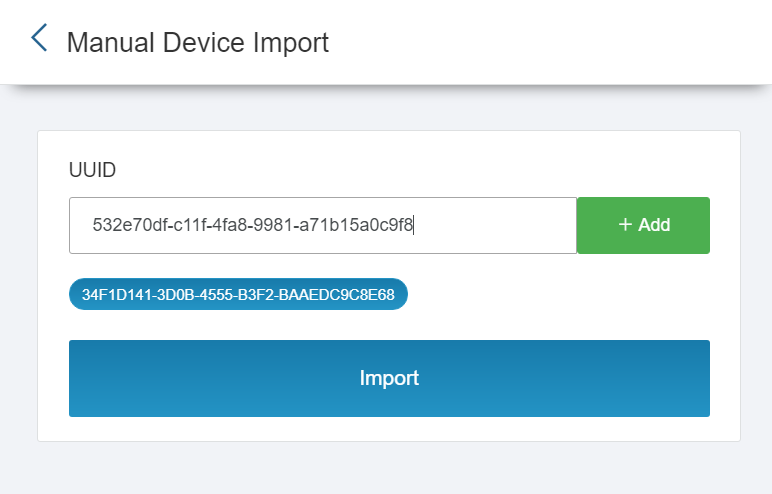
After entering the Device-UUID, Press Import.
Devices will be synchronized into MIDA.
Devices that are already in MIDA, will be resynched.
The same UUID cannot be added twice in this from.
Signed-out Devices
Since devices lose the client labels on the MI Core during a sign-out, these devices can no longer be assigned to a client. In MIDA these devices remain visible in the Client Label.
Procedure:
The user performs a sign-out on the device
When the MI Core records this change on a device, it changes the information about the device:
- The USER_NAME field is cleared, therefore all user related filter labels are removed.
- The device continues to have the status: Active.
The MIDA Device Sync service queries the device data in automatic run from the MI Core and receives new information:
- USER_NAME is empty
If the field is empty, the device receives in the MIDA database in the field „Status“ the value: SIGNED_OUT (Signed-Out in the frontend UI). This status exists only in the MIDA database, not in MI Core. In the MI Core the label Signed-Out is assigned to the device.
Later the Device Label Sync service checks the device. This checks the status of the device in MIDA. If the status of the device is SIGNED_OUT, the task stops and does not make any changes to the device labels. MIDA thus keeps the labels of the device. This keep the previous labels assigned to the device and to the client label.
The user performs a sign-in on the device
When MI Core records this change, it changes the information about the device:
- The USER_NAME field is filled. – The device continues to have the status: Active.
The device receives the filter labels according to the user.
The MIDA Device Sync service queries the device data in automatic run from the MI Core and receives new information:
- USER_NAME is filled
MIDA Device Sync service then checks the USER_NAME field. MIDA writes the new username into the internal database and the device gets the status it has also on MI Core (e.g. Active).
Then the Device Label Sync service runs. This service checks the status of the device in MIDA. If the status of the device is not SIGNED_OUT, MIDA gets the new label data about the device from the MI Core and writes this information internally.
Reports
MIDA provides the possibility to create different device related reports:
All Devices
The device data of all managed devices of the client label are exported into an Excel(.xlsx) file.
The Source of data for this report are:
- Local MIDA database from which the labels and the list of devices are generated.
- MI Core: Installed profiles of the devices via APIv1. API v2 does not provide such function, which leads to longer runtime for a lot of devices.
All devices – Quick report
All devices, but only the following values:
User, User-ID, E-Mail, Phone number, Model, Platform, Version, Serial No., IMEI, iOS.Supervised, DEP-Device, DEP Installation via Remote Management, MI App Version, Status, Compliant, iOS device name and iOS.iPhone ICCID.
Source of data: Local MIDA database
All Devices – (DEP)
All devices including some DEP related information.
Source of data: Local MIDA database
Number of devices by os version
The number of devices per OS.
Source of data: Local MIDA database
Devices enrolled last 30 days
The devices put into operation in the last 30 days.
Source of data: Local MIDA database
Devices not synchronized last 30 days
Devices that have a Last Checkin of more than 30 days are exported here.
Source of data: Local MIDA database
Devices checked out last 30 days
Devices retired in the last 30 days using MIDA.
Source of data: Local MIDA database
Devices wipred last 30 days
Devices wiped in the last 30 days using MIDA.
Source of data: Local MIDA database
Compliance violations
Current compliance violations of the devices.
Source of data: Local MIDA database
Devices with installed apps
Report about all or defined apps installed on the devices.
Source of data: Local MIDA database
While a report is being created MIDA shows an orange circle in the top right.

If a report and device actions are running, MIDA will show:

Find and retire old devices
Devices are applied to a client by a client label. This client label is applied to the user by the connected LDAP group.
If a user is removed from the LDAP Group, the device loses the client label and the device will no longer be displayed in MIDA for the client admin.
To identify these devices in MIDA a new report has been developed.
The report will:
- Identify these devices and display them.
Note:
This report shows devices that have a last check-in date higher 90 days, Pending or Expired devices that have no check-in information are displayed as well.
If devices are showing in the report the superadmin or client admin can:
- Export the data of a single or all devices to a csv file (quick report format)
- Retire single or all devices (an audit user cannot retire devices)
To identify these devices MIDA is using the custom attribute that is added to the device for other requirements. This custom attribute also defines the client of the device. The custom attribute is created out of the first four characters of the client label.
Required MIDA permission: The permission Report Management:orphandevices needs to be
applied to the role/s.
The new report can be found in:
Devices > Reports> Orphan devices
(German: Geräte > Reports > Verwaiste Geräte).
When selected, MIDA will scan the devices in MIDA. Afterwards MIDA will display the devices matching.
The displayed differs from the user who started the report:
- For the Superadmin
If a MIDA Superadmin (a user working in the label All-Smartphones) is running this report,
MIDA scans all devices in the tenant for devices that have a custom attribute but no label
matching the custom attribute. All these devices will be displayed. - For the client admin
If a client admin (using a client label) is starting the report, MIDA will scan the devices for the custom attrib. If a device does not have the matching client label it will be displayed.
DEP Token
Each client admin can upload their updated DEP-Token.
In Devices click on the button “DEP-Token”
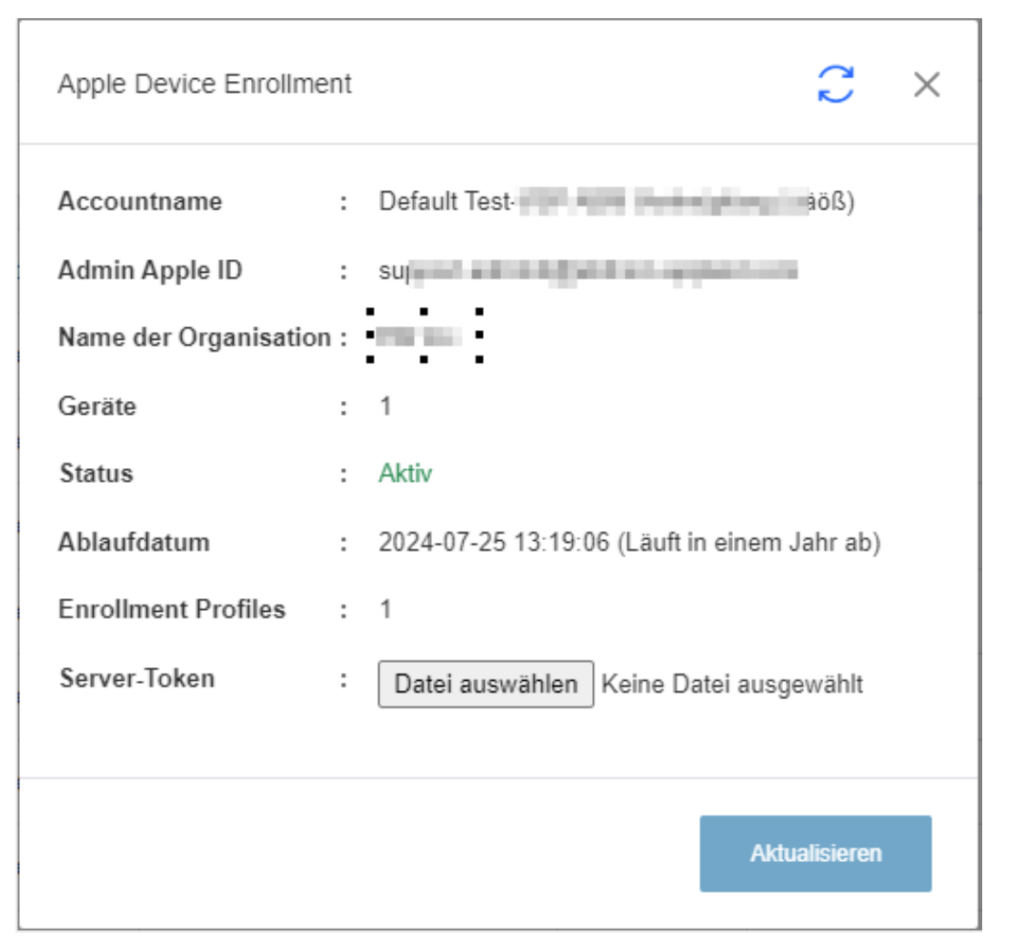
The details of the DEP token are displayed:
Account Name
Admin Apple ID
Organization Name
Devices
Status
Expiry Date (Example 2024-07-25 13:19:06 (Will expire in a year))
Enrollment Profiles
A very important note about this feature:
- We cannot control the account name as this created by each client on their own.
- To identify the DEP token of a client, MIDA is checking the description.
- The description needs to start with the 4-char-code of the client.
- That’s the reason, why the description of the DEP Token is not displayed in the MIDA frontend.
The default search algorithm to find the DEP Tokens in the EPMM is:
mida.dep.account-matcher-pattern = ^<institute>[_\\-\\s]*
With this pattern, a client DEP token can be found on the EPMM, if the description, for example for client A123, starts with:
| Example 01: A123-Account Description |
| Example 02: A123 Account Description |
| Example 03: A123_Account Description |
| Example 04: A123 – Account Description |
| Example 05: A123 Account Description |
| Example 06: A123 _ Account Description |
| Example 06: A123 _ Account Description |
Required permissions:
| Apple Device Enrollment (DEP) Management | |
| READACCOUNT | Display the DEP Token button in Devices and see the current token |
| UPDATETOKEN | Upload a DEP Token |
