Label Management
Labels are a fundamental part of the MIDA system.
Labels are typically associated with users. These labels are in turn assigned to devices.
This is used, to assign apps, different profiles, configurations or restrictions to these devices.
The available labels that can be used to handle the devices in mida client based:
Clients primary labels (<client-label>) can have a format like: A001-All-Users.
This should be a filter label using the filter: user.ldap.groups.name
These kind of labels should also be used to be applied to MIDA users to access the client area.
So, all Devices users of this client/dept should get this label on the MI Core.
It is recommended to follow a naming convention for a proper client based administration.
There are two further Labels formats, that can be used as well for a better administrations of the devices.
<tenant-id>:<client-label>:<label_config01-20>
Labels with this format can have the type filter or manual, but filter labels are prefered.
They are displayed in MIDA and can be applied to devices(if manual), Apps, App Lists, iBooks
<tenant-id>_A001:<client-label>:PIM
<tenant-id>_A001:<client-label>:Content
These type of labels should also be filter labels.
They are assigned to device users, so they get custom configurations/apps/vpp labels applied.
They are not visible in MIDA > Labels!
If this kind of label is applied to a device, this can be confirmed on the device > label in MIDA:
For the first example, only PIM is showing.
Apps assigned to this label are not displayed in the client/label.
Note:
Please keep in mind:
The users always needs to be applied to the “Client primary label”
Other label can be applied to the user only in addition, not instead.`
MIDA > Labels shows the label overview and how many devices and apps are assigned to each label.
The devices and apps information are hyperlinks. With a click you open the device or app.
To the right of the Actions button is a Refresh icon.
Hereby the name, description and criterion (label filter) can be queried from the MI Core.
No devices or apps can be queried, as this action would create too high a load on the system.
Note:
If a used label structure has already been created on the core, the labels must be restructured for MIDA as described above.
Setup Tenant
Add a new tenant
When MIDA started the first time the Tenant Management is used to set up and manage the connection of MIDA to a MI Core and to administer general configurations for the operation of MIDA. After the first login with the Super Admin user, the „Tenant Management“ is displayed.
Click on „Create New Tenant.“ Enter the name you want here.
Please note: This cannot be changed afterwards.
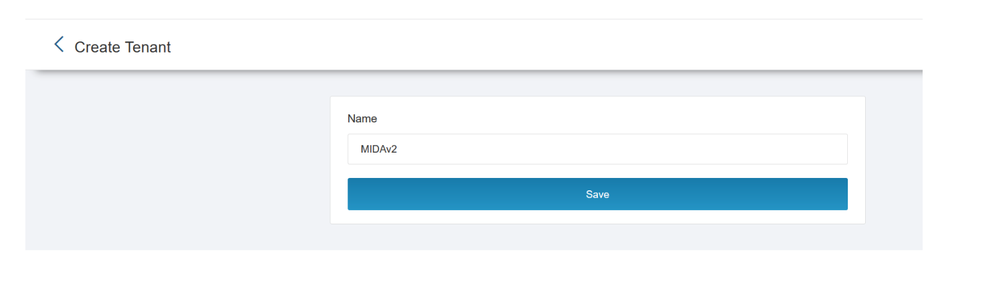
Press „Save“.
The next step is to enter the data of the MDM/MI Core.
The MI Core setup is typically done once and is not changed, but can be if required.
For the intial setup you need the following data:
- MI Core URL (e.g. https://emm.example.com)
- MI Core API Username
- MI Core API Password
This MI Core API user (local) needs to be created on the MI Core.
This API user needs the following roles:
- All admin roles (“Select all admin roles”) from Space
- API (under „Other Roles“)
Set “Locale” according to your region/language and press Save.
Settings > Tab Cores is displayed and API Status might show an X.
Click on API Status information and the press the Test button to check the connection with the MI Core.
If the connection could be established successfully a green checkmark will be displayed.

In the event of an error, a red X is displayed.
In case you created more than one tenant and you access the mida with the super user, the active tenant is marked.
You can also search within Tenant Management.
Hint:
If an error occurs, you can check the following:
- Check the MI Core URL
- Check/re-enter user credentials of the API user
- Check the connection from the MIDA server to the MI Core via a Telnet command (port 443)
Settings
The following configurations are administered via the settings:
Cores:
Configuration of the connection to the MI Core, the synchronization Workers and ENS
Roles:
Configuration of the different roles that can be assigned to the MIDA Admins
Users:
Setup of Local users and LDAP Users if not using the MIDA LDAP option.
Examples: MIDA Admin, MIDA Audit, MIDA Support, MIDA Super Admin, MIDA Devices
LDAP:
LDAP configuration setup for users and groups
Branding:
Logo management
Supported Locals:
Language settings
App Upload Settings:
App parameter settings that are applied to an app on the MI Core during import using mida.
Policy Sync Config:
Setup of Policies, Configuration and Restrictions of the MI Core to be displayed in MIDA
Details about the options:
While in Settings > Simply click in the Core entry, then the Settings opens
Configure API
The current values are displayed and can be edited here.
Core Url: URL of the MI Core
Core API Username: Username of the API user accessing the MI Core
Core API Password: Password of the API user
API Status: Connection status to MI Core
Actions:
Press Test to test the MI Core connection
An overview of the Workers are displayed below.
Status display of the Sync Tasks (green tick for: Enabled, red X for: Disabled):
- Devices Import & Synchronization: Import and synchronization of the device data with the MI Core.
- Label Import & Synchronization: Import and synchronization of labels with MI Core.
- Apps Import & Synchronization: Import and synchronization of the apps with the MI Core.
- Policy Synchronization: Import and synchronization of the policies/configuraiton/restriction with MI Core.
Configure Workers
Further settings must be made in the tenant configuration for:
- Synchronization Label Import
- Devices Import
- Synchronization Apps Import
- Synchronization Policy synchronization
The Label task is the most important task and is mandatory for all objects (devices, apps, etc according to the requirement).
The Label Task needs to be started first and should complete the import before other tasks are enabled.
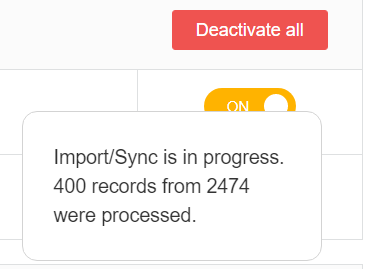
During the import, the switch is displayed in orange. If the cursor is placed over the switch, the current progress is displayed. Message: „Import/Sync is in progress…“
When the import is complete, the switch is displayed in green, „Import/Sync has been performed“ is displayed.
General Information about the Tasks/Worker
- Progress initial data import
When the data import is started for the first time, the button is displayed in orange during the import . When the cursor is positioned over the button, the progress can be seen (As shown above already)
- Data import completed
When the initial data import is finished, the button is displayed in green. When the cursor is positioned over the button: Import/Sync has been performed.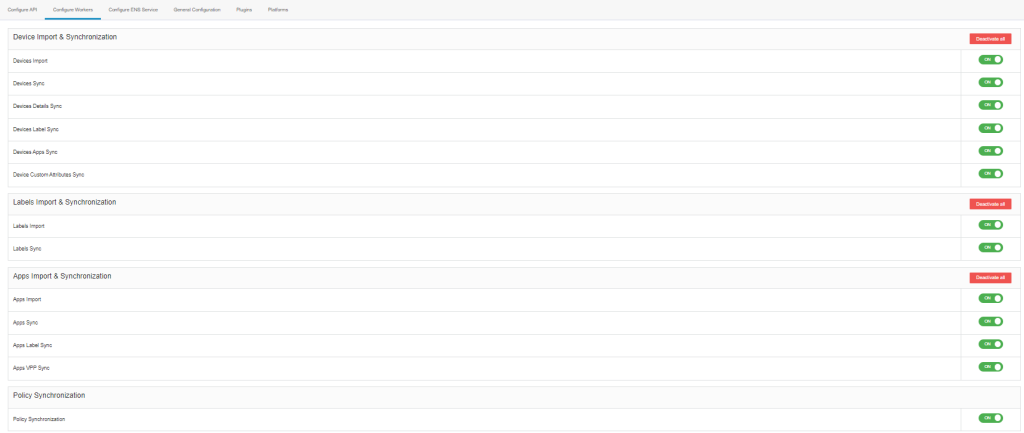
- If the MI Core API Status goes to FAIL (showing a red X) when using the Test button the three general Sync Tasks are switched off! In this case the reason for this error needs to be resolved and the workers needs to be enabled again.If an error occurs, you can check the following:
- Check the MI Core URL
- Check/re-enter user credentials of the API user
- Check the connection from the MIDA server to the MI Core via a Telnet command (port 443)
Stop synchronization and re-read data
If the synchronization services are active, there is a possibility to stop the synchronization or to re-read the existing data for the Labels, Devices and Apps Sync Worker.
A click on the related green ON button opens a pop with the following choices:

No Action / Stop synchronization
The synchronization of the data with the MI Core is stopped. The device, label or apps overview then shows the objects that have been read in up to this point. Synchronization with the MI Core will be stopped. The switch shows OFF.
Re-sync:
The data read in so far are read in again from the MI Core, the data in the local MIDA database are not removed in the process. The devices/apps in the database have a snapshot date when this object was last read in by the MI Core. This snapshot date is removed so that the details for the objects (devices/apps) are read in again.
Configure ENS service
The connection to the ENS port of the MI Core can be configured:

ENS is activated / changed / administered and disabled.

General configuration
Locale: Language setting for the MI Core
Roles
In Roles the different MIDA roles are created and edited.
This allows to assign very different rights to different users of the MIDA portal and the management of devices, apps, app lists etc.

MIDA roles and permissions in detail
Dashboard
| Permission | Function |
| View | Show Dashboard |
Device Management
| Permission | Function |
| applyLabel | Assign manual label to a device. If this permission is not assigned to a role, no label can be assigned when creating a new device. |
| checkCompliance | Device Action: Query compliance of the device: For AppListen(Black/White) and Core |
| configurations | Reading out the configuration of a device (Configuration tab in Device Details) |
| findAll | Find and display all devices |
| findOne | Show single device |
| locate | No function |
| lock | Devices Action: Lock device |
| logs | Display additional tab Logs in a device showing sync errors (to be used by a superadmin only!) |
| unlock | Devices Action: Unlock device |
| notify | Device Action: Notify device: APNS or GCM Push/SMS/Email |
| policies | Show Policies in the device details |
| profiles | Show profiles in the device details |
| pushprofiles | Send profiles to a device |
| register | Add a single new device |
| registerMany | Create multiple devices, using one csv file |
| manualdeviceimport | Add a device using a device uuid to mida |
| reinstall | Perform „Reinstall“, send MDM profile to device |
| removeLabel | Remove manual label from device |
| retire | Devices Action: Execute “Retire” |
| wakeup | Devices Action: Perform “Force Device Check-in” |
| wipe | Device action: Wipe device/ Reset device |
| allowedPlatforms | Check the Enabled OS Platforms for registration on the Ivanti EPMM (MI Core) (required to create a device), can be removed in MIDA 3.0.0, if “Core Configuration:updateAllowedPlatforms” is used |
| activeSync | Devices Action: Show ActiveSync Menu |
| appTunnel | Devices Action: Show AppTunnel Menu |
| showActiveSyncStatus | Show ActiveSync status of the device in the device details |
| showAppTunnels | Show AppTunel status of the device in the device details |
| search | No function |
App Black/White Lists
| Permission | Function |
| activate | Activate list |
| addActions | Add compliance actions |
| addApp | Add app to a list |
| deactivate | Disable list |
| delete | Delete list |
| editApp | Edit apps in a list (icon/name) |
| findAll | Find all AppLists for this label/tenant |
| findApps | Read apps within a list |
| removeAction | Remove action from a list |
| removeApp | Remove app from a list |
| save | Save list |
| update | Edit data of the list (label, name) |
| rename | Rename an App List |
Label
| Permission | Function |
| app | Show apps that are assigned to a label |
| create | Create a label |
| delete | Delete a label |
| edit | Edit a label |
| device | Show label of a device |
| findAll *) | Read all labels of the current user |
| findOne | Show a label |
| sendmessage | Send message to devies in this label |
*) Requires a MIDA user to create additional MIDA users
App management
| Permission | Function |
| addInHouseApp | Add Inhouse App |
| searchInHousePerLabel | Find in-house app of the institute |
| addItunesApp | Add Apple iTunes App |
| addPlayStore | Add Google Playstore App |
| addWindowsApp | Add Windows App |
| searchWindows10 | Add Windows 10 App |
| searchWindows8 | Add Windows 8 App |
| searchWindowsPhone | Add Windows Phone App |
| addWebApp | Add WebApp |
| applyLabels | Add labels to an app |
| catalogue | Show app catalog |
| countryList | Show country list |
| deleteApp | Delete app |
| findOne | Find app |
| Inventory | Show installed apps of a single device |
| removeLabel | Remove label from an app |
| searchInHouse | Search Inhouse App in App Catalog |
| searchITunes | Search Apple iTunes App in App Catalog |
| searchPlayStore | Google Playstore Search App in App Catalog |
| sendConvertToManagedRequest | iOS: convert app to managed app |
| sendInstallAndUpdateRequest | iOS: Send install and update for app to devices |
| sendInstallRequest | iOS: Send app installation request to device |
| sendUpdateRequest | Send iOS app update request to device |
| Whitelisted Exclusively for Mymo frame app | Show all whitelisted apps of a single device |
| EDITWEBAPPURL | Editing the WebApp URL afterwards |
iBooks
| Permission | Function |
| addBookFromFile | Create iBook from a file |
| addBookFromUrl | Create iBook with URL |
| applyLabel | Assign label |
| delete | Delete iBook |
| findAll | View all iBooks |
| forceUpdateIBookWithUrl | Overwrite iBook created with URL on Core |
| removeLabel | Remove label |
VPP Management
| Permission | Function |
| addVpp | Add VPP Account |
| applyApp | Assign the VPP label to an app |
| deleteVpp | VPP Account |
| disconnectApp | Revoke the VPP account of an app |
| findLicenses | Show VPP license |
| findVpp | View VPP Account |
| removeFromApp | Withdraw the VPP label from an app |
| syncLicenses | Sync VPP license with Apple iTunes Store |
| editvpp | Edit vpp settings |
| editvpptoken | Replace the vpp Token |
Apple Device Enrollment (DEP) Management*
| Permission | Function |
| read account | Read account from EPMM |
| update token | Update VPP Token on EPMM |
Icon Management*
| Permission | Function |
| Add | Add icon |
| Remove | Remove icon |
*) Exclusively for the app list of the Mymo frame app
Policy Sync Config
| Permission | Function |
| delete | Delete Policy Sync Config |
| findall | Show all Policy Sync Config |
| Save | Save/create a Policy Sync Config |
Policy Sync Config Fields
| Permission | Function |
| add all | Add all available parameters of an Security, AppConnect policy or Restriction to a policy config |
| delete | Remove a parameter |
| deleteall | Remove all parameters |
| findall | Display all Policy Sync Configs |
| resyncavailbelpolicyfields | Resync available parameters from Ivanti EPMM (MI Core) to MIDA |
| save | Save |
Policies
| Permission | Function |
| availableIPhoneVersions | Read available Ios versions from the Ivanti EPMM (MI Core) |
| create | Create policy: for client |
| delete | Remove policy entry: for client |
| editIosVersion | Minimum iOS version change |
| findIosVersion | Minimum iOS version read out |
| findone | Display a single avalable policy/config |
| findall | Display available policies/configs |
| sync | Sync data content from Ivanti EPMM (MI Core) to MIDA |
| editRestrictionConfigs | Edit a restriction configuration for the “Defer Software Update” Feature |
Compliance Action Management
| Permission | Function |
| create | Create |
| delete | Delete |
| findAll | View all compliance actions for a user label |
| findOne | Display a compliance action |
| update | Edit |
Audit Log
| Permission | Function |
| findAll | Display all audit logs of a tenant; FindOne is not required any further |
| export | Export Audit Logs (all or filtered) |
Report Management
| Permission | Function |
| allDevices | All devices |
| allDevicesDEP | All devices with DEP information |
| allDevicesPerUser | All devices per user |
| allDevicesQuick | A quick report using data only from the MIDA database, not the Ivanti EPMM (MI Core) |
| appsAllPlatforms | Apps from all platforms |
| appsAndroid | Android Apps |
| appsInHouse | In-house apps |
| appsIOS | iOS apps |
| complianceViolations | Compliance violations |
| devicesCheckedOutLast30Days | Devices removed from the system in the last 30 days using with MIDA |
| devicesEnrolledLast30Days | Devices created in the last 30 days |
| devicesNotSynchronizedLast30Days | Devices that have not reported to the Ivanti EPMM (MI Core) in the last 30 days |
| devicesWipedLast30Days | Devices deleted/wiped in the last 30 days |
| devicesWithInstalledApps | Report of the apps installed on the devices, for all or selected installed apps |
| numberOfAppsAllPlatforms | Apps in MIDA App Catalog with the number of installations |
| numberOfComplianceViolations | Listing of devices with compliance violations |
| numberOfDevicesByOsVersion | Number of devices per OS |
| securitypolicy | Report of the Security Policy |
| appconnectpolicy | Report of the AppConnect Policy |
| restrictionconfiguration | Report of the Restriction Configuration |
| orphandevices | Report of orphan devices |
ENS Events
| Permission | Function |
| findAll | Show all permissions |
| retry | Repeat ENS event |
| Deleteone | Delete individual ENS events |
System (for ENS)
| Permission | Function |
| reelectleader | Be able to choose another ENS Leader |
Permissions for Tenant Administration
Tenant Management (Superadmin)
| Permission | Function |
| findAll | Show all tenants |
| findOne | Display a tenant |
| changeappuploadsettings | Change App Upload Settings |
| findappuploadsettings | Read/access App Upload Settings |
| editbranding | Edit the Branding |
| editlocales | Edit the Locales |
| save | Save |
Core User Permissions
| Permission | Function |
| search | Search for users in Ivanti EPMM (MI Core) |
LDAP group management
| Permission | Function |
| count | Show number of monitored user groups (LDAP) |
| delete | Delete monitored user group (LDAP) from MIDA |
| deleteAll | Delete all monitored user groups (LDAP) from MIDA |
| exists | Check if a user group (LDAP) exists in MIDA |
| findAll | Display all monitored user groups (LDAP) in MIDA |
| findOne | Display a monitored user group (LDAP) in MIDA |
| save | Save a monitored user group (LDAP) |
Access permissions:
| Permission | Function |
| findAll | Show all permissions |
| findOne | Show a permission |
Core Configuration
| Permission | Function |
| editenstopics | Configure ENS topic |
| reconnectens | Reconnect to ENS |
| count | Read number of core configurations |
| delete | Delete core configuration |
| deleteAll | Delete all core configurations |
| exists | Query existing core configuration |
| findAll | Show all core configurations |
| findOne | Display a core configuration |
| save | Save core configuration |
| updateAllowedPlatforms | Change the allowed Platforms |
LDAP Configuration
| Permission | Function |
| changePassword | Enter password for LDAP user |
| count | Query number of LDAP configurations |
| delete | Delete LDAP |
| deleteAll | Delete all LDAP configurations |
| exists | Query existing LDAP |
| findAll | Show all LDAP configurations |
| findOne | Display an LDAP configuration |
| import | Allow to import LDAP configuration from Ivanti EPMM (MI Core) |
| save | Save LDAP |
| scan | Query user groups of this LDAP |
Role permissions
| Permission | Function |
| count | Query number of roles |
| delete | Delete role |
| exists | Query existing role |
| findAll | Show all rolls |
| findOne | Show one roll |
| save | Save roll |
MIDA User Permissions
| Permission | Function |
| changepassword | Change the password for a local user |
| count | Query number of MIDA users |
| delete | Delete MIDA User |
| deleteAll | Delete all MIDA users |
| exists | Check if a MIDA user exists |
| findAll | Show all MIDA users |
| findOne | Display a MIDA User |
| save | Save MIDA User |
Plugins
| Permission | Function |
| configure | Configure plugins |
| findall | Find plugins |
Two-Factor Authentication Management
| Permission | Function |
| configure | Configure 2FA |
| reset users | Let user setup his 2FA again |
Addons
| Permission | Function |
| access | Display/Open the Addon option |
| configure | Add, configure and remove Addons |
Specifics of the Audit Role
Users assigned with a role type Audit will see all available options/actions, but greyed out.
Permissions that trigger an action (e.g. device actions, adding or editing objects such as apps, app lists, policies, iBooks) may not be assigned to this role.
When creating the role type „Audit“ selected.

An example of an audit role:
A user with this role will be able to access all the data, but cannot change aynthing.
This user is also able to create reports.

User Creation
In the tab „Users“ the MIDA users are created, edited or deleted.
In „Users“ current MIDA users are displayed.

New User:
Using Actions > New User in the upper right corner a new MIDA user can be created.
Here you have the choice between Imported (user from a LDAP/MobileIron Connector) or Local (Local MIDA user).
User Type: Imported
At „Select user“ enter a user name ID or other value from the LDAP and select the user. Afterwards „First Name“ , „Last Name“ and „Email“, so the data of the user will be displayed for verification.
You need to enter 4 characters to start the search.
The result will show in the Format: (USER_ID) Firstname Lastename <email address>.
Select roles: Select the role intended for the user. A user should have only one role, a later change is possible.
Label: Select one or more labels that this user is allowed to access.
Save the user. The access is possible immediately.
Note:
User/Groups needs to have the „User Portal“ role in the MI Core.
Check: MI Core: Devices & Users > Users > LDAP Entities: LDAP Groups or LDAP UsersFor the LDAP user logon, the MIDA server IPs, from which users logs on must be granted access in MI Core > MIFS > Portal ACL.

User type: Local
How to create a local user:
Email: Enter username /email.
Password: Enter password for the user account (Hint: cannot be modified at this time!).
Select roles: Select the role intended for the user. (multiple selection possible by clicking again)
Label: select one or more labels that this user is allowed to access
Click the save button and the access is possible immediately.

If several client labels are to be assigned to a new user, it is recommended to create a new user with one label first and save it. To add further labels, the edit mode should be used as super admin using the label All-Smartphones to have access to all labels.
From MIDA 3.0.0 on you can create users from other users:
Create User from other user
It is possible to apply the labels and the role from a user to a new user that is created.
In „Copy Properties from this user“ enter the username of the user you want to copy.
Select imported or local and and enter the user data and press save.
After the creation the user list is filtered for this user so it can be checked again.
Press the X to clear the filter.
Modify Users
Edit Labels
Press the “edit”-Icon in the user’s Label field to open the Label-edit function.
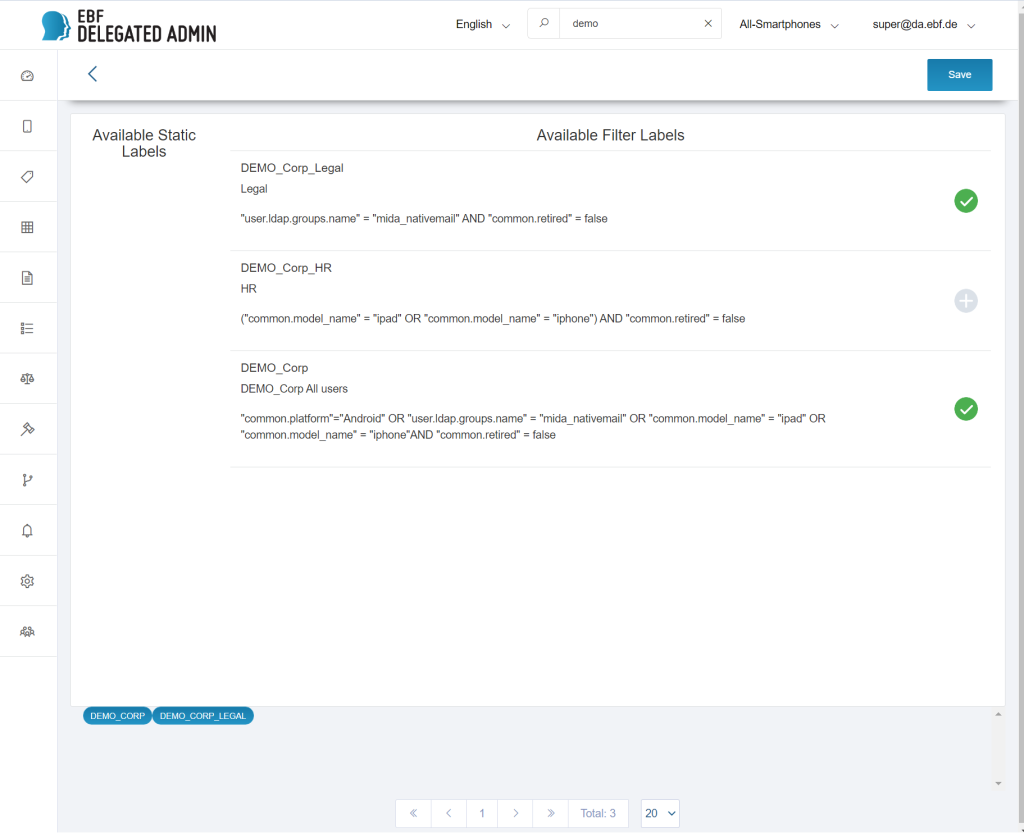
In the upper area the available manual and filter (LDAP) labels are displayed.
The search can be used to filter by label name. Normally, only filter labels (on the right) are assigned to users.
In the lower area, the currently assigned labels are displayed. In addition, these labels are marked in green in the upper label list.
A click on a label in the upper area assigns the label to the user.
If a label should be removed from a user, the corresponding label in the lower light blue area is clicked and thus removed. If the label to be removed is displayed in the upper area, it can also be removed here by clicking on the label.
Cancel discards the changes.
Before saving, the list in the lower area should be checked for correctness.
With OK the changes are accepted and saved.
Edit role
If you want to assign another role to a user, the editing mode is opened by clicking the edit icon in the roles column of the user. After selecting a role click OK.
It is recommended to assign only one role to a user.
Note:
If you open Users you might find blue buttons.If a user has more than three client labels assigned, the label list is collapsed.
The list of labels can be displayed if required.
Press the button to expand the list.

Press the button again to collapse the list.

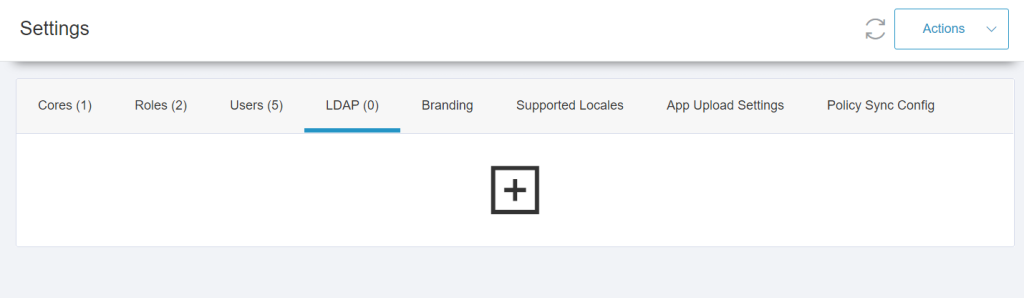
LDAP
If the MI Core is connected to an LDAP/AD via the MobileIron Connector, this connection is only displayed on the MI Core, not in MIDA.
If no LDAP connection has been set up yet, a plus icon is displayed in MIDA.
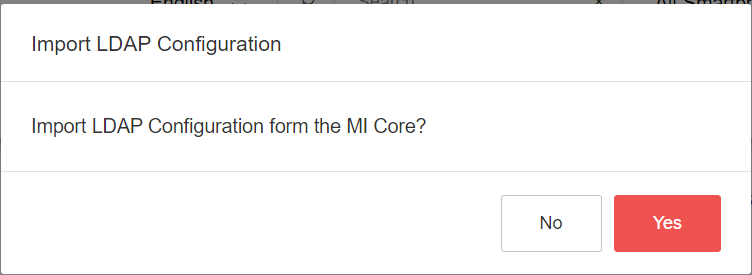
If an LDAP connection is to be set up, proceed as follows. Please note that the users who have LDAP access via the MI Connector cannot log in/authenticate afterwards. Press the +, a query is displayed: Import LDAP configurations.
Do you want to import the LDAP configuration of MI Core?
If you confirm the query with OK, the LDAP connections set up on the MI Core are imported into MIDA (from MI Core Admin Portal > Services > LDAP)
In the following the general setup of the LDAP is described.
MIDA Server supports creation of label / role / LDAP group combinations, to automatically import and synchronize LDAP users as MIDA users.
Relationship LDAP Group(Role), Client/Dept Labels and LDAP Groups
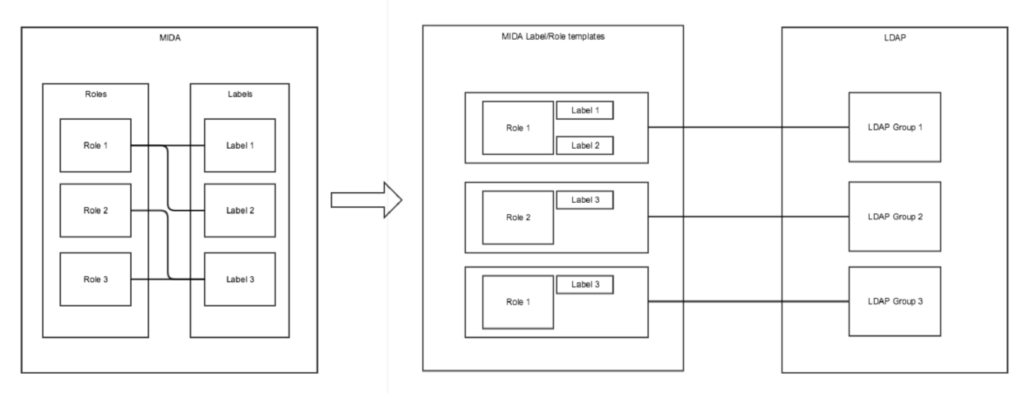
The required steps in detail:
- Import of the LDAP configuration from the connected MI Core
MIDA can automatically read the LDAP connections set up in the MI Core.
If there are no LDAP configurations in MIDA yet, MIDA offers the option to import them from the connected MI Core.Click the large plus icon and click OK in the Import LDAP Configurations confirmation dialog box:
- In order for the MIDA system to use the imported LDAP configurations, it must have the required credentials. If necessary, edit the user name by double-clicking the „User name“ field and also add the password.

- The next step is to specify the LDAP search query that will be used to determine the LDAP groups. This configures the user synchronization.The search query can be any expression compatible with LDAP search filter syntax, which is also used in other LDAP browsing tools.After the search query is configured, the „Search by user groups“ button is activated.
- Click this button to see the scan result and open the dialog for connecting the roles / labels / LDAP groups.
- Once the LDAP groups are found and displayed in the Roles / Labels / LDAP Groups dialog, they are associated with labels and roles.
- For each of the groups it is possible to specify a combination of role and label.
 After you have configured the groups, click OK.
 - After a few seconds the user Import / Sync Worker will start the import. The new imported MIDA users are displayed on the Users tab.
Edit the templates
You can edit the configured import templates for an LDAP configuration at any time by clicking the number of groups in „Synchronization“ on the LDAP tab.

Changing the configuration does not overwrite and update the already imported users.
Changing the configuration will synchronize the already imported users if they have been modified in the connected LDAP and if new users have been authorized.
In the steps it was described how to configure automatic import from MIDA to LDAP with few clicks. Whenever a new user is added to a connected LDAP group, he will be added to MIDA immediately.
There is no limit to the number of LDAP groups that can be connected.
There is no limit to the size of an LDAP group from the MIDA system.
Note that after synchronization is configured, an LDAP group is checked for changes every 10 seconds (configurable interval) by default.
This means that the longest time from a user being added / edited to an LDAP group to being synchronized to the MIDA database is: 10 * number of monitored LDAP groups.
Branding
In Branding a logo for the MIDA Portal can be configured. This picture (typically *.png) will be displayed in the upper left corner of MIDA.

Supported Locales
Here you can configure the languages the MIDA Portal is displayed in.

Example 1:
MIDA is operated in German language only:

Example 2:
All languages are enabled, while English is the default language after login:

After each change, users needs to login again to apply this general change.
If more than one languages are enabled, a user can change the language:
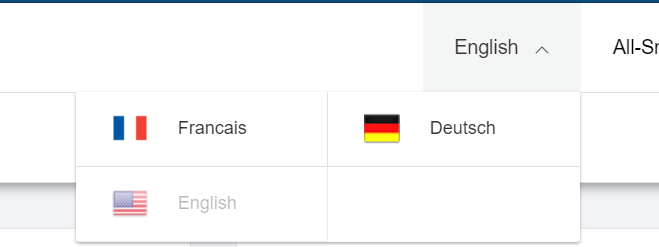
After the next login, MIDA will show the default language again.
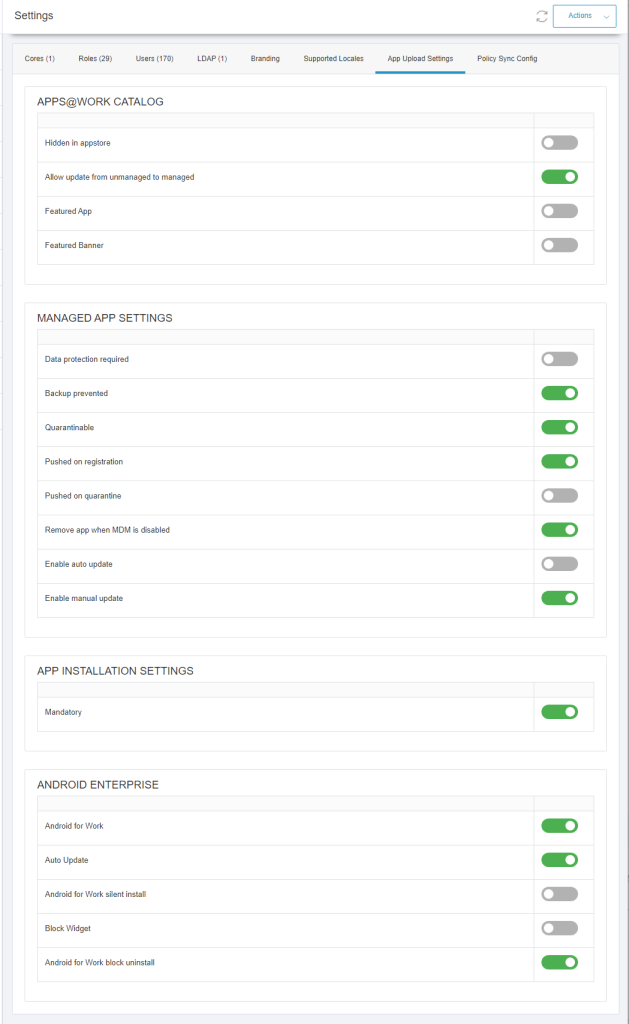
App Upload Settings
An app, that is added using MIDA, is created on the MI Core with the Managed App Settings as configured in the “App Upload Settings”.
The parameters apply to all apps added with MIDA.
Individual configuration at app on client/institute level is not possible, because the MI Core does not support this.
APPS@WORK CATALOG
- Hidden in the Apps@Work catalog
- Allow the update from unmanaged to managed
- App is highlighted
- App receives „Recommended“ banner
MANAGED APP SETTINGS
- Data encryption required
- Prevent backups
- Remove App on Quarantine or Sign-Out
- Install app after registration
- Install app after quarantine
- Remove app when MDM has been disabled
- Allow automatic updates
- Allow manual update via Apps@Work
APP INSTALLATION SETTINGS
- Force installation
ANDROID ENTERPRISE
- Android for Work
- Allow automatic updates
- Android for Work automatic installation
- Block widget
- Block uninstall
Example:
Platforms for registration
Platforms (v3.0.0)
Filter the platforms for single device registrations
In MIDA you can select, which OS Platforms can be selected by the MIDA users to create new device registrations.
Example for this feature:
You can enable all platforms for device registration on the MDM but allow only iOS and Android registrations in MIDA.
This can be helpful if you need to test new platforms on the MI Core, but this should not show up in MIDA.
Please Note:
While opening the platforms tab, MIDA checks the MI Core for the enabled Platforms for Registration.
If a platform has been disabled on the MI Core but is enabled in MIDA, MIDA recognizes, that the Platform has been disabled in the EMM and disables the platform in MIDA as well.
But MIDA will never do this on its own, only when opening the tab or when you press „Reload Data“
MIDA Update information:
After the Update, the Switches should be toggled once to bring them in sync and at the end press the reload data button to confirm the settings.

Information about permissions:
Device Management: ALLOWEDPLATFORMS is now obsolete and can be removed from all roles.
New Permission for a user who is allowed to change the setting:
Core Configuration: UPDATEALLOWEDPLATFORMS